Silver Beatle - She's now with an old friend!

...ask your questions in the appropriate forums BUT document your build here...preferably in a single thread...dates for updates, are appreciated....

Postby aggie79 » Sun Feb 07, 2010 10:50 pm

:applause: :lol: :applause: I managed to break my cycle of working on the teardrop once every three weeks and finished quite a bit of work this weekend. (This was the second week in a row for TD construction time.)

I roughed in the electrical in the ceiling.

Image

Then I finished the installing the insulation board. In the channel for the wiring, I used some "can-type" insulation foam. After it cured, I trimmed and sanded it flush.

Image

Now it was time to skin the front and the roof with 1/8" plywood. This process seemed to inhale the PL Premium.

Image

By late Sunday afternoon, I had the front and roof skinned.

Image

For me, this seems like a major milestone. I can now see the end of the build in sight...or is that another freight train?

:thumbsup: Gig'em, Tom
Last edited by aggie79 on Mon Feb 15, 2010 10:44 pm, edited 1 time in total.
Tom (& Linda)
For build info on our former Silver Beatle teardrop:
Build Thread

93503
User avatar
aggie79
Super Duper Lifetime Member
 
Posts: 5405
Images: 686
Joined: Tue Aug 07, 2007 5:42 pm
Location: Watauga, Texas

Postby starleen2 » Sun Feb 07, 2010 10:54 pm

Tom - I don't know how your are planning to finish you tear for the exterior, but after that PL sets, I bet you can remove at least half of the them screws and still have a satisfactory bond :thinking:
User avatar
starleen2
5th Teardrop Club
 
Posts: 16272
Images: 224
Joined: Sat May 12, 2007 8:26 pm
Location: Pea Ridge ,AR

Postby aggie79 » Sun Feb 07, 2010 11:01 pm

Scott,

All of the 200-300+ screws will be removed; the PL Premium will be the only thing adhering the plywood skin to the framing. I used this method on the hatch and it seems to have worked well even with the wicked radius at the bottom of the hatch.

It's a good thing that I have two batteries for my electric drill. :?

The exterior will be aluminum. I'm hoping Bill L will pass along some of his metalworking skills.

Tom
Tom (& Linda)
For build info on our former Silver Beatle teardrop:
Build Thread

93503
User avatar
aggie79
Super Duper Lifetime Member
 
Posts: 5405
Images: 686
Joined: Tue Aug 07, 2007 5:42 pm
Location: Watauga, Texas
Top

Postby starleen2 » Sun Feb 07, 2010 11:44 pm

aggie79 wrote:Scott,

All of the 200-300+ screws will be removed; the PL Premium will be the only thing adhering the plywood skin to the framing. I used this method on the hatch and it seems to have worked well even with the wicked radius at the bottom of the hatch.

It's a good thing that I have two batteries for my electric drill. :?

The exterior will be aluminum. I'm hoping Bill L will pass along some of his metalworking skills.

Tom


Since we both didn't show up in the cold to heckle him or bring hot beverages - he might be a bit slow in bringing forth in help section to us :lol:
User avatar
starleen2
5th Teardrop Club
 
Posts: 16272
Images: 224
Joined: Sat May 12, 2007 8:26 pm
Location: Pea Ridge ,AR
Top

Postby planovet » Mon Feb 08, 2010 10:39 am

aggie79 wrote:Image


Nice job Tom! :thumbsup:

I like this picture of yours. It's a good tip for builders, marking the distances in marker and taking a picture of it. I did the same thing and it came in VERY handy. You might write the numbers down somewhere but they can get lost. All you have to do is look at the pictures.

Image
ImageMark (& Cindi)
Visit our website: Little Swiss Teardrop

I was wondering why the water balloon was getting bigger... and then it hit me.

ImageImageImageImage
User avatar
planovet
The Cat Man
 
Posts: 5583
Images: 3
Joined: Tue Nov 27, 2007 4:48 pm
Location: Plano, Texas
Top

Postby aggie79 » Mon Feb 08, 2010 10:54 am

planovet wrote:I like this picture of yours. It's a good tip for builders, marking the distances in marker and taking a picture of it. I did the same thing and it came in VERY handy. You might write the numbers down somewhere but they can get lost. All you have to do is look at the pictures.

Image


Mark,
This is one of the many tidbits of experience I borrowed from your build. I have trouble finding my car keys in the morning, so I knew that writing the dimensions on a scrap piece of paper wasn't going to work. I figured the pictures would at least give me a chance of recalling what I did.
Tom
Tom (& Linda)
For build info on our former Silver Beatle teardrop:
Build Thread

93503
User avatar
aggie79
Super Duper Lifetime Member
 
Posts: 5405
Images: 686
Joined: Tue Aug 07, 2007 5:42 pm
Location: Watauga, Texas
Top

Postby planovet » Mon Feb 08, 2010 1:37 pm

aggie79 wrote:...so I knew that writing the dimensions on a scrap piece of paper wasn't going to work.


I tried that...but ending up misplacing them. The photos worked much better. Just don't lose the photos :lol:

Keep the pictures coming! :thumbsup:
ImageMark (& Cindi)
Visit our website: Little Swiss Teardrop

I was wondering why the water balloon was getting bigger... and then it hit me.

ImageImageImageImage
User avatar
planovet
The Cat Man
 
Posts: 5583
Images: 3
Joined: Tue Nov 27, 2007 4:48 pm
Location: Plano, Texas
Top

Postby starleen2 » Mon Feb 08, 2010 2:59 pm

. . .and it also helps when running screws down - would hate to have one run trough one of those wires! ;)
User avatar
starleen2
5th Teardrop Club
 
Posts: 16272
Images: 224
Joined: Sat May 12, 2007 8:26 pm
Location: Pea Ridge ,AR
Top

Postby wlivesey » Mon Feb 08, 2010 6:56 pm

aggie79 wrote:
The exterior will be aluminum. I'm hoping Bill L will pass along some of his metalworking skills.

Tom
]

I'd be glad to pass along whatever I can. It's probably not much though...

Have you developed a game plan for installing the aluminum yet?
User avatar
wlivesey
The 300 Club
 
Posts: 469
Images: 283
Joined: Sun Aug 12, 2007 1:22 pm
Location: DFW, Texas
Top

Postby 2bits » Mon Feb 08, 2010 11:11 pm

I got the idea of actually caring about where the wires were laid after reading this forum, I used that same concept to think ten steps ahead in every aspect of the project. for the past year no one has needed to ask me what I was thinking about, a more appropriate question would be what part of the teardrop are are you thinking about!

I used two drills, it REALLY saves time when predrilling and screwing in screws. I got that idea from here too...
Thomas

Image
User avatar
2bits
2bit Member
 
Posts: 5132
Images: 8
Joined: Thu Dec 27, 2007 6:04 pm
Location: Lake Tawakoni, TX
Top

Postby aggie79 » Tue Feb 09, 2010 9:34 am

wlivesey wrote:
aggie79 wrote:
I'm hoping Bill L will pass along some of his metalworking skills.

Tom
]

I'd be glad to pass along whatever I can. It's probably not much though...

Have you developed a game plan for installing the aluminum yet?


Bill,
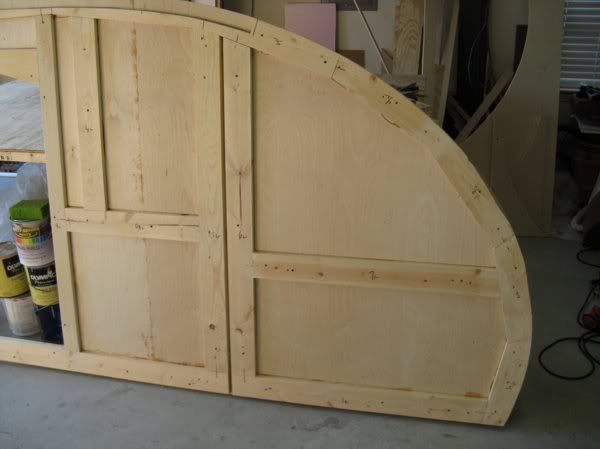
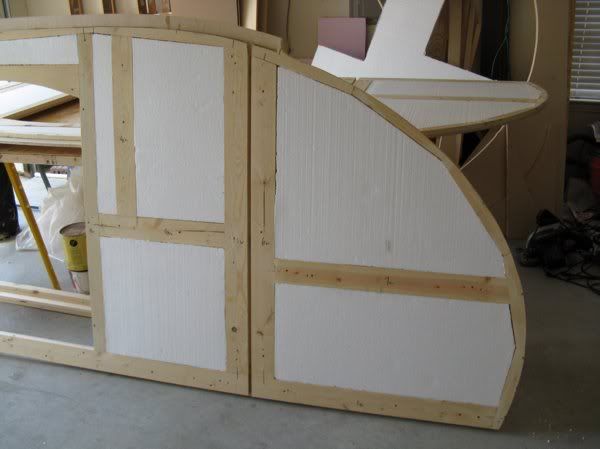
My aluminum has been sitting on a cart for about a year, and other than purchasing some VHB tape to seam it (the aluminum is is in 4' x 10' sheets), I haven't been giving it much thought. I have a 6-inch radius in the front and a 10-inch radius in the rear to deal with. Applying 1/8" plywood was a little work, but I imagine bending the .060 aluminum is going to be loads of fun! And I still have to make the trim decision - old school with exposed rivets/screws or sleek with insert trim.

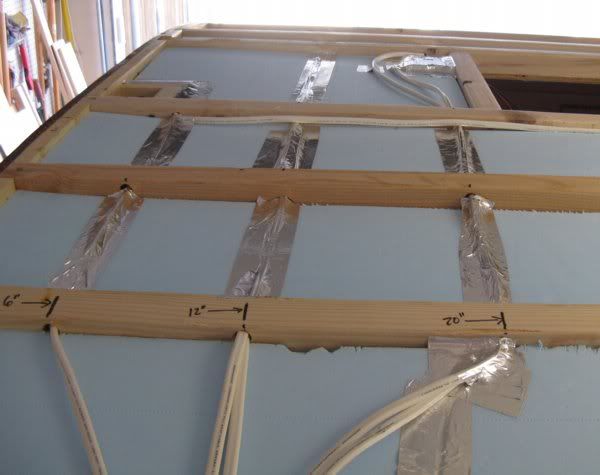
2bits wrote:I got the idea of actually caring about where the wires were laid after reading this forum, I used that same concept to think ten steps ahead in every aspect of the project. for the past year no one has needed to ask me what I was thinking about, a more appropriate question would be what part of the teardrop are are you thinking about!


Thomas,
My wife said, somewhat tongue in cheek, that the only thing I've been thinking of for the last year has been the teardrop. Truthfully she has admitted that the teardrop build has relieved me of a lot of stress and anxiety that I used to carry around.

2bits wrote:I used two drills, it REALLY saves time when predrilling and screwing in screws. I got that idea from here too...


That's for sure! When I started, all I had was one corded drill. Early into the build, I purchased an inexpensive cordless drill. Then my father-in-law gave me a second cordless drill that he wasn't using any more. If it's in the budget, two drills are the way to go.

:thumbsup: Gig'em, Tom
Tom (& Linda)
For build info on our former Silver Beatle teardrop:
Build Thread

93503
User avatar
aggie79
Super Duper Lifetime Member
 
Posts: 5405
Images: 686
Joined: Tue Aug 07, 2007 5:42 pm
Location: Watauga, Texas
Top

Postby 2bits » Tue Feb 09, 2010 10:02 pm

YESSS! Obsessing over how to do your cabinets and route your A/C vents is a fun obsession rather than obsessing over the usual stuff! You can still take time to make those decisions that need to be made but since you have other things occupying your time, those other decisions are somehow made easier or if not easier, you aren't spending double the time thinking about it to come to the same outcome anyway! Good insight! !!

Speaking of Aluminum, remember AL won't split like wood, so that allows for some more flexibility. I know my hatch radius is pretty tight but I no issue at all and my aluminum is pretty thick!
Thomas

Image
User avatar
2bits
2bit Member
 
Posts: 5132
Images: 8
Joined: Thu Dec 27, 2007 6:04 pm
Location: Lake Tawakoni, TX
Top

Postby DMcCam » Thu Feb 11, 2010 12:00 pm

Hi Tom, I've been following your build since I joined up and I really like everything you've done. Elegant profile with excellent design work too. I have a couple of questions if I may. What size ply did you use for your interior 'skeleton' frame and what kind of insulation will you be using? From the early photo with you standing next to the tear on it's front, is it 4'x10'x5'? Great job.

Warm Regards, Dave
User avatar
DMcCam
Gold Donating Member
 
Posts: 883
Joined: Wed Jan 06, 2010 8:30 pm
Location: Reno, Nevada
Top

Postby aggie79 » Thu Feb 11, 2010 1:04 pm

DMcCam wrote:Hi Tom, I've been following your build since I joined up and I really like everything you've done. Elegant profile with excellent design work too. I have a couple of questions if I may. What size ply did you use for your interior 'skeleton' frame and what kind of insulation will you be using? From the early photo with you standing next to the tear on it's front, is it 4'x10'x5'? Great job.

Warm Regards, Dave


Thanks for the nice comments Dave! I wish I had a small fraction of your design capabilities.

My teardrop is a 4'x10'x5' wide. I used 3/4" MDO plywood which actually is a full 3/4" in thickness.

I don't know the technical term, but the insulation I will be using is the white board with the foam beads. I peeled off the vapor barrier on both sides so the adhesive would adhere. The white board is more consistent in thickness than the blue or pink insulation boards, and it compresses more easily. It also sands easily but can be more messy with all the foam beads from cutting. I used a utility knife and straight edge to cut the insulation for my roof and this produced less beads than cutting it on the table saw.

Insulating the sides will be tricky trying to fit the insulation in all of the various shapes of openings in the plywood framing. I will probably cut the insulation about 1/2" shy of the openings and use spray foam to fill the gaps. I don't remember what type of saw it is called, but I have a Japanese flush cutting saw that I used to trim the can spray foam flush. It was easy to do. I used this method to fill in the chase around the my wiring in the roof of the teardrop.

I can't wait to see your build begin and progress.

Tom
Tom (& Linda)
For build info on our former Silver Beatle teardrop:
Build Thread

93503
User avatar
aggie79
Super Duper Lifetime Member
 
Posts: 5405
Images: 686
Joined: Tue Aug 07, 2007 5:42 pm
Location: Watauga, Texas
Top

Postby planovet » Thu Feb 11, 2010 2:42 pm

aggie79 wrote:Insulating the sides will be tricky trying to fit the insulation in all of the various shapes of openings in the plywood framing.


I felt the same way when I was insulating my sides. I wish I had put the framing down on the insulation and traced out the outlines BEFORE I had glued one side on. Would have made cutting the insulation much easier. But I took the sheets and pressed them against the opening that I was going to fill. Then I tapped lightly on the foam board around the edge of the opening and the imprint of the opening was left on the foam. It was faint but enough to see where to cut. It made for a nice tight fit, tight enough that I didn't need glue to hold them in.


Image

Image
ImageMark (& Cindi)
Visit our website: Little Swiss Teardrop

I was wondering why the water balloon was getting bigger... and then it hit me.

ImageImageImageImage
User avatar
planovet
The Cat Man
 
Posts: 5583
Images: 3
Joined: Tue Nov 27, 2007 4:48 pm
Location: Plano, Texas
Top

PreviousNext

Return to Build Journals

Who is online

Users browsing this forum: No registered users and 9 guests