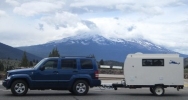
The Smith's First Teardrop!!!

...ask your questions in the appropriate forums BUT document your build here...preferably in a single thread...dates for updates, are appreciated....

Postby S. Heisley » Wed Jan 27, 2010 9:27 pm

Go to the top of the screen and click on Generic Benroy Plans. Print pertinent sheets out, if you want to. Even though your teardrop is different, chances are you'll get a lot of guidance there if you read through it. After that, I think I would do a thorough check of what is already done and make a list of anything you want changed as well as what is left to do. Then, you'll know your answers and, whether you realize it or not, you will have started! Matt, you'll be fine. ;)
User avatar
S. Heisley
Super Lifetime Member
 
Posts: 8866
Images: 495
Joined: Mon Sep 17, 2007 10:02 am
Location: No. California

Postby Spottersmitty » Wed Jan 27, 2010 10:07 pm

Thanks so much, Sharon, for the encouragement! Those plans are AWESOME, and I'm excited all over again. I'll be referring to those a lot throughout the build. Thanks again for the help.
User avatar
Spottersmitty
Teardrop Inspector
 
Posts: 17
Images: 83
Joined: Wed Dec 16, 2009 8:50 am
Location: Greeneville, TN

Postby toypusher » Thu Jan 28, 2010 5:43 am

A possible work of caution! Since you plan on putting batteries in the interior of you build, you really need to think out insuring that they are properly ventilated!
User avatar
toypusher
Site Admin
 
Posts: 43040
Images: 324
Joined: Fri Jan 28, 2005 12:21 pm
Location: York, PA Area
Top

Postby Spottersmitty » Thu Jan 28, 2010 6:08 am

Thanks, Kerry. I will take that into consideration during the build. That's a great tip!
User avatar
Spottersmitty
Teardrop Inspector
 
Posts: 17
Images: 83
Joined: Wed Dec 16, 2009 8:50 am
Location: Greeneville, TN
Top

Finally--Getting some work done!

Postby Spottersmitty » Tue Mar 16, 2010 8:57 am

Well, yesterday was a very productive day! I'm finally finished, more or less, with my other project, my 1963 VW Beetle. So now it's full speed ahead on our teardrop.

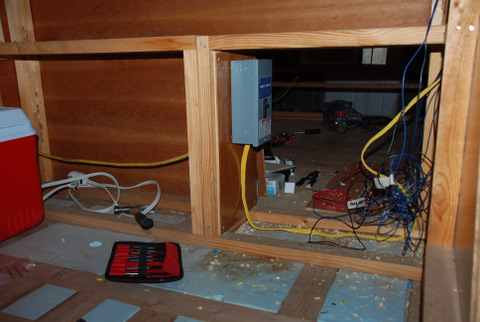
I have spent so many hours reading the forums on here to understand what I need to wire this baby the way I want it. You guys are AWESOME! I've learned so much from your words of wisdom and your experience. So, armed with all the learning I've received from you, I have decided to wire the teardrop for 12v and 110. The lights will be 12v, and the air conditioner and outlets will be 110. I went to Lowes and spent a couple hours talking to the nice employees there. They helped me so much as well. I ended up leaving with a bag full of goodies. They included: a breaker box that I got a discount on because it didn't have it's cardboard box with it, two 20 amp breakers, a ground strip, two outlets, two light switches, and the junction boxes for them. It was a successful trip. When I got home, I dove right into the wiring, and here's what I got done.

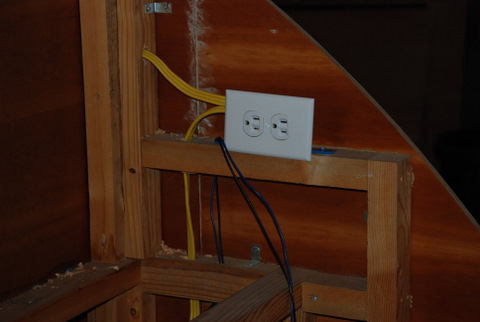
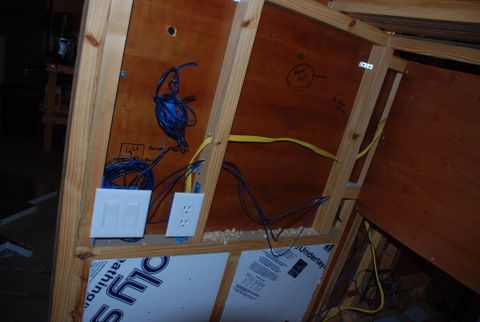
I mounted the breaker box and wired the air conditioner and outlets. The yellow cable from the left is for the A/C, and the yellow wires going to the right are to the two outlets.
Image
This outlet is in the galley.
Image
These are the switches for the porch lights and the interior lights, and here is the outlet for the cabin.
Image

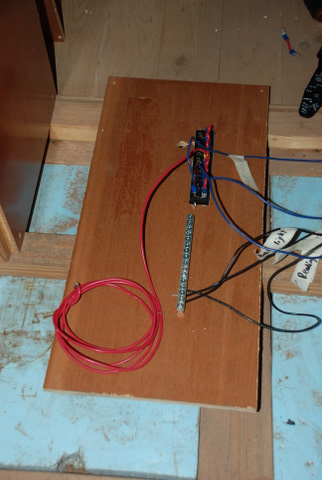
Then I started wiring the 12v items. Adam, the guy I bought this project from, had already installed this fuse box. I installed a grounding block to run all the grounds back to. This is the back side of that panel.
Image
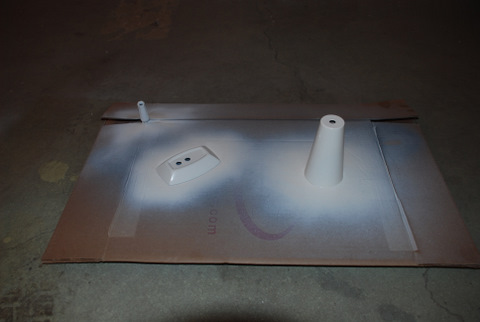
I have run most of the 12v wires, and now I'm waiting to put the sides on so I can mount the lights and get them fully wired. Adam gave us some old school reading lights that were goofy looking because they were gold. We originally wanted to buy some new ones, but I wondered what they would look like painted. So, I painted them flat white, and I think they will look really good. Here they are after a couple coats of paint.
Image

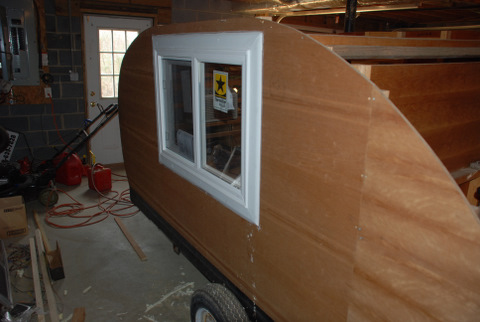
Another project that I have been working on is replacing the window on the driver's side. The window that was in there when I bought this project was a storm window for a basement. It was pretty fragile and wouldn't insulate worth jack! So, I bought a really nice window that fit very similar to the previous one. After installing it, insulating around it, and putting the molding up, I sealed it with caulking. I think it looks pretty good.
Image

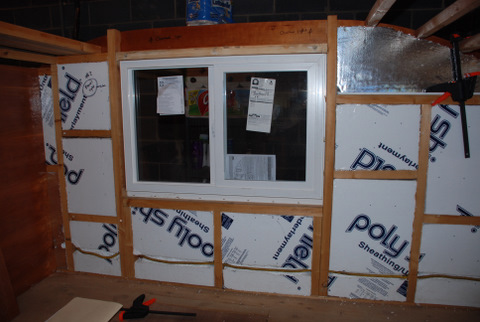
I have also been working on insulating the sides of the teardrop. I bought 2 inch foam from Lowes and fit it into place. It is a lot easier than I thought. I hope this will make the difference between being cold or hot while we are "camping."
Image

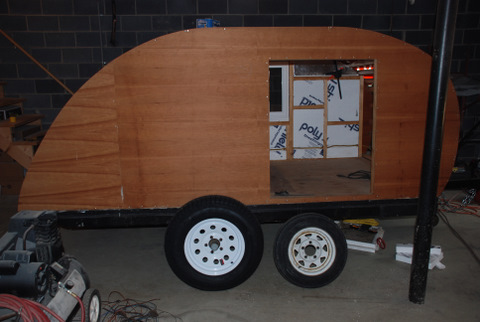
After reading and reading about tires and wheels in the forums, I think I have decided on going with a bigger size. The 12 inch wheels that were on here are so pansy, and I'm a little scared to take them barreling down the interstate. So, I stopped at Tractor Supply Center on the way home yesterday and picked up a 15 inch wheel and tire to see if it would fit. It went on quite well, but there is not enough space between the tire and the body of the teardrop (maybe an 1/8 inch). So, I'm going to see what the 14 inch wheel and tire combo is like. It may be the same since the tire is quite similar. Are spacers a terrible idea? Anyway, here's the difference between the 12 inch and the 15 inch.
Image
It really raised the teardrop up quite a bit. I really like how it looks, and I'm sure I'll feel better hitting potholes and going faster...
Image

Well, that's the update for now. I plan on finishing the wiring and then putting the interior sides on. Any suggestions on how to cut the walls the correct shape? My plan right now is to clamp the plywood to the exterior. Then, I'll trace the shape of the exterior walls out on the wood. Then, I'll simply subtract 2 inches around the entire perimeter because the spars are 2 inches thick. Shouldn't that give me the correct shape?

I'll post more pictures and updates soon.
User avatar
Spottersmitty
Teardrop Inspector
 
Posts: 17
Images: 83
Joined: Wed Dec 16, 2009 8:50 am
Location: Greeneville, TN
Top

Postby teardrop_focus » Tue Mar 16, 2010 11:34 am

Just dropped into your thread here to say "Congrats!" on diving head first into your new project... I like yer '63 bug, too.

:thumbsup:

I've read through your account of who, what, when, where and how you acquired the partially-built teardrop and about your own progress thus far... but dunno if you've yet purchased a battery or batteries (as the original owner had planned).

Here's a very helpful link from the Electrical Secrets forum:

http://www.batteryfaq.org/

Also, since you're going w/ such a strong 110V package, you may not need two 12V batteries unless you plan on booddocking off the grid for a week... even then, that can be done with one battery and a decent-sized ($) solar panel.

If you go w/ two batteries, think about weight distribution; you don't want them placed together on one side of the chassis if you can help it unless you can counterbalance their postition aft of the axle with something else that is equally as heavy for side-to-side chassis balance.

At that point, even w/ the A/C unit in the front of the sleeping cabin, depending on your battery decision and planned galley accessories, the axle may be a bit too far foward to give the desired trailer hitch tongue weight of 10 to 15% (of the trailer's loaded static weight). The larger wheel and tire was a good move!

:SG

Don't forget to take the time to ponder these things! You're on teardrop time!


:campfire: :relaxing:
.
Image

"There is something about these little trailers that brings out the best in people." - BigAl, Scotland, 2010

"Climb the mountains and get their good tidings. Nature's peace will flow into you as sunshine flows into the trees...
The winds will blow their own freshness into you and the storms their energy, while cares will drop away like autumn leaves..." - John Muir, 1898


Chris Squier / teardrop_focus :-)~
User avatar
teardrop_focus
Donating Member
 
Posts: 5975
Images: 127
Joined: Sat Apr 11, 2009 3:18 pm
Location: SoCal
Top

Postby Spottersmitty » Tue Mar 16, 2010 11:48 am

Thanks for the comments, Chris. I still haven't bought the battery, but I'm hoping to do it soon. It sounds like the Optima batteries are a little more expensive but well worth it, so I'm thinking about getting one of those. Also, about having multiple batteries, I think I will probably only need one which should be a little lighter to tow.

I hear ya on the "teardrop time!" I can't wait to get out there and start the fun!!!
User avatar
Spottersmitty
Teardrop Inspector
 
Posts: 17
Images: 83
Joined: Wed Dec 16, 2009 8:50 am
Location: Greeneville, TN
Top

Postby Cliffmeister2000 » Tue Mar 16, 2010 12:23 pm

When considering batteries, lots of sharp folks on this site recommend 2 6V batteries in series over 2 12V batteries in parallel. The 6V "Golf Cart" batteries are made to run a golf cart for a long time, where an automotive battery is designed for lots of "Cranking power", rather than lots of run time. Makes sense to me, anyway. :?
God Bless

Cliff

♥God. ♥People.
1 John 4:9-11

My Teardrop build pictures
User avatar
Cliffmeister2000
Titanium Donating Member
 
Posts: 3622
Images: 157
Joined: Thu Jul 26, 2007 10:18 pm
Location: Phoenix, AZ
Top

Postby teardrop_focus » Tue Mar 16, 2010 2:31 pm

Makes sense to me, anyway.


Indeed, sir; indeed. :thumbsup:


>>> v v v Threadjack Warning v v v <<<

A two-6V golf cart battery bank was my original plan... until I happened, with the aid of this excellent forum resource, to read up on the current (par-doane the pun) state-of-the-art of flooded-cell lead/acid battery technology. One of the advances in recent years is the AGM, or absorbed glass matte, battery and the gel cell battery. Both are considered a flooded-cell lead/acid, but have no "loose" electrolyte; it is contained. Optima (with it's spiral-cell construction), Lifeline, Deka, etc are all AGM batteries.

Most, if not all, of these newest generation of batteries are "sealed" and require no watering (there are, however, pressure relief vents in case of a severe overcharge). The only maintenance these types require are voltage monitoring, and preventative "float" charging when stored, say, for the winter to guard against atypical self-discharge.

These batteries are well-suited for use in confined spaces such as teardrop trailers as when charging or under heavy draw do not outgas very much at all. All batteries still need to be placed in a vented area, however.


One thing hasn't changed, and that is lead-acid storage battery weight-per-amp-hour capacity. We still don't get something for nothing, dangit! For example, I want to use a (+/-) 100 amp hour battery. Regardless of manufacturer, they all seem to weigh right around 70 lbs.

100 amp hours capacity is a good place in my opinion to begin if I want to boondock for a couple of days at a time with a small solar panel and run 12V incandescent (in spite of the more efficient LEDs) reading lights, galley lights and 2.5-amp draw 12V foodstuffs refrigeration.

It'd be nice, too, to plug in the laptop's small converter power supply via a 110W inverter (12V to 110V to 19V seems wasteful, but that's the setup for now) and watch DVDs in high resolution in case of foul weather! But that may be pushing it... we'll see.

Please pardon the threadjack!

:pipe:
.
Image

"There is something about these little trailers that brings out the best in people." - BigAl, Scotland, 2010

"Climb the mountains and get their good tidings. Nature's peace will flow into you as sunshine flows into the trees...
The winds will blow their own freshness into you and the storms their energy, while cares will drop away like autumn leaves..." - John Muir, 1898


Chris Squier / teardrop_focus :-)~
User avatar
teardrop_focus
Donating Member
 
Posts: 5975
Images: 127
Joined: Sat Apr 11, 2009 3:18 pm
Location: SoCal
Top

Postby Spottersmitty » Thu Mar 18, 2010 7:29 am

Between work, training for triathlons and spending time with the wife, I have managed to fit in a little time here and there to work on the teardrop. Last night, after Jennifer had picked me up a jig saw at Harbor Freight, I cut out the interior panels out of the luan that we had bought a couple weeks ago. The first side surprised me several times. I thought I had it measured correctly, but once I got it in there, it wasn't right, so I had to bring it back out. This happened a couple times till I got it just right. I pulled it back out and traced its shape on the other side's luan so I didn't have to go through all that again. After setting it in place, I think it looks pretty good. There will be some molding around the window, and I'm even thinking about running a strip of molding or something around the top edge, kind of like crown molding.

Here's a pic of the side cut and ready to be installed:
Image
And here it is just setting in against the wall.
Image

Today I'll try and order the interior lights and maybe even get a battery!
User avatar
Spottersmitty
Teardrop Inspector
 
Posts: 17
Images: 83
Joined: Wed Dec 16, 2009 8:50 am
Location: Greeneville, TN
Top

Progress, progress, progress!

Postby Spottersmitty » Tue Mar 30, 2010 7:02 pm

A lot has happened in the last week or so...

I bought a battery! I decided to go with the sealed Optima Yellow top one. It sounded like it would be the best for what I want to do. I'll have to figure out how I want to mount it once I get my converter.
Image
I also got both interior walls installed. I think they look pretty great. They'll look even better with a coat of Armory Gray paint on them and some white trim to complete the look. I think the switches look pretty good as well.
Image
The little reading lamps that Adam gave me look pretty swell as well after they were painted white. I had a little trouble getting one to make a solid ground. I kept having to sand different spots down to bare metal. Finally they both are working.
Image
After both walls were installed, Jennifer, my wife, and I started the pretty intense process of installing the interior ceiling. We ended up taking wet hot towels and letting the plywood soak a few minutes before trying to bend it into place. This was a two person job for sure!
Image
Here's my pretty girl! It's pretty cool to have a wife that can and wants to do lots of different projects with me!
Image
Here's what the interior ceiling looks from the outside. I hadn't cut the hole for the A/C unit.
Image
The puck lights finally arrived from the UPS man. I think I got a pretty good deal to get 12v lights for $9 each. Plus, they mount flush which is really sweet. I don't want to be hitting my head every time I sit up. They were easy to wire, and I think they look AWESOME!
Image
Finally, yesterday, I put all the rest of the insulation over the top of the TD. I think it'll do it's job.
Image
I'm now ready for the outer skin. I've been toying with the idea of using FRP, Fiberglass Reinforced Panels for the outside. After reading everything I can on this forum, I still think it'll be great. What do you think? How should I mount it? Should I just glue and screw it to the spars, or should I put a thin luan plywood underneath it to give it more stability and then glue it on? Also, is there anything cheaper to seal the edge where the top and sides meet than getting the edge molding? It's so pricey!
User avatar
Spottersmitty
Teardrop Inspector
 
Posts: 17
Images: 83
Joined: Wed Dec 16, 2009 8:50 am
Location: Greeneville, TN
Top

Postby John T. Hodgen » Tue Mar 30, 2010 7:53 pm

great build, great price and I really like the puck lights too. Your doing great and will really enjoy it after your done. :applause: Keep up the great work :thumbsup:
Til later by the fire--John T. & Linda 8)
User avatar
John T. Hodgen
The 300 Club
 
Posts: 415
Images: 8
Joined: Thu Jul 24, 2008 5:50 am
Location: Summersville, West Virginia
Top

Postby BC Dave » Tue Mar 30, 2010 11:51 pm

nice job; the puck lights are a great idea; are they halogen bulbs? How many watts and whats the power usage? (...just remember to turn then off when you ... lol (...oh! did I say puck? sorry I couldnt resist ...)

I like the shape and size you'll be getting out of the shape.

Carry on, let the saw dust fly.

Cheers BC D
User avatar
BC Dave
Teardrop Master
 
Posts: 247
Images: 13
Joined: Sat Oct 31, 2009 12:32 am
Location: BC, Canada
Top

Postby Spottersmitty » Thu Apr 01, 2010 9:29 am

Yup, the puck lights are halogen. They are just perfect...not too much light or too little light. With the reading lights available too, if we want to have less light, we'll just turn them on.

I bought some FRP the other day, so I'm ready to get it installed. I'm nervous as to how well it will mount. I guess we'll see. Any advice will be really helpful!
User avatar
Spottersmitty
Teardrop Inspector
 
Posts: 17
Images: 83
Joined: Wed Dec 16, 2009 8:50 am
Location: Greeneville, TN
Top

Postby Spottersmitty » Fri Apr 09, 2010 6:48 am

Sorry for the long gap in the updates...

A lot has happened in the past few days/weeks. We purchased our interior and exterior paint and did a little painting. Jennifer did such a great job working on this while I worked on some other stuff. We went with a fairly light gray for the interior. I think the guy at Wal-Mart screwed up the mixing though. He used a light base instead of a medium base, so it turned out lighter than we wanted. Oh well, I think it looks pretty good anyway.
Image
We also got started on the outside. I went ahead with the Fiberglass Reinforced Panels from Lowes. They look like they are going to be just the ticket. I glued them and screwed them on. After the glue had set up nicely, I removed all the screws, but I still need to fill the holes with caulking. I think it looks pretty good. It'll look even better once I get the edge molding on too!
Image
I think the previous owner, Adam, was going to go for beautifully stained and sealed wood sides. But, because we don't have the same wood to make the door out of, we just decided to paint the sides. We saw a teardrop in Knoxville the other day, and it looked awesome! It was white on top and yellow on the sides. We thought a really bright color for the sides would be pretty rad, so we chose an exterior paint called Transatlantic. It's pretty bright!
Image
I started cutting in around the lights...
Image
...and Jenn started with the roller.
Image
Here's how the passenger side look right now.
Image
And here's how the driver's side looks.
Image
Once we get the edge molding and seal everything else up, I'm hoping that we won't have any leaks! I guess we'll see.

We decided to install a shelf to hold books, cell phones, alarm clocks etc., so here is what it looks like. I think it looks pretty good...
Image
I also installed the A/C unit. I still need to fill the crack around it with foam and add a little molding.
Image
I'm slowly learning that molding covers all sins! It's nice to not have cut something perfectly, but a little molding makes it look good. Here's some of the molding on the interior.
Image

Yesterday, the UPS man brought me something exciting. It is our CONVERTER! It's the IntelliPower PD 9130. It's a 30amp unit that I got off of Ebay. It was brand new, and I scored it for $27! That's a pretty good deal if you ask me!!!
Image

I have started on the galley and am rearranging things the way that we will want them. So far I've created a drawer for our cooler that extends 24 inches. That way, we'll be able to drain it easily. I also have installed the supports for our countertop. It's coming along slowly, but I think it will be very functional.
Image

I'm getting to the point where I'm planning the hatch and the door. I hear that these are the scariest parts for most people, but once you start them, they are really easy. I guess I'll just have to do it!
User avatar
Spottersmitty
Teardrop Inspector
 
Posts: 17
Images: 83
Joined: Wed Dec 16, 2009 8:50 am
Location: Greeneville, TN
Top

PreviousNext

Return to Build Journals

Who is online

Users browsing this forum: No registered users and 12 guests