DD, on the road to LCG

...ask your questions in the appropriate forums BUT document your build here...preferably in a single thread...dates for updates, are appreciated....

Postby StPatron » Sat May 22, 2010 5:21 am

Yes, finding those 4 bowls was a nice surprise. A touch of cowboy Americana. I plan to store them in the galley and use them on occasion.
User avatar
StPatron
Donating Member
 
Posts: 748
Images: 297
Joined: Tue Dec 15, 2009 8:38 pm
Location: OK

Postby StPatron » Tue May 25, 2010 1:10 am

Been kinda busy lately, here's a re-cap. I went out to the shop the next morning expecting to see nicely adhered vinyl on the bumpy wall,,,,, NOT! The contact cement decided to fail me in the middle of the night, rascal. That's ok, though. That area will be covered with an upper cabinet and a small counter below with a basin for tooth-brushing and face-washing. In between,,, a rectangular wall mirror maybe???

I hadn't made a final decision about what to do with the bathroom wall corners. Maybe run a bead of silicone and then add trim? Then, I was reading "fromeo's" build thread and saw the vinyl welt he used. Ah! That's perfect. Here's a link to that thread:

http://www.mikenchell.com/forums/viewtopic.php?p=687894#687894

Hmmm, I wanted to do it today so that I could secure the aft bulkhead and begin the desk/bathroom divider wall. Home-made welt? Why not? I had enough vinyl left-overs that could be cut into strips. I could then encase a piece of rope in the strips and staple them in place. It would've been easier to pre-fab the welt strips but after my recent experience with failing adhesives, I decided to "welt in-situ".

From the back side of the bulkhead I slid the vinyl strip in the gap and stapled one edge, then went inside the cabin to place the rope and fold the vinyl back over and slip it back into the gap. Back to the other side of the bulkhead, pull tightly and staple. Worked pretty good but I had to make about 27 round-trips!

The materials used:
Image

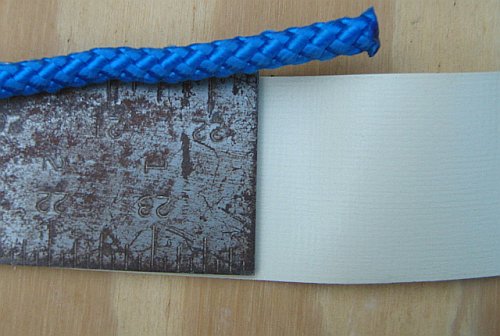
This strip was too narrow, making it difficult to grab it after it was wrapped around the rope. I later cut a much wider strip and trimmed excess after stapling.

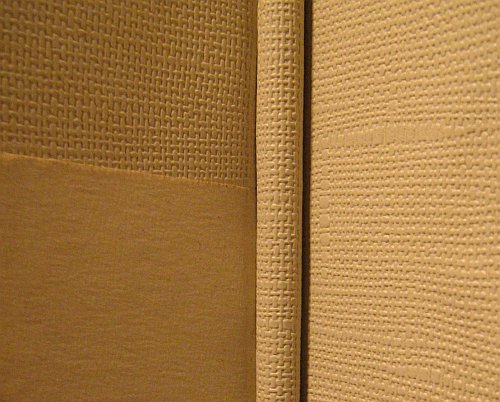
I was happy with how it turned out and think it will provide a water-proof seal. The nylon rope floats,, hope I don't have to witness that first-hand. :lol:
Image

Pre-fabbing the welt strips would be much faster and easier to apply. I may use that technique in other areas,,, using cloth or other materials that can be sewn. Or, I may just use that flexible trim sold in the box-stores or the vinyl welt that "fromeo" used. Lotta options. Another challenge overcome today, love it!
User avatar
StPatron
Donating Member
 
Posts: 748
Images: 297
Joined: Tue Dec 15, 2009 8:38 pm
Location: OK

Postby StPatron » Thu May 27, 2010 1:10 am

052610 Divider wall

Today was a productive day, which was welcomed after hastling with the vinyl adhesion fiasco. My goal was to build the divider wall that fits in between the bathroom and desk area. I needed a fairly substantial wall there and decided to use another piece from the pop-up, a 5/8" thick piece of plywood that was one of the bed supports in its former life. Some of the edges were delaminated but the "core" was good, so I trimmed it down and had plenty to use for the wall.

As the clouds built, storms threatened and thunder rolled,,, I began working outside. Not enough space inside the shop, the deck serves as an outdoors extension. With a coupla sawhorses set up, I laid out the cutting lines, trimmed the ply down and applied the vinyl and a section of under-desk luan.

Image

Sure hate to see that nice flame pattern be hidden under the desk knee space,,

Applying the vinyl to the other side:

Image

The dark spots are glue smudges, I'll clean those up later.

Image

I folded the vinyl over the face edge of the ply before stapling the luan on.

Image
User avatar
StPatron
Donating Member
 
Posts: 748
Images: 297
Joined: Tue Dec 15, 2009 8:38 pm
Location: OK
Top

Postby StPatron » Thu May 27, 2010 1:53 am

More treasures found at the cabinet shop dumpster "gold-mine",,,, 4 pieces of corian, sink cut-outs. What a waste! I can't believe they toss this out. Let's see,, how can I recycle this? Sink top? I laid out lines in order to maximize the material:

Image

Now,, what to use for a sink bowl? Blue granite ware seems to me like a perfect match. I've got the blue laminate on one wall, a marriage in the making! Wal-Mart camping supplies,,,, $2.88.

Image

The bowl has a small lip, undecided now as to whether I will drop it in or epoxy it in place underneath???
User avatar
StPatron
Donating Member
 
Posts: 748
Images: 297
Joined: Tue Dec 15, 2009 8:38 pm
Location: OK
Top

Postby Cliffmeister2000 » Thu May 27, 2010 7:51 am

What a great find! :thumbsup:
God Bless

Cliff

♥God. ♥People.
1 John 4:9-11

My Teardrop build pictures
User avatar
Cliffmeister2000
Titanium Donating Member
 
Posts: 3622
Images: 157
Joined: Thu Jul 26, 2007 10:18 pm
Location: Phoenix, AZ
Top

Postby StPatron » Thu May 27, 2010 1:24 pm

Cliffmeister2000 wrote:What a great find! :thumbsup:


Well,,,, what do ya know? There IS someone reading this,, :lol:

I was pleased with that find, indeed. I've found Corian scraps before but it's been a long while and they were white. Trimmed them up and put a routed round-over edge on them, made nice cutting boards.
User avatar
StPatron
Donating Member
 
Posts: 748
Images: 297
Joined: Tue Dec 15, 2009 8:38 pm
Location: OK
Top

Postby grizz » Thu May 27, 2010 2:04 pm

Getting more and more proud of you :lol:

Great find.

I have been a bit busy the last couple of weeks, so no trips to the council tip.... I do miss it.
Greetings from England.

Rian.


Hoping to get it all done in time.
User avatar
grizz
1000 Club
1000 Club
 
Posts: 1210
Images: 29
Joined: Mon Sep 21, 2009 2:37 pm
Location: Rochester, Kent, UK
Top

Postby 2bits » Fri May 28, 2010 12:08 am

Wow, I just ramped up on the last two months of your work! I am glad your finger is all well and you are making great progress! Unfortunately I am not on the board as much as I used to be so I miss alot! You are doing great though! At least I will be getting the email updates again now!

Oh and on the cat subject my departed Shirley was a rescue cat too, you couldn't ever pick him up or shake a trash bag near him, he would freak, but you could run any kind of saw or do anything like that and he would just hang out totally relaxed. He was always there through my build.

Image

Image

Image

Image
Thomas

Image
User avatar
2bits
2bit Member
 
Posts: 5132
Images: 8
Joined: Thu Dec 27, 2007 6:04 pm
Location: Lake Tawakoni, TX
Top

Postby StPatron » Fri May 28, 2010 1:02 am

Thanks for visiting my odd-ball build and cat picture thread, Thomas.

Those are some great pics of Shirley, thanks for sharing. I really like tuxedo kitties. Want another one? "Cream" is up for adoption too. She's a real sweetheart.

I think rescue kitties always remember the kindness shown to them and then make for wonderful pets. Dewey is a cat-magnet if there ever was one! My outside "herd" is comprised of strays and feral cats that enjoy the wooded acreage and catnip plots. Luckily, there is a spay/neuter clinic in OKC that offers low-cost procedures, I'm on a first-name basis with them now,,, :lol:

I've been having a blast working on my trailer and have been able to get quite a few hrs. of shop time in lately. I'm about to scrap the vinyl idea altogether, though. I thought it was a good idea, but I'm growing weary of hastling with it. Today I had the idea of covering the bathroom walls with tileboard, leaving the vinyl in place as a waterproof barrier. Might go that route. I already have a lot of trim on hand from another project.

Today's work went well. The divider wall is now installed, just need to trim it out. The desk surface is in place and I started building the upper cabinet for the bathroom. The interior is chock-full of tools and supplies now, will clean that out soon and post some updated pics. It won't be long before the cabin area is done, then I'll start on the A/C install and the galley. 76" W x 32" D, oughta be fun! I'm trying to determine if a 76" wide hatch will be a monster to lift or not??? If so, has anyone split a hatch into two sections, side-by-side?

What's the status of that "canned ham" trailer you picked up? I'm anxious to complete my trailer, pull it to a gathering and b.s. with ya again.
User avatar
StPatron
Donating Member
 
Posts: 748
Images: 297
Joined: Tue Dec 15, 2009 8:38 pm
Location: OK
Top

Postby aggie79 » Fri May 28, 2010 3:21 pm

StPatrón wrote:Thanks for visiting my odd-ball build and cat picture thread, Thomas.

I think rescue kitties always remember the kindness shown to them and then make for wonderful pets. Dewey is a cat-magnet if there ever was one! My outside "herd" is comprised of strays and feral cats that enjoy the wooded acreage and catnip plots. Luckily, there is a spay/neuter clinic in OKC that offers low-cost procedures, I'm on a first-name basis with them now,,, :lol:


Gary,

We live in just a regular subdivision, but at one time we too had a huge population wiith feral cats. We also had our own spay and neuter program and a local vet who worked with us. Eventually we got everything under control (or the word got out in the cat community to not come around our house.)

StPatrón wrote:Today's work went well. The divider wall is now installed, just need to trim it out. The desk surface is in place and I started building the upper cabinet for the bathroom. The interior is chock-full of tools and supplies now, will clean that out soon and post some updated pics. It won't be long before the cabin area is done, then I'll start on the A/C install and the galley. 76" W x 32" D, oughta be fun! I'm trying to determine if a 76" wide hatch will be a monster to lift or not??? If so, has anyone split a hatch into two sections, side-by-side?


Your hatch shouldn't be too much to lift. Mine is 64" deep x 60" wide. I don't have the aluminum on it yet but it doesn't take much to lift. I think a double hatch would be really cool, too. I can't remember his full screen name, but you may want look up Len___ to see his detail for sealing hatches.
Tom (& Linda)
For build info on our former Silver Beatle teardrop:
Build Thread

93503
User avatar
aggie79
Super Duper Lifetime Member
 
Posts: 5405
Images: 686
Joined: Tue Aug 07, 2007 5:42 pm
Location: Watauga, Texas
Top

Postby StPatron » Sat May 29, 2010 3:42 am

Hi Tom! Thanks for stopping by, I always appreciate your comments.

I admire your work in helping to control the cat population in your neighborhood, it's a challenge for sure. I suppose I have a reputation for being a cat rescuer and today found 2 kittens on my property with ribbons for collars, obviously not feral and probably not strays. I'll catch them if I can and trap them if I can't, then take them to the clinic for neutering and try to adopt them out, which is getting very tough.

Thanks for the hatch weight input. The only Len that I'm familiar with is the guy who does the Scotty re-builds and fashions his own aluminum siding, a very talented guy whose skills I envy. Is that the guy you are referring to?

I'm weighing hatch options, I have a tendency to over-analyze some aspects of my build and fly past others, trying to find the proper balance. I think the split-hatch offers the advantage of being able to construct two matching hatches that MIGHT individually be sturdier than one hatch merely due to their smaller size. Dunno. The downside is that it would increase the total hatch seal length "real estate" thereby offering more opportunity for water penetration. On the upside, though, if I located the Igloo on one side and the sink on the other side,,, I might have the tendency to keep the dishwashing area closed and just open the side with the Igloo in it,,,, :lol:
User avatar
StPatron
Donating Member
 
Posts: 748
Images: 297
Joined: Tue Dec 15, 2009 8:38 pm
Location: OK
Top

Postby StPatron » Sat May 29, 2010 5:01 am

I decided to scrap the vinyl application idea. It looked ok in some areas, in others it sucked. I've been told I have the patience of a,,,,, Saint. But there are limits. I had a sheet of tileboard on-hand and lotza edge trim and decided to go with that. My experience with tileboard hasn't been exactly rosey, which is why I had avoided it originally. It has a tendency to deteriorate over time, 15 yrs. is about the limit with daily showers hitting it. If I get 15 yrs. out of it, I'll be happy. Gotta put it all in perspective. It will be easy to replace later if needed.

This is the back wall of the bathroom area:

Image

The area next to the ceiling seemed to be a perfect spot for a small storage area for t.p., etc. I applied some salvaged laminate scraps to 1/4" ply, material availability turned it into a "racing stripe" design. This is the cabinet bottom surface.

Image

Now, for the desk area. I thought this piece of salvaged laminate was gorgeous! I've been using a lightweight approach during the build so far, so I splurged by adding this, it's heavy. I want an area where I can set up my fly-tying vise without wobble. And, an area where I can use my laptop, watercoloring supplies, small guitar amp and music paper or anything else a desk area offers. The dinette table may offer that, but it will be nice to have another area and a desk seemed to fit the bill.

Image

It's challenging to get pics of everything. I decided a coupla sky-view shots were in order and set up the step-ladder on the galley deck. This is the bathroom area:

Image

A wider shot of the area forward of the bulkhead, including the adjacent desk area. I considered clearing all the tools and supplies out before taking the shot and then thought,, what the heck. This is how I do it, works for me. It's a work in progress,,, Norm probably wouldn't agree. :lol:

Image
User avatar
StPatron
Donating Member
 
Posts: 748
Images: 297
Joined: Tue Dec 15, 2009 8:38 pm
Location: OK
Top

Postby StPatron » Tue Jun 01, 2010 11:57 pm

I worked with the Corian scraps today, a difficult material to work with,,, probably due to my mediocre tools and skill level. I decided that the cut-off edges could be used for a backsplash and ripped some pieces, then attempted to put a round-over on them. That wasn't successful, too much chatter. Worn bit I suppose, I've used it on a lotta red oak. Feather boards on top and also on the side didn't do the trick, so I punted and tried my bevel bit. That worked much better. Here the first piece of Corian backsplash is about to meet the router. (Ignore the arrow, direction of feed is opposite in this case.) Recognize the router table material? It's a salvaged laminate counter-top, works great! The switch on that router died, so I built the table from the laminate counter scrap and installed a toggle switch on the front. The fence is a piece of red oak, bolted on one end and the other end slides in a slot, adjusted with a thumb screw on top. I like it much better than my old router table.

Image

The beveled edge. The reflection makes it look odd.

Image

Then, the granite ware bowl was placed on a slab of Corian and lines laid out. I used a compass to mark an inner line that would be smaller than the bowl lip. In the center is a shallow hole used to hold the compass point.

Image

I made several "starter holes" with a spade bit but found these to be unnecessary. Tilting the router into the Corian worked ok. I cut on the line, free-handed, using several passes of increasing depth. Need to build a circle jig for the router.

Image
Sink cut out done.
Image

As I was cutting this out I couldn't help but think how ironic it was that I was using a scrap piece of Corian that found its way to the dumpster because it was a sink cut-out,,, now transformed into a smaller sink cut-out.

Image

The pieces laid out to check for alignment and fine-tuning before final install. Need to bottom sand that far right corner piece, it's riding a bit high. The curved appearance in some areas is due to camera lens.

Why the thin strips on each side of the sink? I needed to hide the joint lines. Admittedly, they weren't perfect, there were some small gaps. I think the pros use a mix of epoxy and corian dust or a tinted epoxy to fill in joint lines. I'm far from being a pro Corian guy so the beveled strips were used.

Now to cut out the drain hole in the granite ware bowl without it chipping or flaking. Not sure what will be the best approach for that?? Then, I'll seal all with silicone and use epoxy to tack down the strips.

Image

I have also begun adding outlets to the desk area. Need to fix that crooked one with a rasp in the upper left corner. That's a 12-volt receptacle on the far right. The cable plate I had was white and,,,,, for some odd reason,, is larger than a standard wall plate? Go figure. The plate and outlet colors aren't permanent, just getting something in place for now. Might paint them green to match the desk area trimwork.

Image
Oops!
User avatar
StPatron
Donating Member
 
Posts: 748
Images: 297
Joined: Tue Dec 15, 2009 8:38 pm
Location: OK
Top

Postby StPatron » Wed Jun 02, 2010 10:50 pm

I didn't get much done on the camper today. Don't ya just hate it when yardwork and chainsawing interrupts your build progress? :lol:

Creating the drain hole in the granite-ware bowl went pretty well. Using the compass I drew a pattern on paper and then taped it to the bowl. Then I used my drill press to create some starter holes and "connected the dots" using a cut-off wheel on the Dremel. I was hoping the tape would prevent edge chipping and it worked pretty well, only got one big flake. (1 o'clock) which will be covered by the drain lip.

Image
I had this brass colored, beat-up drain to use for testing.

Image
However, this other drain doesn't look too bad. More of an antique look,,,

I might have to get an HGTV consult,,,, :lol:
Image

I've been tossing around ideas of what to use for bathroom cabinet door handles ,,, why not pieces of Corian? I made a few test samples. I think these will look nice with the counter top, a coordinated look. Rather than marring the surface, I think these will look best if they are on a coupla short stand-offs with screws from the backside. I'll try tapping the Corian and if that doesn't work, will epoxy them in place. Might use both.
Image

While I had the wire wheel on the Dremel, I decided I'd work on a junker Coleman lantern I found at the thrift store, a $2 bargain. I've got several Coleman lanterns, both white gas and propane models,,, so, I think I might turn this one into a combo 12 volt/AC light for the dinette area. Inspiration courtesy of Bob Henry.

Image

I'll rob the "guts" from this thrift store find. Roller switch, socket and cord,, worth the 50 cents I paid for it.
Image

Pretty good day. Time to toss some cheddar/bacon Angus on the grill, a few jalapeno poppers and some buttered corn on the cob. Then, a cream soda and vanilla ice cream float. Ahhh! Lifes little pleasures.
Image

Mike and Steve Frederick have their Lil' Diners, it might be appropriate to name mine,,,,, "Dumpster Diner". :lol:
User avatar
StPatron
Donating Member
 
Posts: 748
Images: 297
Joined: Tue Dec 15, 2009 8:38 pm
Location: OK
Top

Postby grizz » Thu Jun 03, 2010 1:33 am

Some beautifull and sensible creations there.

Waiting to see what the polished up Coleman looks like.

Sink is a great creation, will show Nicola later.
Greetings from England.

Rian.


Hoping to get it all done in time.
User avatar
grizz
1000 Club
1000 Club
 
Posts: 1210
Images: 29
Joined: Mon Sep 21, 2009 2:37 pm
Location: Rochester, Kent, UK
Top

PreviousNext

Return to Build Journals

Who is online

Users browsing this forum: No registered users and 13 guests