DD, on the road to LCG

...ask your questions in the appropriate forums BUT document your build here...preferably in a single thread...dates for updates, are appreciated....

Postby StPatron » Thu Jun 03, 2010 1:54 am

grizz wrote:Some beautifull and sensible creations there.

Oh, the plate of food? 8)

grizz wrote:Waiting to see what the polished up Coleman looks like.


The lantern was in fair shape, no globe and a chip in the enamel on top. I didn't tie any mantles on it to check it, it's a propane unit. I'm half-tempted to put it back together and use for a spare, I have some concerns about it being too large for the dinette area.

grizz wrote: Sink is a great creation, will show Nicola later.

Thanks, Rian. It was an enjoyable side-track challenge while I ponder the hatch build.
User avatar
StPatron
Donating Member
 
Posts: 748
Images: 297
Joined: Tue Dec 15, 2009 8:38 pm
Location: OK

Postby aggie79 » Thu Jun 03, 2010 8:20 am

Gary,

Nice work on the bowl/sink and Corian counter. (I've always wanted to work with Corian but it is so hard to find if you're not "in the trade.")

When I saw the burger, my mouth watered. I too love roasted jalapenos, although I have to admit I remove the seeds before roasting. And you can't beat grilled corn.

Keep up the good work!

Tom
Tom (& Linda)
For build info on our former Silver Beatle teardrop:
Build Thread

93503
User avatar
aggie79
Super Duper Lifetime Member
 
Posts: 5405
Images: 686
Joined: Tue Aug 07, 2007 5:42 pm
Location: Watauga, Texas

Postby StPatron » Thu Jun 03, 2010 1:09 pm

aggie79 wrote:Nice work on the bowl/sink and Corian counter. (I've always wanted to work with Corian but it is so hard to find if you're not "in the trade.")


Thanks, Tom. I've got one slab left that I'll save for you. When I was making the door handles I used a different beveling bit and it must have been sharper, it went thru the Corian like butter. I've noticed that Corian will readily show any imperfections, but the good part is that it sands or files well and a touch of buffing compound will bring back the gloss. Oh, and it stinks when you cut it. Burning plastic smell but very unique odor.
aggie79 wrote:I too love roasted jalapenos, although I have to admit I remove the seeds before roasting.


Same here. Then, I save the seeds for planting. I grow 6 pepper varieties in my gardens, easy to grow and high producers. Roasted anaheims on the grill are also to die for but best served in pieces rather than whole. De-seeded and de-veined they've still got some fire to them.
User avatar
StPatron
Donating Member
 
Posts: 748
Images: 297
Joined: Tue Dec 15, 2009 8:38 pm
Location: OK
Top

Postby grizz » Thu Jun 03, 2010 3:47 pm

StPatrón wrote:
aggie79 wrote:Nice work on the bowl/sink and Corian counter. (I've always wanted to work with Corian but it is so hard to find if you're not "in the trade.")


Thanks, Tom. I've got one slab left that I'll save for you. When I was making the door handles I used a different beveling bit and it must have been sharper, it went thru the Corian like butter. I've noticed that Corian will readily show any imperfections, but the good part is that it sands or files well and a touch of buffing compound will bring back the gloss. Oh, and it stinks when you cut it. Burning plastic smell but very unique odor.
aggie79 wrote:I too love roasted jalapenos, although I have to admit I remove the seeds before roasting.


Same here. Then, I save the seeds for planting. I grow 6 pepper varieties in my gardens, easy to grow and high producers. Roasted anaheims on the grill are also to die for but best served in pieces rather than whole. De-seeded and de-veined they've still got some fire to them.


You really are a generous guy Gary.

It always makes me smile when I see that in people.

Roast corn is pretty hard to beat. Back home it is known as a "mielie" and the besy are the ones you grow and pull off and roast same day.
Greetings from England.

Rian.


Hoping to get it all done in time.
User avatar
grizz
1000 Club
1000 Club
 
Posts: 1210
Images: 29
Joined: Mon Sep 21, 2009 2:37 pm
Location: Rochester, Kent, UK
Top

Postby StPatron » Sun Jun 06, 2010 11:48 pm

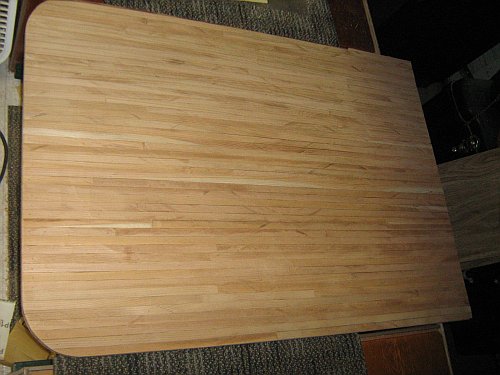
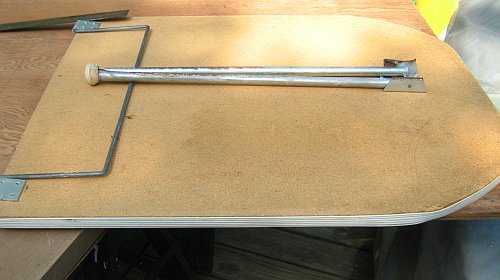
I began work on the new dinette table today. The old table was crumbling, heavy and had to go. First, strip the hardware from it and take some measurements. Then, cut a piece of plywood from the original "fold out" bed platform.

Image

I'd been holding off, undecided about the table surface. I decided to go with cedar stripping and will put a coat of epoxy on it, ala stripper kayak/canoe finish. This brings the "journey" full circle as I first discovered this forum via Steve Frederick's stripper kayak building site. I love the look and with the epoxy coating on it, I expect it to last a lifetime.

For the cedar I used rare, imported, straight grain, old-growth forest, dog-ear fence pickets from the box store, under two bucks a picket. Ran them through the table saw rip fence at 1/4" using feather boards to hold downward and lateral pressure and using a thin-kerf blade. Then, with a bundle of strips cut, I began applying them to the raw table surface with Titebond 3 and brads. The glue was probably unnecessary, I'm a creature of habit. I wasn't too concerned about any gaps, the weight of the epoxy is insignificant in this application. I'll leave the brads in place,,, the rustic look.

Here's the start of the work:
Image
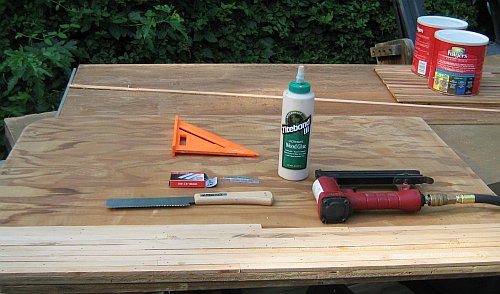
(There's a matching cabinet door in the background).

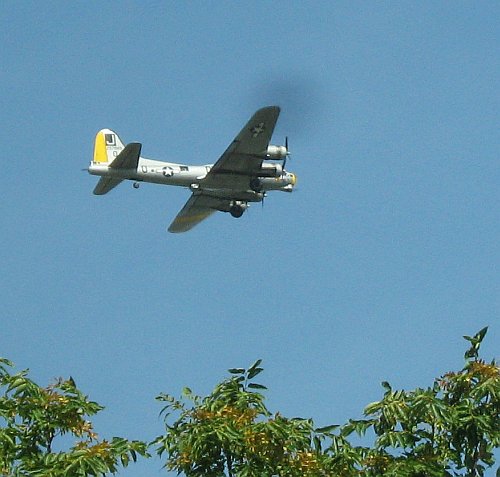
As I was working outside on my deck, I got a pleasant surprise. The B-17 Flying Fortress "Liberty Belle" was in town and buzzed the tree-tops numerous times. What a thrill to hear the sound of those four radial engines and see that magnificent warbird!

Image

I attempted to stagger the joints and change the grain direction for interest, nothing fancy, no bubinga and rosewood inlays. But, creating a design on the flat surface would be pretty easy and an option for future table builds.

Then I trimmed the edges flush with my router and hit it a few licks with the belt sander. It needs some more sanding but that will come later, time to call it a day.
Image
User avatar
StPatron
Donating Member
 
Posts: 748
Images: 297
Joined: Tue Dec 15, 2009 8:38 pm
Location: OK
Top

Postby grizz » Mon Jun 07, 2010 2:22 pm

Nicola and I are just looking at your table creation..... Want one too now.

That looks lovely.
Greetings from England.

Rian.


Hoping to get it all done in time.
User avatar
grizz
1000 Club
1000 Club
 
Posts: 1210
Images: 29
Joined: Mon Sep 21, 2009 2:37 pm
Location: Rochester, Kent, UK
Top

Postby StPatron » Mon Jun 07, 2010 9:46 pm

Thanks to both of ya. I'll trade ya a table for one of your hatches,,, :lol:

Cedar stripping a flat surface isn't too difficult and the options for creating inlaid designs are endless. I can't wait to get some epoxy on it and see it come "alive".
User avatar
StPatron
Donating Member
 
Posts: 748
Images: 297
Joined: Tue Dec 15, 2009 8:38 pm
Location: OK
Top

Postby StPatron » Sun Jun 13, 2010 11:43 pm

I've been working on cabinet doors that will match the dinette table. I constructed a simple door frame, routing a channel for the cedar strips and then painted the pieces. Once dry, I slid the strips into place and used dowel joinery for the frame. Could've used about 3 extra sets of hands for final assembly!

Image

Then, I applied masking tape to the back-side to prevent leak-thru, flipped it over and applied a seal coat of Enviro-Tex Lite. Once that dried, I applied a thicker coat. I got a few bubbles but was fairly satisfied with the results, the bubbles are only apparent in certain light angles and camera flash. I thought it best to experiment on the doors before tackling the table coating.

Image

Then,, what to use for door handles? Hmmm,,, go to the store? No, no, no, no. I went to my stack of dried cedar limbs and cut some small pieces of "worm-trail" cedar, sanded them, applied polyurethane and mounted them.

Image
User avatar
StPatron
Donating Member
 
Posts: 748
Images: 297
Joined: Tue Dec 15, 2009 8:38 pm
Location: OK
Top

Postby grizz » Mon Jun 14, 2010 1:39 am

Love the handles Gary.

Looking good.
Greetings from England.

Rian.


Hoping to get it all done in time.
User avatar
grizz
1000 Club
1000 Club
 
Posts: 1210
Images: 29
Joined: Mon Sep 21, 2009 2:37 pm
Location: Rochester, Kent, UK
Top

Postby Shadow Catcher » Mon Jun 14, 2010 6:45 am

Looks like a B17G. We were camping a couple of years ago and there were a number of flights WWII war birds headed over to Metcalf airport, a B17, B24 couple of P40s, and P51.
I love the richness in cedar and a good light weight wood with no risk of moths :)
User avatar
Shadow Catcher
Donating Member
 
Posts: 6008
Images: 234
Joined: Sat Apr 11, 2009 8:26 pm
Location: Metamora, OH
Top

Postby StPatron » Mon Jun 14, 2010 2:36 pm

Shadow Catcher wrote:Looks like a B17G. We were camping a couple of years ago and there were a number of flights WWII war birds headed over to Metcalf airport, a B17, B24 couple of P40s, and P51.
I love the richness in cedar and a good light weight wood with no risk of moths :)


Here's a link to the "Liberty Belle" website:
http://www.libertyfoundation.org/

A friend will be displaying his P-51D "Miss America" this coming week-end at a local airshow. Love the sound of those planes!

I'm a cedar fan too, as you can probably tell. It's a rustic look,,, a good match with my carpentry skills. :lol:
User avatar
StPatron
Donating Member
 
Posts: 748
Images: 297
Joined: Tue Dec 15, 2009 8:38 pm
Location: OK
Top

Postby grizz » Mon Jul 05, 2010 5:44 pm

.... earth to Gary !!!!

How you doing Mate ?

Trust things are still moving in a forward direction.
Greetings from England.

Rian.


Hoping to get it all done in time.
User avatar
grizz
1000 Club
1000 Club
 
Posts: 1210
Images: 29
Joined: Mon Sep 21, 2009 2:37 pm
Location: Rochester, Kent, UK
Top

Postby StPatron » Mon Jul 05, 2010 6:46 pm

Howdy Rian! Thx for checking on me.

The pace has slowed a bit due to budget constraints. I haven't figured out how to print $'s yet.

Been doing some odds and ends, installed the three ceiling panels yesterday and then attached the table hardware. Talk about a change in the interior, wowzer! I'm building a couple of sliding doors and the associated track work for under sink storage in the bathroom. Installed a stereo unit and speakers. Bunch of trim work. All those little items that are time consuming but not worth picking up the bullhorn for.

Rain, rain, go away.
User avatar
StPatron
Donating Member
 
Posts: 748
Images: 297
Joined: Tue Dec 15, 2009 8:38 pm
Location: OK
Top

Postby aggie79 » Tue Jul 06, 2010 8:36 am

StPatrón wrote:

The pace has slowed a bit due to budget constraints. I haven't figured out how to print $'s yet.

All those little items that are time consuming but not worth picking up the bullhorn for.


Hi Gary,

Details and [lack of] dollars have added about 12 months to my build. If I only knew enough to schedule the detail work when money runs out.

Tom
Tom (& Linda)
For build info on our former Silver Beatle teardrop:
Build Thread

93503
User avatar
aggie79
Super Duper Lifetime Member
 
Posts: 5405
Images: 686
Joined: Tue Aug 07, 2007 5:42 pm
Location: Watauga, Texas
Top

Postby High Desert » Sat Jul 17, 2010 2:02 am

10 day check in call needed...hey Gaaarrryyyy....

how goes it bud? Any new tidbits? ;)
Shaun

"it's not the years honey, it's the mileage"
High Desert
Platinum Donating Member
 
Posts: 8780
Images: 27
Joined: Wed Apr 08, 2009 1:46 pm
Location: SW Washington state
Top

PreviousNext

Return to Build Journals

Who is online

Users browsing this forum: No registered users and 8 guests