Don & Christi's 6 x 10 Cargo Conversion

Converting Cargo Trailers into TTTs

Don & Christi's 6 x 10 Cargo Conversion

Postby d30gaijin » Sat Jun 19, 2010 11:36 pm

OK, here's what we're starting with. Where we hope to go is a conversion we can camp in as well as haul my Harley Sportster up into the mountains of Idaho (the Stanley Basin/Galena Summit) to camp and cruise the cooler high country when the heat of summer gets unbearable here in the Treasure Valley (Boise).

We bought the cargo trailer used locally. It is a 2002 model that was made locally. Overall it is sound and we consider it a good deal at $1k. There are a few issues but no show stoppers that won't be addressed in the conversion. The plywood wall paneling has already been removed to make way for insulation, insulation I bought today. Once the insulation is in the next thing is to belt sand the plywood floor, coat it, then install commercial grade linoleum.

Image

Image

Image

Image

Don
Last edited by d30gaijin on Thu Jun 24, 2010 7:11 pm, edited 2 times in total.
User avatar
d30gaijin
Titanium Donating Member
 
Posts: 594
Images: 139
Joined: Sat Jun 12, 2010 9:27 pm
Location: Boise, Idaho

Postby Camper » Sun Jun 20, 2010 1:30 am

Hey Don
Just think you are half way there already.Loks like you got an awesome deal on your trailer.
Camper
Teardrop Builder
 
Posts: 30
Images: 34
Joined: Wed Sep 23, 2009 5:23 pm
Location: Boise Idaho

Postby michiganflipper » Sun Jun 20, 2010 9:31 am

look's like you have a good start on your conversion. post more pics as you go
User avatar
michiganflipper
Teardrop Master
 
Posts: 129
Joined: Sun Jul 05, 2009 4:28 pm
Location: belding mich
Top

Postby d30gaijin » Sun Jun 20, 2010 11:36 am

Camper wrote:Hey Don
Just think you are half way there already.Loks like you got an awesome deal on your trailer.


Camper,

There are a few small issues but overall we feel it was a good deal. In the first photo towards the rear of the trailer about midway up you can see a hole (tear) poked in the outside wall. Not a problem as that is where a window will go in. Thankfully it already has the roof vent, which is in good shape. The plan is to reuse the existing shelving at the front of the trailer with some improvements made as we go.

We have a small ABS sink on order (should arrive Wednesday) that will mount on the middle shelf towards the right side along with a simple hand-pump type faucet feeding out of a 5 or 10 gallon freshwater tank. We have a cast iron 2 burner propane stove that will also sit on the middle shelf, or on a table outside in nice weather. A small 800 watt microwave will sit on the top shelf. A "Luggable Loo" will go in the forward most left side corner, or in a "Loo/shower" tent outside. An inflatable double mattress on the floor will serve as a bed, it can be deflated or stored up-right on one side of the trailer. If needed, a home window type 5k btu air conditional will go in somewhere (haven't decided just where yet). Wiring will be as simple as possible, heck everything will be as simple as possible.

This will be a "Keep it simple so we can get out camping" project that will get additions/modifications as we go out camping and learn from experience what we'd like to add in the way of conveniences, storage, necessities, etc.

Don
User avatar
d30gaijin
Titanium Donating Member
 
Posts: 594
Images: 139
Joined: Sat Jun 12, 2010 9:27 pm
Location: Boise, Idaho
Top

Postby d30gaijin » Sun Jun 20, 2010 11:46 am

michiganflipper wrote:look's like you have a good start on your conversion. post more pics as you go


Will do! I hope to get started on the insulation installation today (after a few other "Honey Do's are out of the way).

One thing that bothered me is the trailer maker used a low quality sheet metal screw that appears to have a rather poor zinc coating so about half of them have rusting heads leaving brown streaks down the trailer outer skin. I bought 500 stainless screws to replace them and will do so as I go.

I will be photo documenting and posting here as I go. Others who have done the same here documenting their conversions have been a big help to me so I want to return the favor i.e., pay it forward.

Don
User avatar
d30gaijin
Titanium Donating Member
 
Posts: 594
Images: 139
Joined: Sat Jun 12, 2010 9:27 pm
Location: Boise, Idaho
Top

Postby michiganflipper » Sun Jun 20, 2010 1:16 pm

i painted each of my screws black to cover the rusted ones
User avatar
michiganflipper
Teardrop Master
 
Posts: 129
Joined: Sun Jul 05, 2009 4:28 pm
Location: belding mich
Top

Postby d30gaijin » Sun Jun 20, 2010 10:34 pm

Made some more progress today with insulation.

Image

Started putting the original plywood back in over the insulation (front left)
Image

Back end. The rear doors are not insulated and I am not sure what I want to do about that. I don't really want to disassemble them to insulate inside so might go with blue foamboard on the inside face of the door then try to figure out something to cover it with. Any suggestions would be greatly appreciated.
Image
Last edited by d30gaijin on Wed Jun 23, 2010 8:54 pm, edited 1 time in total.
User avatar
d30gaijin
Titanium Donating Member
 
Posts: 594
Images: 139
Joined: Sat Jun 12, 2010 9:27 pm
Location: Boise, Idaho
Top

Postby d30gaijin » Mon Jun 21, 2010 8:57 pm

Insulated the front face of the cargo trailer and started re-installation of original plywood plus got started on roof insulation install.

Image

More roof insulation progress

Image

Don
Last edited by d30gaijin on Wed Jun 23, 2010 9:08 pm, edited 1 time in total.
User avatar
d30gaijin
Titanium Donating Member
 
Posts: 594
Images: 139
Joined: Sat Jun 12, 2010 9:27 pm
Location: Boise, Idaho
Top

Postby pete42 » Mon Jun 21, 2010 10:11 pm

Looking good keep it going.
User avatar
pete42
Super Lifetime Member
 
Posts: 2203
Images: 13
Joined: Sat Nov 07, 2009 11:52 am
Location: SouthWest Ohio
Top

Postby d30gaijin » Mon Jun 21, 2010 10:52 pm

pete42 wrote:Looking good keep it going.


Thanks Pete!

I sometimes wonder if I am posting too much uninteresting stuff although I thought some folks might be interested in what I am doing i.e., I wanted to share my day to day progress. I do so only because I had the weekend plus Monday and Tuesday off from work. From Wednesday (June 23rd 2010) forward the the posts/progress will be considerably further and fewer between unless I make significant progress and deem it worth posting.

Don
User avatar
d30gaijin
Titanium Donating Member
 
Posts: 594
Images: 139
Joined: Sat Jun 12, 2010 9:27 pm
Location: Boise, Idaho
Top

Postby d30gaijin » Tue Jun 22, 2010 6:07 pm

Another strip of foam board insulation glued to the ceiling along with a rough start on 120v electrical.
Image

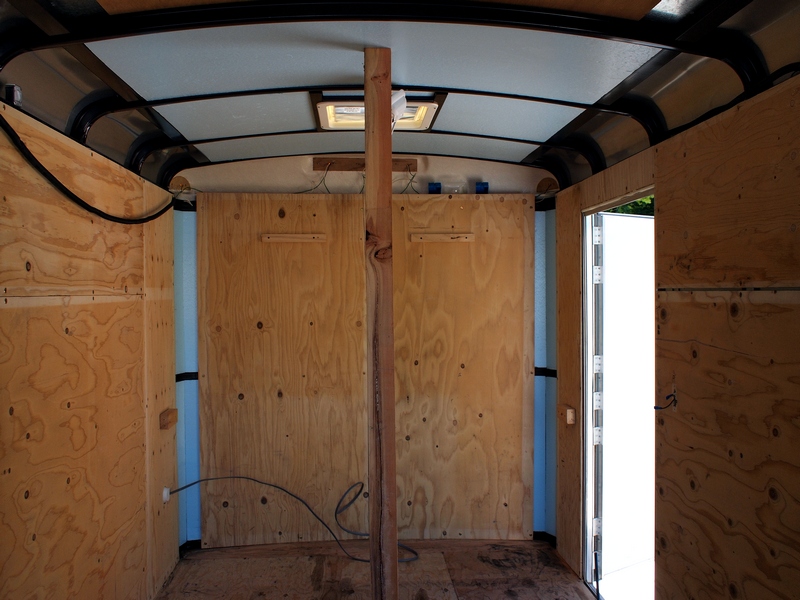
Final strip of foam board installed in the main roof. Now just need to insulate the curves where the roof meets the side walls.
Image

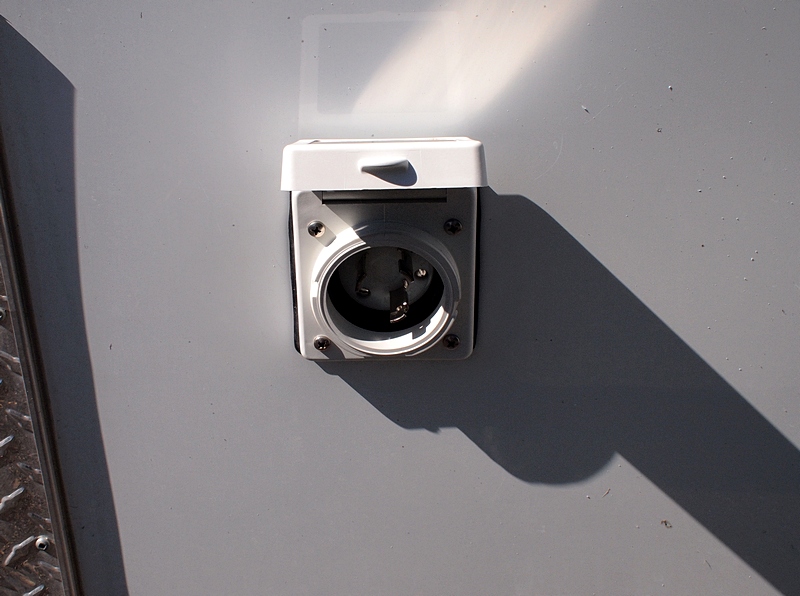
Installed the external plug in for 120v use. Take a lead from me and do not buy what I bought. I just installed a Marinco 30 amp twistlock power inlet in my CT conversion (see photo below) and if I had it to do over I would not have. I bought it from Pacific RV Parts via their web site wherein they claim it is a "Standard RV 30 amp inlet" but it isn't. It is a marine 30 amp inlet and requires a special adapter to convert from the marine 30 amp inlet to a true standard RV 30 amp, or even a 15/20 amp regular home type 120v cord, and the adapter costs $33 to $45 depending upon which type you want. And while the twistlock is a nice unit it isn't what I needed or really wanted. A true standard 30 amp RV inlet is what I wanted but a 20 amp would have, most likely, worked just as well for my meager AC voltage requirements i.e., an 800 watt microwave, an ac to dc converter for running 12v, battery charging, and maybe,down the road, a 5k BTU home window type AC unit.

Learn from one who learned the hard way (it'll work quite well but I could have gotten off a lot cheaper). Another aside is it requires a 2 7/8" hole saw to install. Try to find one of those at your local Lowe's, Home Depot, or Ace. They carry 2 3/4" and 3" but no 2 7/8" hole saw. I ended up buying a 2 3/4" hole saw plus a rotary rasp and that cost me an additional $19 and additional handwork just to make one hole.
Image
Rough initial 120v incoming wire.
Image

Don
Last edited by d30gaijin on Wed Jun 23, 2010 9:28 pm, edited 4 times in total.
User avatar
d30gaijin
Titanium Donating Member
 
Posts: 594
Images: 139
Joined: Sat Jun 12, 2010 9:27 pm
Location: Boise, Idaho
Top

Postby Crazylegs » Tue Jun 22, 2010 9:51 pm

I sometimes wonder if I am posting too much uninteresting stuff although I thought some folks might be interested in what I am doing i.e., I wanted to share my day to day progress.


No you are not posting to much.
Detailed posts are instruction books for us trying to do the same with lots of pics.
:thumbsup:
User avatar
Crazylegs
Teardrop Advisor
 
Posts: 51
Images: 72
Joined: Tue May 04, 2010 12:50 am
Location: Salem Utah
Top

Reality Checks

Postby Engineer Guy » Tue Jun 22, 2010 11:27 pm

A few reality checks to consider are to observe or measure what's on commercial RVs to avoid getting nicked on trivia like the Marine Connector.

Camping World or Leviton Websites or a Big Box Store are some places to reality check. On subsequent Electrical stuff, even a Wholesale Electrical joint might let you see/measure stuff [like a Connector diameter]. For example, a small Electrical Breaker Box can handle '1/2 width' Breakers. So, more Breakers fit a smaller, 60 Amp Box. There's one Square D Breaker [and only one I'm aware of] that's also rated for low voltage DC use. I poke around Recycling places to look at or buy used equipment.

The State Code guy busted my chops at my new House for using a bit of 15 Amp #14 AWG Wire hidden 'down the line' for Lighting connections, even though I had a 15 Amp Breaker with 'oversized' 20 Amp [#12 AWG] Wire at the Breaker Box. I had a guano-load of #12 Wire around, so it used it for a few Lighting circuits. The 'logic' was that some subsequent doofus might see the 20 Amp-compatible Wire at the Breaker Box, and stick in a 20 Amp Breaker as a 15 Amp replacement someday. Then, I would have had a few bits of 15 Amp Wire where no one could have seen it post-Drywall; an arguable fire hazard. So, to protect against the really stupid person who would have switched to a larger Breaker w/o reason in an obvious, well-labeled, 15 Amp Lighting circuit, I had to replace some Wire and make it all #12 AWG. No big deal...

Moral: be sure to use Wire rated the same ampacity as any Connector or Breaker you might install. It's not for Code, it's for 'safety'.

Sorry to hear of the initial Connector hassle, but thanks for posting that design 'event' for others. Pix and stories are always good.
~Reality proceeds with or without your consensus~
User avatar
Engineer Guy
The 300 Club
 
Posts: 480
Images: 118
Joined: Wed Mar 17, 2010 5:19 pm
Location: W. CO
Top

Postby NathanL » Wed Jun 23, 2010 12:29 pm

Just an FYI for someoe else in the future on holesaws. If all you need it to do is cut thru the exterior aluminum and plywood on the inside you can use an adjustable circle cutter in a hand held drill. Like $7 or whatever at harbor freight or more at HD/Lowes but they come in pretty handy for cutting odd size holes up to about 5-6".

Cut the outside then use the same pilot hole and do the inside plywood. Probably get a nice looking hole than a hole saw as well.

http://www.harborfreight.com/adjustable ... 37370.html

They're made for use on a drill press but if you go slow and do light stuff like aluminum and then the plywood separately it will work great.

It's a heavy tool and has a lot of rotating mass so go slow and hold onto the drill well.

Tool rental places will rent odd size hole saws as well for next to nothing.
NathanL
The 300 Club
 
Posts: 371
Joined: Thu Sep 17, 2009 4:41 am
Top

Postby d30gaijin » Wed Jun 23, 2010 7:39 pm

NathanL wrote:Just an FYI for someoe else in the future on holesaws. If all you need it to do is cut thru the exterior aluminum and plywood on the inside you can use an adjustable circle cutter in a hand held drill. Like $7 or whatever at harbor freight or more at HD/Lowes but they come in pretty handy for cutting odd size holes up to about 5-6".

Cut the outside then use the same pilot hole and do the inside plywood. Probably get a nice looking hole than a hole saw as well.

http://www.harborfreight.com/adjustable ... 37370.html

They're made for use on a drill press but if you go slow and do light stuff like aluminum and then the plywood separately it will work great.

It's a heavy tool and has a lot of rotating mass so go slow and hold onto the drill well.

Tool rental places will rent odd size hole saws as well for next to nothing.


Nathan,

Thank you for the heads up on the Harbor Freight hole saw. I will definitely keep that in mind considering I know I will have more holes to cut in the aluminum skin and wood. I have a set of Milwaukee hole saws but they only went to 2 1/4" but I have the arbor so wanted to stick with that brand, but the odd size of the electrical in-let threw me. I think I'll drop by Harbor Freight and pick up one of the adjustable hole saws to have on hand. Can't argue with the price.

Don
User avatar
d30gaijin
Titanium Donating Member
 
Posts: 594
Images: 139
Joined: Sat Jun 12, 2010 9:27 pm
Location: Boise, Idaho
Top

Next

Return to Cargo Trailer Conversions

Who is online

Users browsing this forum: No registered users and 5 guests