silver spaceship

...ask your questions in the appropriate forums BUT document your build here...preferably in a single thread...dates for updates, are appreciated....

Postby aggie79 » Thu Jul 08, 2010 11:31 am

R. W. Alexander wrote:As for the door opening. After laminating the wall sections together I will cut out the door opening on the CNC with a 3/8" wide router bit.


I did similar with my doors. The doors and openings were almost fully routed in the plywood "framing". (I left some tabs to hold the doors in place.) I applied the interior skin and then cut the doors out with a jig saw and used a router with a pattern bit to "clean up" the edges.

Image
Tom (& Linda)
For build info on our former Silver Beatle teardrop:
Build Thread

93503
User avatar
aggie79
Super Duper Lifetime Member
 
Posts: 5405
Images: 686
Joined: Tue Aug 07, 2007 5:42 pm
Location: Watauga, Texas

The walls are done

Postby R. W. Alexander » Thu Jul 08, 2010 10:14 pm

The build is going fast. I set the walls on the trailer to mark where the 1/4-20 T-nuts will go into the frame and then into the walls.

Image

I put the T-nuts on the outside of the walls about 8 inches on center. Then when I put up the walls after putting on the aluminum skin I will put in bolts through the frame and into the wall, then cinch them in tight to the frame. And no bolts showing :twisted:

Image

This photo was taken before I laminated the inner walls to the outer wall/frame panels this morning. I weighed one of the finished panels and it weighed 44 lbs. So about 1.49 lbs. per square foot. A little bit higher than expected(I was hoping for 1.00 to 1.25) but better than 3 lbs. per square foot if I used 1/4 inch ply.
User avatar
R. W. Alexander
Teardrop Master
 
Posts: 108
Images: 77
Joined: Wed Jun 02, 2010 9:45 am

Postby kennyrayandersen » Fri Jul 09, 2010 12:52 am

Nice job on the CNC. I did a bit of CNC programming in college, but I’m SURE they come a long way since then. I was looking into doing a home brew, but it looked like there was a LOT of fiddling to do to get it to run, and the commercial stuff is SO expensive that I lost interest in it. I suppose in a few years the home-brew stuff will be a bit more sophisticated and it might be worth looking into again. Keep up the good work (I especially like the lightening hole filled with foam!)!
User avatar
kennyrayandersen
1000 Club
1000 Club
 
Posts: 1750
Images: 38
Joined: Sun Apr 29, 2007 10:27 pm
Location: TX
Top

Postby GuyllFyre » Sat Jul 10, 2010 5:53 pm

About how long did it take to route that out?
How many hp is the router head in the machine?
What size and type bit do you use? Upcut or downcut spiral? Straight blade?

4x10 is a pretty large CNC machine, took a peek on the website and was surprised at how much they are in that range.

Still, I'm utterly fascinated with your build as you also vacuum bagged the sides? How did you do that? Any pictures of the processes?
Things I have for sale on craigslist:
http://albany.craigslist.org/search/?ar ... catAbb=sss

Things I have for sale on eBay:
http://www.ebay.com/sch/merchant/seansmith
User avatar
GuyllFyre
Donating Member
 
Posts: 209
Joined: Fri May 21, 2010 9:35 pm
Location: Scotia, NY
Top

Postby R. W. Alexander » Sat Jul 10, 2010 8:35 pm

GuyllFyre wrote:About how long did it take to route that out?
How many hp is the router head in the machine?
What size and type bit do you use? Upcut or downcut spiral? Straight blade?

4x10 is a pretty large CNC machine, took a peek on the website and was surprised at how much they are in that range.

Still, I'm utterly fascinated with your build as you also vacuum bagged the sides? How did you do that? Any pictures of the processes?


I have a 3 hp spindle on my CNC and for routing plywood I use a 1/4inch downcut spiral end bit.

As for the size of my machine. I wanted the extra 2 feet so I can do metal which is 4 x10 feet in size. The extra size came in handy since my tear drop was about 9 feet long. My Camaster CNC was not as expensive as some of the better known machines, but I also use it in my business.

The vacuum bagging part of my build does not have any photos(I forgot), but there is another tear builder who did take some photos of his process. All he did was use some plastic sheeting and a shop vac to pull out the air. I was simple and effective.
User avatar
R. W. Alexander
Teardrop Master
 
Posts: 108
Images: 77
Joined: Wed Jun 02, 2010 9:45 am
Top

Postby GuyllFyre » Sun Jul 11, 2010 8:46 am

The vacuum bagging part of my build does not have any photos(I forgot), but there is another tear builder who did take some photos of his process. All he did was use some plastic sheeting and a shop vac to pull out the air. I was simple and effective.


I'll have to look for that. It would be a better way of gluing the sides together than my plan of lots of rocks and debris on top of everything. :)
Things I have for sale on craigslist:
http://albany.craigslist.org/search/?ar ... catAbb=sss

Things I have for sale on eBay:
http://www.ebay.com/sch/merchant/seansmith
User avatar
GuyllFyre
Donating Member
 
Posts: 209
Joined: Fri May 21, 2010 9:35 pm
Location: Scotia, NY
Top

Postby R. W. Alexander » Mon Jul 12, 2010 3:39 pm

GuyllFyre wrote:Still, I'm utterly fascinated with your build as you also vacuum bagged the sides? How did you do that? Any pictures of the processes?


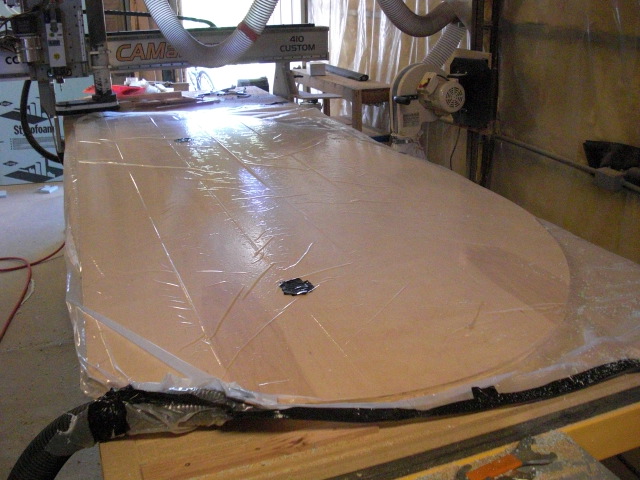
Guy I felt bad that I did not do any photo documentation for you and everyone here at the Teardrop forum on my vacuum bagging process. I have learned a lot from everyone else. So I put one of my walls back into the vacuum bag and took some photos. Also I got this idea from someone else here at the Teardrop forum.

I was going to use my vacuum compressor that I built to hold down parts on my CNC, but the compressor could not pull enough air out fast enough to make a good seal with the cheap plastic bag that I was using. So I got out my "el cheapo" shop vac, and every thing worked fine at that point.

Image
This is what I used to pull the air out.

Image

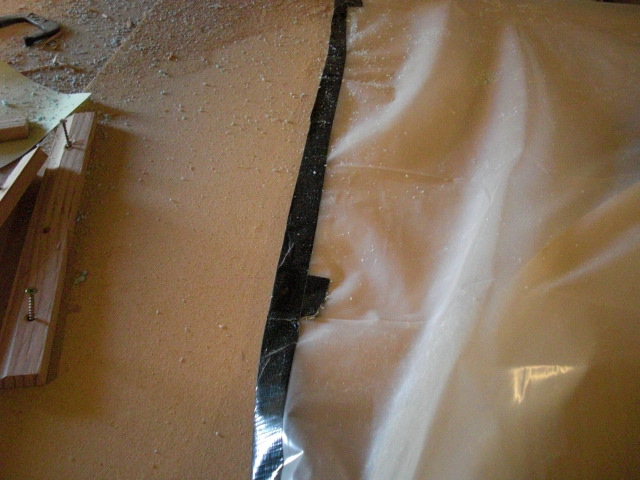
I got a piece of 4 mill plastic 10ft wide by 25ft and some black duct tape from my local B.O.R.G.(that's Big Orange Retail Giant) I cut a piece 10 ft by 10ft, then folded it over in half and put some duct tape on both ends of the now 5 ft sections. So basically I made a big 5 ft by 10ft plastic sandwich bag, with one open end along the 10 ft side.

Then I took the end of the shop vac hose and took 2 small pieces of plywood and duct taped them (No modern civilization can exist without duct tape) to the top and bottom of the shop vac hose. This prevented the plastic from plugging up the intake hose.
Image

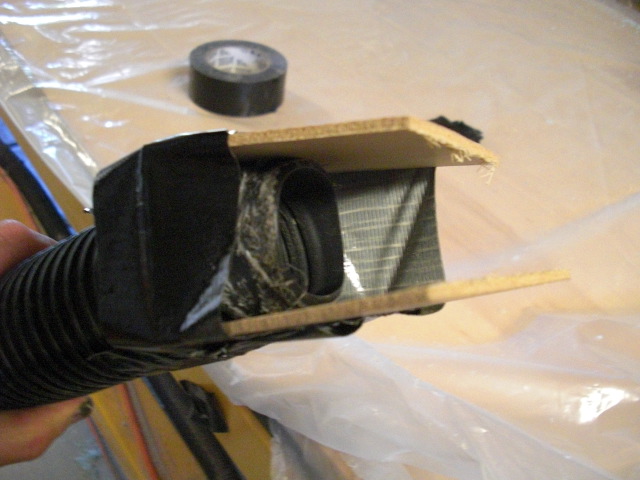
I put this duct tape marvel of cheap engineering into the corner of the plastic bag after I slipped in the wall panel and taped only around the shop vac hose.
Image

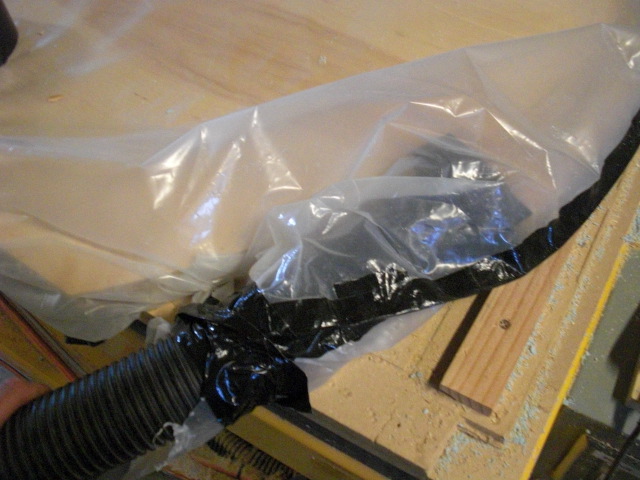
I then tucked under the wall panel the open section of plastic. And turned on the shop vac.
Image

I used some epoxy from Aero marine products http://www.jgreer.com/ because it gave me lots of time(1 hour plus) to get things in place, so I was not rushed in getting thing done before the glue set.
This set up will not pull the walls down so tight that it will squeeze out all the glue and have a glue starved panel, But I will give you a nice flat panel.
User avatar
R. W. Alexander
Teardrop Master
 
Posts: 108
Images: 77
Joined: Wed Jun 02, 2010 9:45 am
Top

Postby GuyllFyre » Mon Jul 12, 2010 4:28 pm

Thanks for showing that! I was having difficulty finding on the forums. It looks simple enough.

What would we ever do without duct tape?
Things I have for sale on craigslist:
http://albany.craigslist.org/search/?ar ... catAbb=sss

Things I have for sale on eBay:
http://www.ebay.com/sch/merchant/seansmith
User avatar
GuyllFyre
Donating Member
 
Posts: 209
Joined: Fri May 21, 2010 9:35 pm
Location: Scotia, NY
Top

Postby Ageless » Mon Jul 12, 2010 5:04 pm

The CNC skin mill at Boeing that does the 747 skins is HUGE!! The main motor is 125 hp.
Strangers on this road we are on; we are not two, we are one - Raymond Douglas Davies
User avatar
Ageless
Platinum Donating Member
 
Posts: 1603
Images: 8
Joined: Tue Aug 04, 2009 8:34 am
Location: Pt. Orchard, WA
Top

Postby TD Beej » Mon Jul 12, 2010 10:58 pm

How long did you need to keep the shop vac running for the setting to occur and not have the wall come apart.

Thanks,
Beej
User avatar
TD Beej
Teardrop Master
 
Posts: 117
Images: 74
Joined: Fri Feb 11, 2005 11:15 pm
Location: Seattle
Top

Postby R. W. Alexander » Tue Jul 13, 2010 8:32 am

TD Beej wrote:How long did you need to keep the shop vac running for the setting to occur and not have the wall come apart.

Thanks,
Beej


2 hours. But I will not move the panel for 24 hours.I have a interesting way of telling when the epoxy is firm enough to turn off the clamping pressure. When I mixed the epoxy for this glue up I did not throw away the mixing cup or stick. I left the mixing stick in the cup and checked on it periodically. When the epoxy had hardened to the stick I knew the epoxy glue had set in the wall section.
User avatar
R. W. Alexander
Teardrop Master
 
Posts: 108
Images: 77
Joined: Wed Jun 02, 2010 9:45 am
Top

Postby Sam I am » Tue Jul 13, 2010 8:28 pm

That's an incredible job of design, engineering and construction! Very good work! You could probably cut out batches of pieces and sell them as kits. It would be like building a giant model plane kit!
User avatar
Sam I am
500 Club
 
Posts: 770
Images: 106
Joined: Sun Jul 02, 2006 9:19 pm
Location: Central PA
Top

Postby R. W. Alexander » Wed Jul 14, 2010 3:03 pm

Sam I am wrote:That's an incredible job of design, engineering and construction! Very good work! You could probably cut out batches of pieces and sell them as kits. It would be like building a giant model plane kit!


That's something to think about ..... but, then it would be a job, and not as fun.

I have built some track kits for the scout pinewood derby. They were 44 ft long tracks that were put together like a big model kit. When they were taken apart and put away, they would fit into a 8 ft by 2 ft x 2 ft box. Here is a video of my grandson's derby last year.
http://www.youtube.com/watch?v=IAAvz4c6KQc
User avatar
R. W. Alexander
Teardrop Master
 
Posts: 108
Images: 77
Joined: Wed Jun 02, 2010 9:45 am
Top

Cutting the Aluminum skins

Postby R. W. Alexander » Wed Jul 14, 2010 3:32 pm

Image

My Aluminum showed up this morning. I got 4 pcs. of .032 x 4 ft. x 10 ft. From a place called Metal by the Inch. I like the way they shipped it. It came in 2 boxes rolled up.


Image


I set one of the plywood wall sections on top of the aluminum, and drew a outline with a fine point magic marker. I let the ink dry and put on a coat of W-D 40, which helps to make the metal cut easier.And keeps the cutting blades sharper longer.
[img]

Image


This photo shows the way I made my notch cuts.
[img]

Image

And the finished skin. It took me about 30 minutes to cut both pieces out.
User avatar
R. W. Alexander
Teardrop Master
 
Posts: 108
Images: 77
Joined: Wed Jun 02, 2010 9:45 am
Top

Hitting the proverbially brick wall.

Postby R. W. Alexander » Thu Jul 15, 2010 2:12 pm

This part of the build was not fun. Aluminum being what it is scratches easily. I tried to be careful but I got a big dent in one panel and assorted long scratches in another. :x

So I tried graining the aluminum in the direction of the major scratchs, but that made it worse. So I flipped over both wall panels so I had new sides to work on l. And this morning I had time to think of a solution that would make the aluminum look better.
I know that eventually there will be lots of scratch marks on this Tear Drop...I can't do anything about that unless I put it in a glass display case.

So if you can't beat them join them.

I took my small palm sander and put on some 240 grit sandpaper and did a small circular pattern in the Aluminum. Then I put on a piece of 3-M green scotch brite pad, and went over the aluminum panel again doing a small circular pattern. My thinking is, when I get more scratches I can then blend them into the aluminum. I will put on some sort of clear metal protector after sanding all of the trailer. Time wise it was less than hour to do both panels.

Image

This is a photo of the finished panel after getting the sanding done, and cutting out the door on the C.N.C.


Image

This is a photo of my solution to my scratch problem.
User avatar
R. W. Alexander
Teardrop Master
 
Posts: 108
Images: 77
Joined: Wed Jun 02, 2010 9:45 am
Top

PreviousNext

Return to Build Journals

Who is online

Users browsing this forum: No registered users and 0 guests