Don & Christi's 6 x 10 Cargo Conversion

Converting Cargo Trailers into TTTs

Postby d30gaijin » Thu Aug 19, 2010 9:01 pm

I realize I am using up a lot of bandwidth here so I will post no more until I make significant progress on my CT conversion.

Our best to all and we'll be following every CT conversion here but we'll be doing it in the background,

Don
User avatar
d30gaijin
Titanium Donating Member
 
Posts: 594
Images: 139
Joined: Sat Jun 12, 2010 9:27 pm
Location: Boise, Idaho

Postby NathanL » Thu Aug 19, 2010 10:43 pm

If people only posted here when they had some work to show there wouldn't be a lot of post....
NathanL
The 300 Club
 
Posts: 371
Joined: Thu Sep 17, 2009 4:41 am

OOPS!

Postby d30gaijin » Fri Aug 20, 2010 8:39 pm

OK, so I was mistaken. I am going to post because I have to make significant progress within the next two weekends on the CT conversion because come h*ll or high water we're going camping in the CT labor Day Weekend... that was decided last night well after I made the previous post. We decided we can't waste a three day weekend sitting around the house. :lol:

So I have to get the galley counter top finished (Formica installed) in order to silicon and secure the sink into place, get a fresh water tank installed under the sink, get the sink plumbed to the fresh water tank, plumb a drain from the sink, learn how to use the porta potty, and get overhead paneling installed to hold the insulation in place, which also means installing the 12v DC wiring for the planned overhead lights.

I have a water heater on order see here: http://www.amazon.com/gp/product/B0006GVO1C/ref=oss_product, and while I may have time to install the water heater, I have doubts as to whether I can get the shower finished in time so, most likely, it will be no shower trip but we should have hot water for a sponge bath, which is fine just so long as we can get away and try out the CT conversion in rough form.

Don
User avatar
d30gaijin
Titanium Donating Member
 
Posts: 594
Images: 139
Joined: Sat Jun 12, 2010 9:27 pm
Location: Boise, Idaho
Top

Postby d30gaijin » Sat Aug 28, 2010 8:50 pm

Deleted because it is better covered with pics below.
Last edited by d30gaijin on Mon Aug 30, 2010 6:02 pm, edited 1 time in total.
User avatar
d30gaijin
Titanium Donating Member
 
Posts: 594
Images: 139
Joined: Sat Jun 12, 2010 9:27 pm
Location: Boise, Idaho
Top

Postby d30gaijin » Sun Aug 29, 2010 10:33 am

Deleted because it made no sense.
Last edited by d30gaijin on Mon Aug 30, 2010 6:01 pm, edited 1 time in total.
User avatar
d30gaijin
Titanium Donating Member
 
Posts: 594
Images: 139
Joined: Sat Jun 12, 2010 9:27 pm
Location: Boise, Idaho
Top

A Progress Update

Postby d30gaijin » Sun Aug 29, 2010 8:16 pm

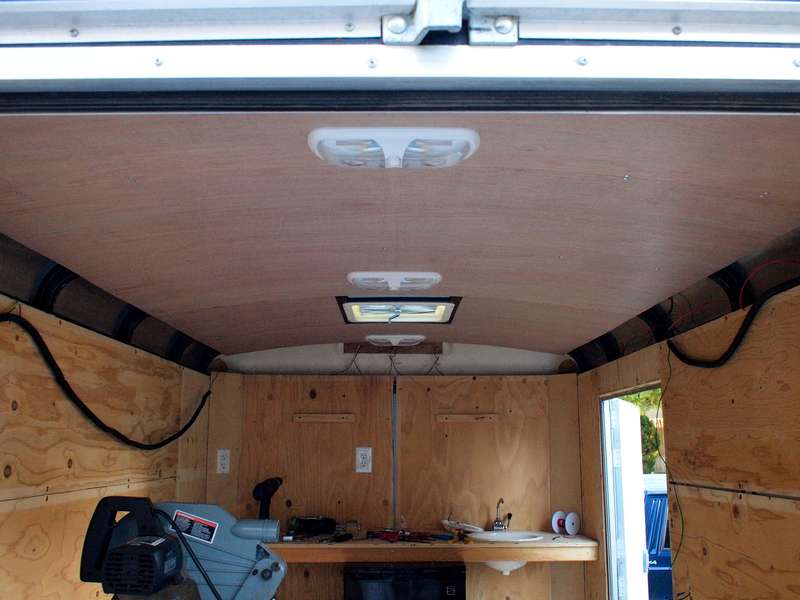
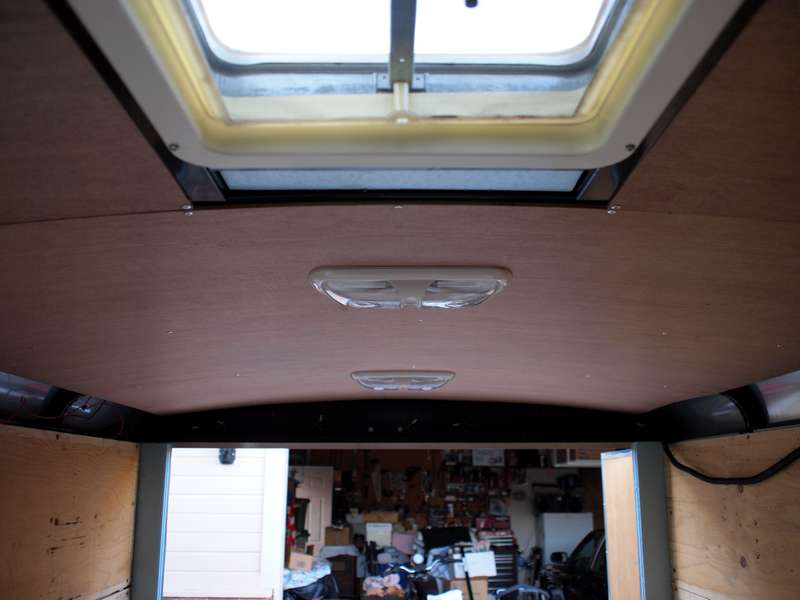
Installed Luan paneling overhead along with three 12v DC light fixtures. If it appears the lights are off center in the ceiling they are not. The manufacturer installed roof vent is off center.
Image
Image

"Let there be light, and there was light."
Image

Installed the Ariston 110v AC water heater and plumbed it to the Thetford RV/Marine shower box, a shower box one normally sees on the outside of an RV but it will work just fine for our interior shower use (the same shower box 8ball_99 used in his CT conversion shower, see here about 2/3rds of the way down the first page of his conversion http://www.tnttt.com/viewtopic.php?t=36422). Interestingly when I did a full pressure hydro test from house water i.e., approximately 60 psi (no typical RV pressure reducer installed in-line at the CT's city water inlet) there were absolutely no leaks in my plumbing but the Thetford shower box leaked where the factory installed flexible outlet line attaches to the shower box. I had to disassemble it to tighten the connection to stop the leak. In the pic below you can see my concern with making splash guards because the water plumbing is right next to the 110v AC electrical. If you're wondering why I didn't install the water heater on the other side of the reefer (where the 12v DC is) it is because I need that space for fresh and gray water tanks that will be plumbed to the sink, and the sink is a hand pump type so I wanted to keep the line run to the tank as short as possible.
Image

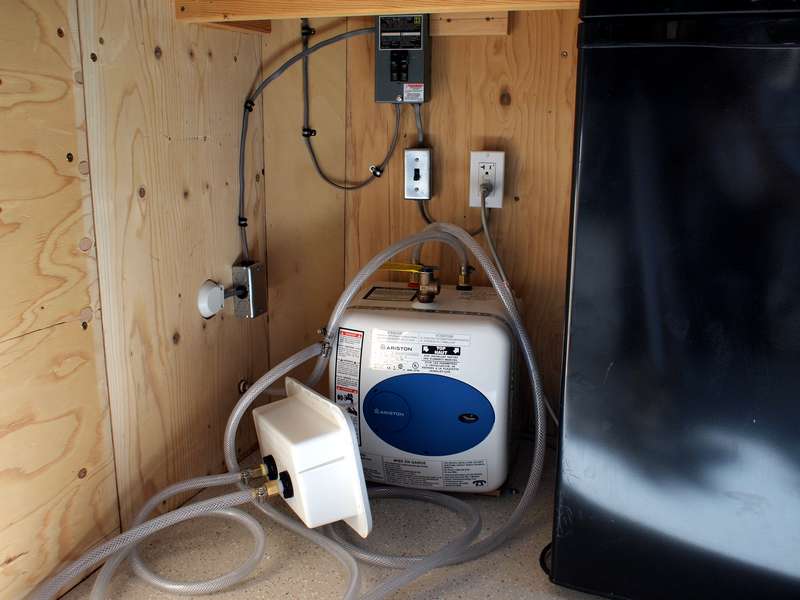
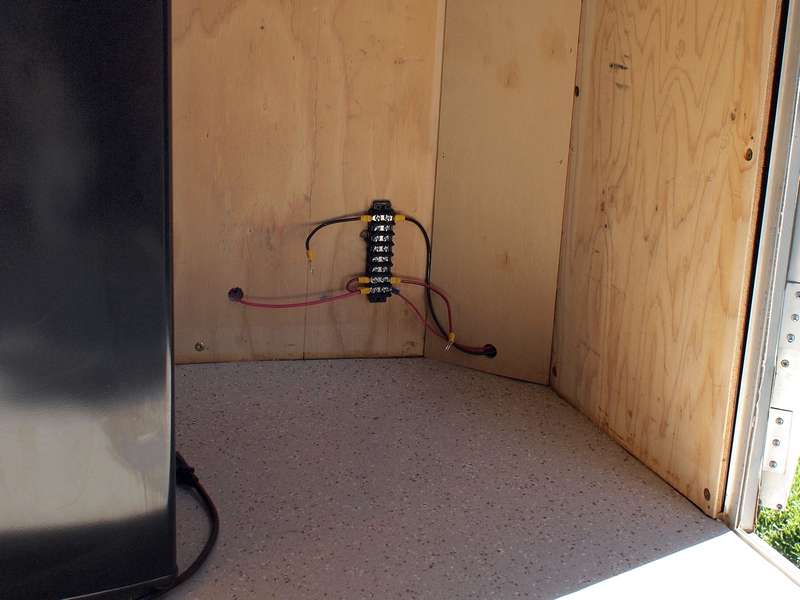
This is a pic of the 12v DC side wiring. It's rather simple in that it will be, at this time, used only for the 12v DC ceiling lights and side door porch light. The positive and negative wires not connected to anything will be the attachment points for a "Battery Tender."
Image

Image

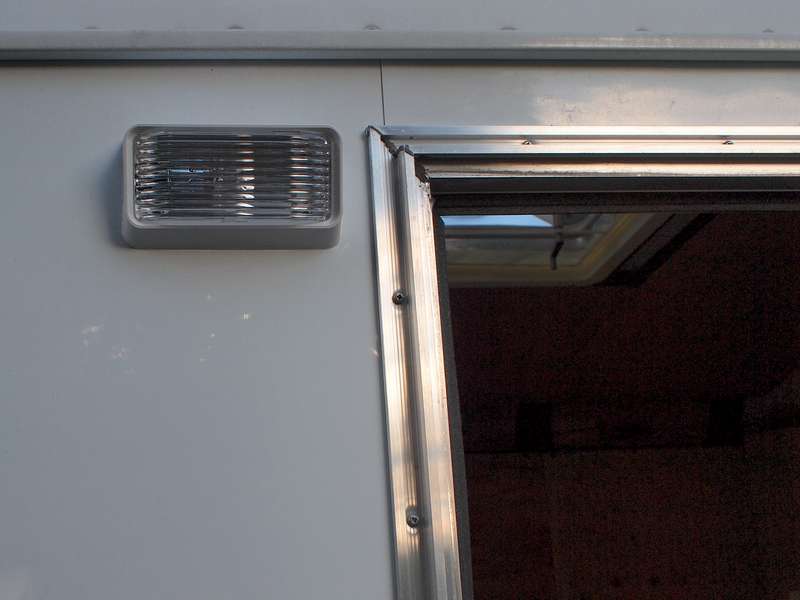
Here's a pic of the porch light, and no it is not installed crooked, it just appears so because of the angle the pic was taken at.
Image

Hopefully more progress to come a bit later this week when the E-Track panels come in allowing me to build the bed platform. I also need to install the Formica on the galley counter top this week so I can get the sink installed/glued in place and plumb it for inlet and drain. In the below pic the galley counter top is cleared of everything and awaiting Formica installation. If I can get the Formic installed and the E-Tracks for the bed we'll be good to go camping Labor Day weekend. The shower enclosure will come later but for now we'll have water (hot and cold) and do Navy showers or use Idaho State campground showers.
Image

Don
Last edited by d30gaijin on Mon Aug 30, 2010 6:34 pm, edited 1 time in total.
User avatar
d30gaijin
Titanium Donating Member
 
Posts: 594
Images: 139
Joined: Sat Jun 12, 2010 9:27 pm
Location: Boise, Idaho
Top

Postby GPW » Mon Aug 30, 2010 1:22 pm

Don, why not just cover over the electrical with some good thick plastic sheeting .. and a few staples ... just a splash guard eh? Not in sunlight so should last forever eh ? Simple in case you have to redo something :o
There’s no place like Foam !
User avatar
GPW
Gold Donating Member
 
Posts: 14920
Images: 546
Joined: Thu Feb 09, 2006 7:58 pm
Location: New Orleans
Top

Postby d30gaijin » Mon Aug 30, 2010 6:09 pm

GPW wrote:Don, why not just cover over the electrical with some good thick plastic sheeting .. and a few staples ... just a splash guard eh? Not in sunlight so should last forever eh ? Simple in case you have to redo something :o


GPW,

I'm looking into some foil type duct tape suggested by Engineer Guy to put over the electrical boxes but your idea of plastic sheeting is an excellent one too. Thanks for the idea!
:thumbsup:

My E-Track mounting rails and parts should be in tomorrow so tomorrow evening after work I can get the bed frame and bed installed.

Don
User avatar
d30gaijin
Titanium Donating Member
 
Posts: 594
Images: 139
Joined: Sat Jun 12, 2010 9:27 pm
Location: Boise, Idaho
Top

Bed Frame

Postby d30gaijin » Tue Aug 31, 2010 9:36 pm

The E-Track hardware came in today and I mounted it, cut the 2x4's for the bed frame and am now ready to buy and cut plywood to finish off the bed frame... tomorrow will see the plywood bought, cut, installed, and Formica counter top installation (taking a day off work to get things done to meet our camping schedule). The entire bed frame is removable/stowable thanks to the E-Track system so as to get the Harley in there when we want to take it along.

Again, many thanks to MegC for posting the info and link (in another thread) to the E-Track system available via Pegasus Racing. This was my first experience ordering form Pegasus Racing and if my experience is any indication, well they are great folks to deal with. They were very helpful with my needs and my on-line order was shipped the next day after placing my order the evening before.

Don

Image
User avatar
d30gaijin
Titanium Donating Member
 
Posts: 594
Images: 139
Joined: Sat Jun 12, 2010 9:27 pm
Location: Boise, Idaho
Top

Postby heritage06 » Tue Aug 31, 2010 10:37 pm

Don, Looking forward to seeing your completed E-Track bed frame. I’ve been following your build a few weeks and decided this weekend to give it a try on my 6 x 12. I already have a ton of E-Track in my trailer. Too bad I have take it all out to insulate. Great job on your build!
User avatar
heritage06
Teardrop Inspector
 
Posts: 6
Images: 8
Joined: Sun Aug 29, 2010 4:25 pm
Location: Alabama
Top

Postby d30gaijin » Tue Aug 31, 2010 11:29 pm

heritage06 wrote:Don, Looking forward to seeing your completed E-Track bed frame. I’ve been following your build a few weeks and decided this weekend to give it a try on my 6 x 12. I already have a ton of E-Track in my trailer. Too bad I have take it all out to insulate. Great job on your build!


Heritage06,

Thank you for the compliments.

I would much prefer to have to take out installed E-track (to insulate) than have to install E-Track anew. It is not a pleasant job trying to tie into existing frame rails to get the support one thinks is needed (nothing seems to line up from one side to the other in my CT). My problem is I believe in "Too much is just enough" in terms of structural support. But then again, once I found the structural support, well I think my drill bits are getting dull... what a pain in the a** drilling into the frame rails to try to just tap a screw. Do they really use self drilling/taping screws to drill and tap in trailer construction? I really need to see that in practical application.

Stay with us and post some info about your build. We all learn from each other.

Don
User avatar
d30gaijin
Titanium Donating Member
 
Posts: 594
Images: 139
Joined: Sat Jun 12, 2010 9:27 pm
Location: Boise, Idaho
Top

Postby azmotoman » Wed Sep 01, 2010 6:25 am

Yes, the self drill/tapping screws are used with a high degree of success. I tried some a few years back in a thin sheet metal application and was very impressed. I would never have thought to, had I not seen them used in attaching the wood to the bed of my truck many years ago. Of course, those were EXTRA heavy duty and the metal cross members were fairly stout, too.

BTW, this build has been interesting to watch. Have fun with it and good luck.
Money isn't everything, but it keeps the kids in touch!
*************
Dinero isn' ¡t todo, pero él mantiene el interés de los niños!
User avatar
azmotoman
Silver Donating Member
 
Posts: 165
Images: 10
Joined: Fri Jul 02, 2010 10:07 am
Location: AZ ('bama transplant)
Top

Postby GPW » Wed Sep 01, 2010 7:32 am

Don , got any more info on that E-track ? ... that looks like cool stuff ... 8)
There’s no place like Foam !
User avatar
GPW
Gold Donating Member
 
Posts: 14920
Images: 546
Joined: Thu Feb 09, 2006 7:58 pm
Location: New Orleans
Top

Postby d30gaijin » Wed Sep 01, 2010 9:39 am

GPW wrote:Don , got any more info on that E-track ? ... that looks like cool stuff ... 8)


GPW,

The E-Track is indeed cool stuff. :eyebrows:
Check it our here:
https://www.pegasusautoracing.com/group.asp?GroupID=ETRACK

Don
User avatar
d30gaijin
Titanium Donating Member
 
Posts: 594
Images: 139
Joined: Sat Jun 12, 2010 9:27 pm
Location: Boise, Idaho
Top

Postby GPW » Wed Sep 01, 2010 11:06 am

Wow!!! That's COOL stuff , and not as expensive as we thought ... :thumbsup:
There’s no place like Foam !
User avatar
GPW
Gold Donating Member
 
Posts: 14920
Images: 546
Joined: Thu Feb 09, 2006 7:58 pm
Location: New Orleans
Top

PreviousNext

Return to Cargo Trailer Conversions

Who is online

Users browsing this forum: onehoser and 6 guests