Help with bending the ply around the curve

Anything to do with mechanical, construction etc

Help with bending the ply around the curve

Postby tcolar » Thu Sep 23, 2010 7:16 pm

My trailer is 5.5' wide and the top section as a 2' radius (see pic bellow)

Now I want to skin that radius, ideally I wanted to cut the 8' long ply board to the 5.5 width but that would mean bending against the grain which it does not seem it wants to do(too stiff).

If I want to go with the grain, which is more flexible, I will have to join two piece of plywood to cover the width (vertical joint) which I really wanted to avoid (might look ugly and harder to seal).

So how do you guys do it ?

Image
User avatar
tcolar
Teardrop Master
 
Posts: 216
Images: 15
Joined: Fri Jul 16, 2010 12:50 am
Location: Kent, WA

Postby b.bodemer » Thu Sep 23, 2010 8:23 pm

My front is a 24" radius also. My birch was 1/4".

I needed three of us to bend it gently into place. We tested it once and then glued it. Just cut off the extra as you plan.

Image

I was all smiles when it came out. It was better than I thought and I switched plans from painting the top to making it a woodie!

Image

Image

Barb
User avatar
b.bodemer
1000 Club
1000 Club
 
Posts: 1608
Images: 328
Joined: Mon May 08, 2006 5:43 pm
Location: Lakewood OH

Postby tcolar » Thu Sep 23, 2010 9:08 pm

Looks nice
Is that against the grain ?
User avatar
tcolar
Teardrop Master
 
Posts: 216
Images: 15
Joined: Fri Jul 16, 2010 12:50 am
Location: Kent, WA
Top

Postby tcolar » Thu Sep 23, 2010 9:43 pm

I've tried with a scrap against the grain ... and it seem it will work, although at full width it will take LOTS of muscle (and tie down straps)

Questions:
- I do a sandwich construction, so I figure the "inside skin", which i will do first will be much more trouble because i can't use tie down straps there .... would "molding" the shape on the outside and letting it seat there for a day or two help .... in other word, if I leave the ply against the radius for 48 hours will it "take"/keep that shape ?

- Are there techniques to make the ply a bit more flexible (making it wet ?)

Image

Image
User avatar
tcolar
Teardrop Master
 
Posts: 216
Images: 15
Joined: Fri Jul 16, 2010 12:50 am
Location: Kent, WA
Top

Postby dh » Thu Sep 23, 2010 10:43 pm

One product too look at is bending birch. You can get it in 4'x8' or 8'x4'.

The 4'x8' makes a "barrol" bend and the 8'x4' makes a "column" bend. All the plys have the grain running the same way.

I'm having a hard time finding the 8'x4' though.
Ignorant doesn't know any better, Stupid knows better but does it anyway.

My build page: http://www.tdbuildlog.blogspot.com/
User avatar
dh
Gold Donating Member
 
Posts: 1647
Joined: Fri Aug 14, 2009 7:08 pm
Location: North East Arkansas
Top

Postby dh » Thu Sep 23, 2010 10:45 pm

Oh ya, I almost forgot, on the inside, why not use 1/8" material???
Ignorant doesn't know any better, Stupid knows better but does it anyway.

My build page: http://www.tdbuildlog.blogspot.com/
User avatar
dh
Gold Donating Member
 
Posts: 1647
Joined: Fri Aug 14, 2009 7:08 pm
Location: North East Arkansas
Top

Postby NathanL » Thu Sep 23, 2010 10:50 pm

Water
Hot Water
Soaking a towel with hot water and soak the plywood


If all else fails you can try ammonia. You gotta be really CAREFUL with ammonia because it literally breaks down the bond of the fibers in the wood instead of softening them like water. You can spray ammonia on plywood on one side and you put enough of high enough concentration it will start to curl on it's own...so be warned.
NathanL
The 300 Club
 
Posts: 371
Joined: Thu Sep 17, 2009 4:41 am
Top

Postby bobhenry » Fri Sep 24, 2010 4:19 am

you can pretreat a whole sheet by wetting it down real good and wrapping it in black plastic on a good sunny day. Let set for a few hours then apply wet.

I never knew about the ammonia learned a new trick maybe ????
Growing older but not up !
User avatar
bobhenry
Ten Grand Club
Ten Grand Club
 
Posts: 10368
Images: 2623
Joined: Fri Feb 09, 2007 7:49 am
Location: INDIANA, LINDEN
Top

Postby madjack » Fri Sep 24, 2010 8:15 am

...cover ply with a couple of layers of toweling and poor hot, boiling water onto towel and allow to stand to it starts to cool, pick up and bend around radius and allow to sit for a day..........
madjack 8)
...I have come to believe that, conflict resolution, through violence, is never acceptable.....................mj
User avatar
madjack
Site Admin
 
Posts: 15128
Images: 177
Joined: Thu Dec 02, 2004 5:27 pm
Location: Central Louisiana
Top

Postby Mary K » Fri Sep 24, 2010 9:14 am

I used 1/8" Luan on the inside

Do what ya got to do to make it stick. LOL!!
Image

Image

I used 1 layer of 1/8" luan on exterior and covered it with another layer of 1/8" birch using the strap method. Barb showed me how to do this also. :)

Image

I let it over hang and trimmed it with a router.

Good Luck!!
Mary K

I don't know half of you half as well as I should like; and I like less than half of you half as well as you deserve. Bilbo Baggins
User avatar
Mary K
6000 Club
6000 Club
 
Posts: 6425
Images: 44
Joined: Wed Aug 02, 2006 3:07 pm
Location: Florida, Pensacola
Top

Postby Miriam C. » Fri Sep 24, 2010 11:01 am

:thumbsup: 
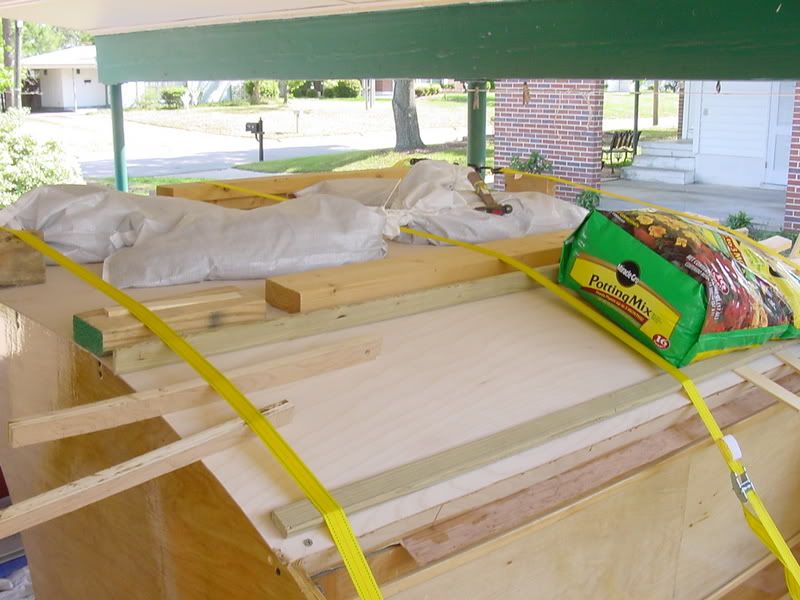
Did mine like Barb's. If you put it vertical you will need to seal the seam like that....The biggest issue I had was a lake on top where I put boards across the seam. Was easier though.
“Forgiveness means giving up all hope for a better past.â€
User avatar
Miriam C.
our Aunti M
 
Posts: 19675
Images: 148
Joined: Wed Feb 15, 2006 3:14 pm
Location: Southwest MO
Top

Postby Sam I am » Fri Sep 24, 2010 11:13 am

Instead of 1/4" ply, you could use two layers of 1/8" Baltic birch. The 1/8" bends easily, and you can stagger the seams with the second layer. I did that on mine and it worked well. The 1st layer is glued and screwed to the spars, and the 2nd is glued over the 1st so no fasteners show.
User avatar
Sam I am
500 Club
 
Posts: 770
Images: 106
Joined: Sun Jul 02, 2006 9:19 pm
Location: Central PA
Top

Postby tcolar » Fri Sep 24, 2010 11:15 am

Sounds good, thanks for all the tips.
Probably gonna do that this w/e ... might be the "last" major step !
User avatar
tcolar
Teardrop Master
 
Posts: 216
Images: 15
Joined: Fri Jul 16, 2010 12:50 am
Location: Kent, WA
Top

Postby Weirdnerd » Sun Sep 26, 2010 3:28 pm

I find interesting that everybody starts bonding the exterior skin, I went the opposite way, bonded the interior skin first, somehow felt logical, because it gave me the freedom to put all the wiring on the final locations without having to crawl inside and drill impossible holes on concave locations, also, nobody warned me about the "impossibility" of bending 1/4 of an inch luan plywood sidewise, the interior skin gave me some trouble, and practiced cursing in several languages, the one that actually made me sweat was the exterior skin, and I had to set it lenghtwise, that way, it didn't shatter when I put the last nail, had to make a seam, but turned out ok.
This is my build thread...
Weirdnerd's teardrop
User avatar
Weirdnerd
The 300 Club
 
Posts: 318
Joined: Thu Sep 23, 2010 3:03 pm
Location: Denver, Co ( USofA)
Top

Postby Senior Ninja » Mon Sep 27, 2010 2:22 am

What Nathan l. said.
We placed a beach towel over the panel to be bent and poured the entire contents of boiling water over the panel. We fastened one end to the hinge beam and weighted the other. We came back and hour later and the panel
fit perfectly.
We also had used eighth plywood on the inside first. Placing the insulation was much easier than the other way. We cut up a hot water heater insulation blanket to use in the curved areas.
Steve
Building the TD was the best thing I ever made.
Senior Ninja
Donating Member
 
Posts: 608
Joined: Fri Apr 28, 2006 4:16 pm
Location: Bakersfield, Kahlifornia
Top


Return to Teardrop Construction Tips & Techniques

Who is online

Users browsing this forum: No registered users and 8 guests