MyAway build - Updates for space usage & organization

...ask your questions in the appropriate forums BUT document your build here...preferably in a single thread...dates for updates, are appreciated....

Postby S. Heisley » Thu Oct 14, 2010 5:42 pm

Aggie79 wrote:

I know you'll really enjoy the PC sander. I've had mine for many years and it keeps on humming along. If you have a shop vac, you may want to get an adapter (or a hose from PC) to connect the sander to the shop vac. I bought the hose about a year ago and it almost completely eliminates any dust while sanding.


Thanks, Tom. I am enjoying using it. The capture canister that it comes with holds so many particles that I've only had to empty it once per day. (My shop vacuum is way too noisy to use much....It drives me crazy, even when wearing ear plugs. :fb I suppose that'll be another purchase that I'll need to make...but it's not in the budget yet. $> )
User avatar
S. Heisley
Super Lifetime Member
 
Posts: 8869
Images: 495
Joined: Mon Sep 17, 2007 10:02 am
Location: No. California

Postby garret » Sun Oct 17, 2010 8:20 am

S. Heisley wrote:After reading what Prem wrote, I figured the waxed paper wouldn’t work for my fiberglass application. Also, I am using Doc Rot’s Lay-up & Laminate epoxy which might not mix well with acetone. However, the Lay-up & Laminate is a soap and water clean-up (if washed off while wet) yet it appears to be as good as any epoxy resin I’ve ever seen used, once it is dry.

So, rather than test first, I went at it with thought. This second outcome was a lot better than the first. Here is what I did:

1. I lightly sanded the previous application; then, vacuumed it to remove loose particles.
2. I cut the sheeting of loose fiberglass particles into pieces that would fit my individual sections, and carefully set them aside.
3. I brushed the surface with a layer of the Lay-up & Laminate and lightly pressed the cut sheeting in place, using a moistened paper towel. Because the paper towel was moistened, it did not stick or react with the loose particles or the epoxy resin.
4. Next, I wiped a spatula with a moist paper towel and began making chopping motions (sort of like mincing sliced onions) to break up air bubbles and further attach the fiberglass to the surface. Using only the end of the spatula in a chopping motion, the fiberglass particles stayed in place and did not attach themselves to the spatula.
5. After 4 hours of drying time, I applied another coating of the Lay-up & Laminate over top. Since it was a small area and I was being a bit lazy, I used a wet sponge applicator. Near the end, the sponge started to break up but the pieces are small and will be covered with paint…no big deal.

Below is a picture of the outcome, still wet from the last application of epoxy.

Image

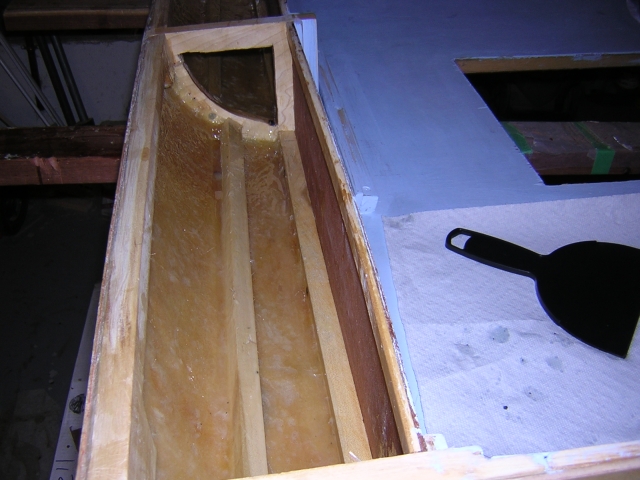
While the old, sanded errors are still evident in the white spots, most of them are now evened out and, when it is sanded again and then painted, I think it will look a lot better than it would have before.


Looks great! :thumbsup:
garret
Teardrop Inspector
 
Posts: 1
Joined: Sun Oct 17, 2010 8:10 am

Postby S. Heisley » Sun Oct 17, 2010 11:39 am

Welcome and thanks, Garret. :D I'm honored to be the recipient of your first posting on the forum.

When you get a moment, the folks here always like to see an introduction and read a little bit about you in the Newbies, introduce yourself section, here:

http://tnttt.com/viewforum.php?f=40

- - - - - -

To others:

There may be a slight delay on painting the outside while I wait for my replacement primer paint to be shipped. (I discovered that the primer that I was planning to use can't be used inside or near the gas water heater and community rules and other issues don't allow me to paint in the driveway.) Meanwhile, there are lots of other things I can do. :whistle:
User avatar
S. Heisley
Super Lifetime Member
 
Posts: 8869
Images: 495
Joined: Mon Sep 17, 2007 10:02 am
Location: No. California
Top

Postby S. Heisley » Sun Oct 31, 2010 12:33 pm

Patiently awaited, the primer finally came.
Want of warmth to use it is driving me insane!

To have all well would be heavenly!
Tomorrow it will be seventy!
Good forecast was bestowed on me.
Painting weather which I shall soon see!

Today, the trailer will not be seen.
For tonight is Happy Halloween!

Image :Smile:
User avatar
S. Heisley
Super Lifetime Member
 
Posts: 8869
Images: 495
Joined: Mon Sep 17, 2007 10:02 am
Location: No. California
Top

Postby Duckfenderly1 » Sun Oct 31, 2010 11:43 pm

I cant see whats not to be seen on a night like halloween. To be seen on such a night would only be a sheen and to see a sheen would only be the lights of halloween! I love your build so far!!! your doing great in my eyes!!!
Duckfenderly1
Teardrop Inspector
 
Posts: 24
Joined: Sun Oct 17, 2010 10:21 pm
Top

Postby S. Heisley » Sun Oct 31, 2010 11:51 pm

Oh, Duckfenderly1! What a laugh you gave me! Thanks! :lol: :applause: :D
User avatar
S. Heisley
Super Lifetime Member
 
Posts: 8869
Images: 495
Joined: Mon Sep 17, 2007 10:02 am
Location: No. California
Top

Postby S. Heisley » Mon Nov 01, 2010 9:57 pm

I’ve got 4 good weather days and I am using them! The first layer of primer went on the roof’s eve underside and on most of the small parts today. I don’t plan on mowing or turning on the sprinklers until these guys have 4 coats (2 primer & 2 top coats) of paint!

Image
The lifting roof is the hardest because of the sharp curves on the eve and because it is so hard to flip. I won’t start painting the cabin until the underside of the lifting roof is totally done. This is because the lifting roof has to rest on the cabin when I am flipping it over and I don’t want to mess up either the paint on the cabin or the paint on the lifting roof.

Image
I already got a little messy. I should have covered more of the ceiling. Ah, well….The ceiling was going to need another coat of paint anyway.

That’s all for now, trailer fans. I’ll post more when I think have something worth showing.
User avatar
S. Heisley
Super Lifetime Member
 
Posts: 8869
Images: 495
Joined: Mon Sep 17, 2007 10:02 am
Location: No. California
Top

Postby Steve_Cox » Tue Nov 02, 2010 6:57 am

Sharon,

Enjoying the latest installment of your build journal, and the comments by your fans. :thumbsup:

This photo was a keeper, thanks :lol:

Image
Steve
User avatar
Steve_Cox
4000 Club
4000 Club
 
Posts: 4903
Images: 196
Joined: Sun Apr 03, 2005 8:46 am
Location: Albuquerque New Mexico
Top

Postby aggie79 » Tue Nov 02, 2010 11:39 am

:thumbsup: Looking great as usual Sharon. It's got to be good feeling to see the finishes going on.

BTW, did I spy some blue painters tape?

Tom
Tom (& Linda)
For build info on our former Silver Beatle teardrop:
Build Thread

93503
User avatar
aggie79
Super Duper Lifetime Member
 
Posts: 5405
Images: 686
Joined: Tue Aug 07, 2007 5:42 pm
Location: Watauga, Texas
Top

Postby myoung » Tue Nov 02, 2010 2:25 pm

Glad to see progress resume. For some reason, I don't get email notices of your updates, hence the reposting.
Mike Young
build thread: viewtopic.php?t=40459
User avatar
myoung
500 Club
 
Posts: 644
Images: 250
Joined: Sat Aug 07, 2010 11:21 am
Location: Nipomo, CA
Top

Postby S. Heisley » Tue Nov 02, 2010 6:18 pm

Aggie79 wrote:

BTW, did I spy some blue painters tape?


:lol: Yes, Tom, you did and I added more where I smeared paint yesterday. Some may call that “locking the barn after the horse was stolenâ€
User avatar
S. Heisley
Super Lifetime Member
 
Posts: 8869
Images: 495
Joined: Mon Sep 17, 2007 10:02 am
Location: No. California
Top

Postby Shadow Catcher » Tue Nov 02, 2010 8:35 pm

Thank you, it gives me more an idea of the whole. Remember you see the details and know how it all fits together. looks good and one day hope to see it in person.
User avatar
Shadow Catcher
Donating Member
 
Posts: 6008
Images: 234
Joined: Sat Apr 11, 2009 8:26 pm
Location: Metamora, OH
Top

Postby Miriam C. » Tue Nov 02, 2010 11:09 pm

Steve_Cox wrote:Sharon,

Enjoying the latest installment of your build journal, and the comments by your fans. :thumbsup:

This photo was a keeper, thanks :lol:

Image


Absolutely! :rofl2: Love it and your build. You certainly have a lot done and a big job! :thumbsup:
“Forgiveness means giving up all hope for a better past.â€
User avatar
Miriam C.
our Aunti M
 
Posts: 19675
Images: 148
Joined: Wed Feb 15, 2006 3:14 pm
Location: Southwest MO
Top

Postby S. Heisley » Wed Nov 03, 2010 9:18 am

Thanks, Auntie M. I bit off a lot for a first build; but, so far, it's coming together pretty nicely. ...Well, if you don't count the dog fur and break-dancing bugs in the paint.... :lol:
User avatar
S. Heisley
Super Lifetime Member
 
Posts: 8869
Images: 495
Joined: Mon Sep 17, 2007 10:02 am
Location: No. California
Top

Postby Ageless » Wed Nov 03, 2010 9:34 am

Dog fur and bugs? Not a problem . . .just tell folks it's yer special 'textured' finish

:lol:
Strangers on this road we are on; we are not two, we are one - Raymond Douglas Davies
User avatar
Ageless
Platinum Donating Member
 
Posts: 1603
Images: 8
Joined: Tue Aug 04, 2009 8:34 am
Location: Pt. Orchard, WA
Top

PreviousNext

Return to Build Journals

Who is online

Users browsing this forum: No registered users and 4 guests