DD, on the road to LCG

...ask your questions in the appropriate forums BUT document your build here...preferably in a single thread...dates for updates, are appreciated....

Postby High Desert » Sun Jul 25, 2010 2:06 am

Looking really good Gary, the pics helped to see it as a whole. I like your design, it's going to be a real beauty :thumbsup:
Shaun

"it's not the years honey, it's the mileage"
High Desert
Platinum Donating Member
 
Posts: 8780
Images: 27
Joined: Wed Apr 08, 2009 1:46 pm
Location: SW Washington state

Postby jkidd6339 » Tue Sep 21, 2010 12:06 am

Congratulations I saw the photos!!
User avatar
jkidd6339
Teardrop Master
 
Posts: 198
Images: 1
Joined: Sat Jan 24, 2009 1:16 am

Postby aggie79 » Wed Nov 24, 2010 10:03 am

Hi Gary,

How's the DD coming along? I can't wait to see your next build photos.

Take care, Tom
Tom (& Linda)
For build info on our former Silver Beatle teardrop:
Build Thread

93503
User avatar
aggie79
Super Duper Lifetime Member
 
Posts: 5405
Images: 686
Joined: Tue Aug 07, 2007 5:42 pm
Location: Watauga, Texas
Top

Postby StPatron » Wed Nov 24, 2010 11:50 pm

Thanks for your interest, Tom.

I checked the date of my last post,,, July. Where did the time go? I spent six weeks in Arizona working on a friends house and then had some lake time afterwards. When I got back home I was anxious to get cracking on my build again and seemed to run into one roadblock after another. Finally, I decided I just needed to step away and think about it. That worked and I'm back at it again.

My focus has shifted somewhat, however. Instead of putting the finishing touches on the interior now, I want something campable. I was disappointed that LCG rolled around and I didn't make it, that was my original goal. Now, the goal is Beavers Bend.

So, I've resumed working on the electrical raceway and started the galley area. I began installing insulation at the aft bulkhead today and hope to button up that area next. I salvaged some of the drawers from the pop-up and have been refinishing them and also started building the cooler slide-out tray. The design of the air conditioner install will be a bit tricky and I've been researching the build threads here, lotza great ideas.

Not much to report and nothing picture worthy at this time, but hopefully soon. We are supposed to get hit with a cold blast tomorrow, might use that time for planning and research, then back out to the shop again.

PS: Congrats on your football win a few weeks ago. I'm pretty sure I heard a loud roar coming from your way! :lol:
User avatar
StPatron
Donating Member
 
Posts: 748
Images: 297
Joined: Tue Dec 15, 2009 8:38 pm
Location: OK
Top

Postby aggie79 » Sat Nov 27, 2010 7:45 pm

Gary,
It's good to here that you're back working on the Diner. I know firsthand about losing focus. While I'd love to be done this is a hobby and I want to keep the build enjoyable. Looks like Beaveer's Bend will be the first outing for both of our campers.

Take care, Tom
Tom (& Linda)
For build info on our former Silver Beatle teardrop:
Build Thread

93503
User avatar
aggie79
Super Duper Lifetime Member
 
Posts: 5405
Images: 686
Joined: Tue Aug 07, 2007 5:42 pm
Location: Watauga, Texas
Top

Postby Darren » Sun Nov 28, 2010 2:21 pm

Love those handles! Great build and hope to camp with you next summer.

Image

Darren
Image
User avatar
Darren
the camper formerly known as Victor Star
 
Posts: 1356
Images: 161
Joined: Sat Dec 03, 2005 12:09 am
Location: Shawnee, Kansas (KC)
Top

Postby YuGun » Sun Nov 28, 2010 3:25 pm

Thanks for sharings,
İt is going well...
:thumbsup:
User avatar
YuGun
The 300 Club
 
Posts: 445
Joined: Sun Apr 11, 2010 1:25 pm
Location: Turkey
Top

Postby StPatron » Mon Nov 29, 2010 12:33 pm

Thanks, Darren. I've always admired your build, the sidewalls are gorgeous. Looking forward to meeting you and seeing your trailer.

YuGun: Greetings! You are very busy too. Best wishes.

Shaun and jkidd: Thx for the compliments, guys.
User avatar
StPatron
Donating Member
 
Posts: 748
Images: 297
Joined: Tue Dec 15, 2009 8:38 pm
Location: OK
Top

Postby StPatron » Thu Dec 02, 2010 12:58 am

I took a short time-out from my camper build to create a couple of cat scratching posts/perches, one for my cat Dewey and one for my Mom's cats. Dewey just LOVES it! He not only naps on top but also stretches on the post or grabs it with all fours and circles it! He's never been a "furniture scratcher" but can't seem to resist digging his claws into the sisal rope and carpeted column.

I hope you don't mind if I outline on this build thread how I constructed these, maybe some will find it a worthwhile project. These are quick and easy to build and much cheaper than the store-bought ones.

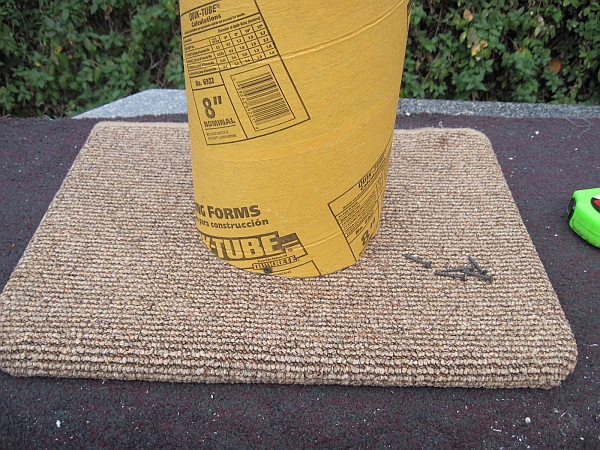
For the bases I used pieces of laminate countertop cut-outs, free from the dumpster bin at the laminate counter shop. Yeah, I'm addicted to that place. :lol:

I sawed the cut-outs in half, making two bases, and rounded the corners. Then, using my 1/4 crown stapler w/3/4" staples, I tacked either regular carpet or rubber-backed rugs to them. The rugs worked better as they were more flexible. I found some at Goodwill, 99 cents for a set. For the top perch area, I used a smaller platform.

For the column I used an 8" Quickcrete sonotube, HD around $7. One tube will make two perches. I cut two plywood circles and fastened them inside the bottom/top of the tube and then screwed each to the base/platform.

I used a carpet scrap to wrap the lower portion of the column, the same staples work good here and actually get a good bite when powered into the cardboard sonotube. Then, I tacked down one end of the sisal rope and wrapped the column, stapling every coupla wraps, finally finishing the top with more carpet. 100' of sisal (two pkgs.) was used for the wrap.

I had considered adding sandbags to the column interior, cats don't trust a wobbly post, but the weight of the base seems sufficient without them. I should also mention that sisal rope is the recommended rope for cat scratching posts and there are several varieties, some with more odor than others. I used Harbor Freight sisal (which has a stronger odor, but is cheaper than WM, HD or L) on Dew's column and the more expensive sisal on the one I made for Mom. She reports that her two cats like their posts also.

I'm fairly pleased with the results and Dew doesn't seem to mind that the corners aren't perfect.

Image

Image
User avatar
StPatron
Donating Member
 
Posts: 748
Images: 297
Joined: Tue Dec 15, 2009 8:38 pm
Location: OK
Top

Postby StPatron » Thu Dec 02, 2010 1:58 am

Back to the camper build.

I insulated the lower aft bulkhead with 3/4" pink foam panels and covered it with salvaged paneling, left-overs from my house renovation. The air conditioner will be located underneath my desk area, so I made the cut-out for it and wired a nearby electrical outlet in the interior. The bottom of the air conditioner has multiple areas for drainage, so a drip pan will need to be constructed later.

Image

I salvaged the drawers from the pop-up and will use them. Here's one of the drawers before refinishing.
Image

Poor picture, will take a better shot later. I found this at L several yrs. ago on end-of-season close-out and grabbed it. It's an accessory to a full-sized grill, a side-burner. It has a spark ignitor and a propane cannister screws into it from below. I plan to mount it on a slide-out, below the counter and above the a/c area. The cannister will fit when slid in, no removal needed. I need to purchase some bolts that won't interfere with the slider, the ones I have are round head and don't work. Sturdiness of the slider-mounted burner is something I question now. If it winds up floppy I'll come up with a different approach.

There's also a bit of my countertop showing in that pic. I've decided to use laminate flooring. I picked this up at Habitat for Humanity and hope it will work out ok. I like the tile look without the weight. I tested it out with 1/4" ply as a base and it doesn't flex with my countertop depth of 23" and multiple divider supports underneath. Floor laminate isn't recommended for countertop usage but with reasonable care I think it will be fine. No cutting board, no huge water spills, etc. I'll add Titebond to the joints for insurance.

Image
The slide-out tray for the Igloo is roughed-in, along with the lower bin for the Rubbermaid Dutch Oven box, with drawers above.

Image
A close-up shot of the counter-top flooring laminate.
Image
I decided, for the benefit of less weight, to use sandwich construction for the lower galley divider walls but I question that decision now for the multiple drawer areas. Installing multiple sliders for stacked drawers requires the installation of horizontal framing, adding to the weight and complexity of the build. 1/2" ply dividers might be a better option, they would be thinner, that could change.
User avatar
StPatron
Donating Member
 
Posts: 748
Images: 297
Joined: Tue Dec 15, 2009 8:38 pm
Location: OK
Top

Postby aggie79 » Thu Dec 02, 2010 9:34 am

Gary,

My cat has read your thread and has put in a request for me to build her a scratching post like the one you constructed. The sonotube is a great idea. The store-bought scratching posts aren't large enough and they tip over too easy.

I was glad to see you post pictures of your cabinets and cabinet drawers. I should be to that stage shortly on my build, but have never built any cabinets before. (Amazingly enough, I worked in a large cabinet shop one summer - several decades ago. The only piece of equipment I operated was a panel saw. The place was so big that I never got to the area where the cabinets were assembled to see how they go together.)

StPatrón wrote:PS: Congrats on your football win a few weeks ago. I'm pretty sure I heard a loud roar coming from your way! :lol:


I'll have to admit that I did holler alot while watching the game. A few years back, I was at the game where OU spanked A&M by a score of 77-0, and am thankful that the Aggies seem to be competitive again.

Take care, Tom
Tom (& Linda)
For build info on our former Silver Beatle teardrop:
Build Thread

93503
User avatar
aggie79
Super Duper Lifetime Member
 
Posts: 5405
Images: 686
Joined: Tue Aug 07, 2007 5:42 pm
Location: Watauga, Texas
Top

Postby S. Heisley » Thu Dec 02, 2010 10:05 am

Hi, Gary:

The scratching post came out great! :thumbsup: Glad to see you are back to working on your build. If you have a warm, sheltered place, winter is a much better time to build than in the summer-hot heat.
User avatar
S. Heisley
Super Lifetime Member
 
Posts: 8866
Images: 495
Joined: Mon Sep 17, 2007 10:02 am
Location: No. California
Top

Postby StPatron » Fri Dec 10, 2010 1:02 am

aggie79 wrote:The store-bought scratching posts aren't large enough and they tip over too easy.


I agree and they are high dollar! :shock:

The day after I posted the scratching post pics, I was at HD and saw this truck in the parking lot. Now, these would make some honker posts!
Image

aggie79 wrote:I was glad to see you post pictures of your cabinets and cabinet drawers. I should be to that stage shortly on my build, but have never built any cabinets before.


Best to not follow my examples. I went with sandwich construction,,, was familiar with it, impressed by the strength to weight ratio and had the material on-hand. With that technique, total width is sacrificed and if you are building stacked drawers,,, the weight savings is probably close to nil as more horizontal framing members are required. If I were to do it again, I'd use plywood dividers like Planovet and others have done.
User avatar
StPatron
Donating Member
 
Posts: 748
Images: 297
Joined: Tue Dec 15, 2009 8:38 pm
Location: OK
Top

Postby StPatron » Fri Dec 10, 2010 1:23 am

S. Heisley wrote:Hi, Gary:

The scratching post came out great! :thumbsup: Glad to see you are back to working on your build. If you have a warm, sheltered place, winter is a much better time to build than in the summer-hot heat.


Thank you, Sharon.

I started the tear-down of the pop-up in miserably cold weather, then decided I would HAVE to move the build inside once the chassis was prepped. Luckily I have a large shop building but it is packed sky high with tools and toys. So,, I rearranged the shop and then shoehorned the chassis inside. That left me with a narrow path on the curbside wall and no path at the rear bumper. To get from one side of the shop to the other required stepping onto the future galley area and then back down the other end. Must've made a million trips, no need for a stair-stepper exercise machine here! :lol:

I would have preferred building my walls full-length, but have had to leave the galley sidewalls for later so I can move about the shop. I don't see it as roadblocks, just a few challenges.

The summer temps here were brutal, hottest that I can recall, I had the fans going full blast while working on the camper interior. Shop temps lately have been absolutely delightful!
User avatar
StPatron
Donating Member
 
Posts: 748
Images: 297
Joined: Tue Dec 15, 2009 8:38 pm
Location: OK
Top

Postby StPatron » Fri Dec 10, 2010 1:50 am

Progress continues.

WARNING: Yacht-builders, take your nitro tablets now! :lol:

I attached a piece of laminated MDF (salvaged sink-cut out) to one end of the countertop, cut the sink hole, and planned to surface the remainder of the countertop with flooring laminate. Then, I changed my mind. I didn't have a good solution for making the transition waterproof, high priority.

So, I removed the MDF piece (PL premium adhesive works great) and went with all flooring laminate. Router (with flush trim bit) was used to trim off the unneeded locking edges.
Image

Here's what 73 inches of countertop looks like. What will I ever do with all that space? :lol:

Image

Galley building is fun. Once the countertop is installed you have a great working area. Need a screwdriver, just open a drawer!

The a/c plenum is done (ideas stolen from Planovet,,, many thanks!) and covered with laminate. Intake and exhaust floor vents are installed and the first layer of fiberglass has been applied to the drip pan. Pics later.

Next up is work on the hinged raceway lid, then an upper cabinet, installation of the pull-out burner, face framing, painting and finishing and hardware. Got a few surprises in mind.
User avatar
StPatron
Donating Member
 
Posts: 748
Images: 297
Joined: Tue Dec 15, 2009 8:38 pm
Location: OK
Top

PreviousNext

Return to Build Journals

Who is online

Users browsing this forum: No registered users and 10 guests

cron