Where or When Jr. --Paint & New Tow Vehicle--update 5/17/15

...ask your questions in the appropriate forums BUT document your build here...preferably in a single thread...dates for updates, are appreciated....

Postby pete42 » Wed Feb 02, 2011 5:56 pm

Have you looked at swapping sink and stove?
User avatar
pete42
Super Lifetime Member
 
Posts: 2203
Images: 13
Joined: Sat Nov 07, 2009 11:52 am
Location: SouthWest Ohio

Postby myoung » Wed Feb 02, 2011 6:41 pm

pete42 wrote:Have you looked at swapping sink and stove?


Yup. And, I will again once the cabinets are fully framed.
Mike Young
build thread: viewtopic.php?t=40459
User avatar
myoung
500 Club
 
Posts: 644
Images: 250
Joined: Sat Aug 07, 2010 11:21 am
Location: Nipomo, CA

Postby myoung » Thu Feb 03, 2011 6:47 pm

Yesterday and today, I framed the settees. Didn't get started until later in the mornings because the temps have been unseasonably low lately.

This is the long side of the L-shaped settee.
Image

This is the short side along the back wall and adjacent to the closet.
Image

Both sides are topped with half-inch plywood.
Image

There is a lip of one half inch between the rear plywood and the side plywood surfaces. This will accommodate the gaucho-style extension of the side settee to make bed of about 39 inches in width once extended. The base of the extension is another piece of half-inch plywood that simply slides over the side section.
Image

Lastly, here is a photo showing the side cabinetry. I haven't decided how many drawers to place here but I have decided to forego doors on the two side openings and will insert a couple of open shelves for folded clothing in these spots.
Image
Mike Young
build thread: viewtopic.php?t=40459
User avatar
myoung
500 Club
 
Posts: 644
Images: 250
Joined: Sat Aug 07, 2010 11:21 am
Location: Nipomo, CA
Top

Postby myoung » Fri Feb 04, 2011 7:38 pm

I don't have a table saw or a router table so making rabbets or grooves for creating drawers would be a bit complicated and time consuming with my tools. So, to simplify the process, I purchased draw sides from Rockler. The sides along with 5 mm Luan bottoms and pine or poplar fronts should allow me to build the four side cabinet drawers and the large drawer over the fridge with minimal effort. I may start those tomorrow.
Mike Young
build thread: viewtopic.php?t=40459
User avatar
myoung
500 Club
 
Posts: 644
Images: 250
Joined: Sat Aug 07, 2010 11:21 am
Location: Nipomo, CA
Top

Postby S. Heisley » Fri Feb 04, 2011 10:07 pm

Low temps in AZ... :rofl: Thanks for the update, Mike. It's lookin' good! :thumbsup:
User avatar
S. Heisley
Super Lifetime Member
 
Posts: 8866
Images: 495
Joined: Mon Sep 17, 2007 10:02 am
Location: No. California
Top

Postby myoung » Sun Feb 06, 2011 5:34 pm

On Friday, I received the linear actuator that will be used to raise the pop top. Today, I fiddled with the positioning in order to determine how to frame the roof. Sounds like a simple problem, but actually it is somewhat complicated by the fact that the hinge on the rear of the pop top and the bottom of the actuator on the front wall are not in the same plane.

The anchor position on the front wall is lower than the hinge so, as the actuator rises up, the angle gets more vertical which means that the body of the actuator moves forward. I planned on this but didn't know for sure how much it would move so I couldn't frame the roof until I saw the contraption in action.

I'll just make a slot for the actuator in the roof to accommodate the 4-5 inches that is moves fore and aft. I'll probably seal it with a rubber boot of some kind. TBD.

Here is the top of the actuator attached to the front of the pop top.
Image

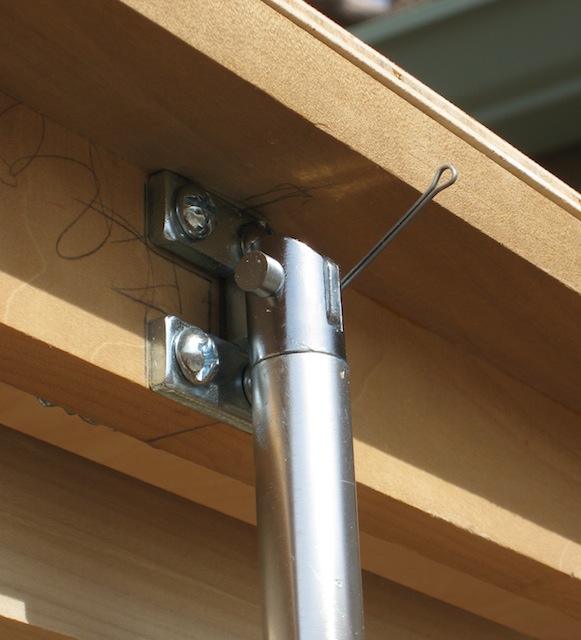
Here is the actuator in the down position showing its anchor position on the wall. The total travel of the push rod is 18 inches. It moves slowly but is way, way cool.
Image

Sorry that I wasn't able to take a photo of the roof in the up position. My helpful helper and I were fully engaged in holding the pieces together so no hands were free for photography.
Mike Young
build thread: viewtopic.php?t=40459
User avatar
myoung
500 Club
 
Posts: 644
Images: 250
Joined: Sat Aug 07, 2010 11:21 am
Location: Nipomo, CA
Top

Postby droid_ca » Sun Feb 06, 2011 6:18 pm

thats looking really good I like the use of the actuator
where did you get it??
There is a world, just beyond now,
where reality runs a razor thin seam between fact and possibility;

Anywhere I roam where I lay my head is home....
Image
“Fide Canem”
Please check out my build thread
viewtopic.php?f=5&t=52816
User avatar
droid_ca
Donating Member
 
Posts: 1981
Images: 176
Joined: Thu Sep 30, 2010 5:08 am
Location: Prince George BC Canada
Top

Postby myoung » Sun Feb 06, 2011 6:27 pm

droid_ca wrote:thats looking really good I like the use of the actuator
where did you get it??


I purchased it on line from Firgelli Automations:
http://www.firgelliauto.com/
Mike Young
build thread: viewtopic.php?t=40459
User avatar
myoung
500 Club
 
Posts: 644
Images: 250
Joined: Sat Aug 07, 2010 11:21 am
Location: Nipomo, CA
Top

Postby myoung » Mon Feb 07, 2011 11:48 pm

Yesterday, after several attempts to position the linear actuator, we established what seems to be the best fore and aft location of the opening for the pop top. Now, it's time to frame the roof.

All day today was spent framing up the roof and opening.
Image

In the front, I left a slot in which the actuator will travel. I'll line the sides with some rubbery material later to make a smooth and tight-fitting slot.
Image

There is an inner lip around the opening to which I will attach the pop up fabric and screening. All the fine sawdust is a result of routing the edges of the lip top and bottom. Shown here is the aft end of the opening doubled to accommodate the hinges.

After looking around and on-line for a 4-foot stainless steel piano hinge, I decided that all the available hinges were far too thin and insubstantial. So, instead I purchased two oil-rubbed bronze 4-inch door hinges. These should be hefty enough to carry the load and provide a good anchor for the pop-up top.
Image

The lip will be 1-5/16 inches above the roof once the 5 mm Luan is added.
Image
Mike Young
build thread: viewtopic.php?t=40459
User avatar
myoung
500 Club
 
Posts: 644
Images: 250
Joined: Sat Aug 07, 2010 11:21 am
Location: Nipomo, CA
Top

Postby myoung » Tue Feb 08, 2011 2:27 pm

If it's a rock pile, I must be skinning something. In this instance, it is the inside of the roof. I'll trim the edges later this afternoon once the glue has set.

Image

Now, I'm ready to bring in some expert help for wiring, plumbing, and anything else that requires experience and collaboration to get the job done right. My Father will come from Boston on Thursday and we can begin installing the various systems. Should be fun.
Mike Young
build thread: viewtopic.php?t=40459
User avatar
myoung
500 Club
 
Posts: 644
Images: 250
Joined: Sat Aug 07, 2010 11:21 am
Location: Nipomo, CA
Top

Postby aggie79 » Tue Feb 08, 2011 2:42 pm

Mike,

Your build is proceeding at an amazing pace. Thank you for posting pictures of your progress.

Nice use of the pavers. I am assuming that they are extras and that you didn't pull up part of your driveway for your build.

Take care,
Tom
Tom (& Linda)
For build info on our former Silver Beatle teardrop:
Build Thread

93503
User avatar
aggie79
Super Duper Lifetime Member
 
Posts: 5405
Images: 686
Joined: Tue Aug 07, 2007 5:42 pm
Location: Watauga, Texas
Top

Postby Cliffmeister2000 » Tue Feb 08, 2011 2:50 pm

Mike, I might need to invite myself over! I'd love to meet your dad!
God Bless

Cliff

♥God. ♥People.
1 John 4:9-11

My Teardrop build pictures
User avatar
Cliffmeister2000
Titanium Donating Member
 
Posts: 3622
Images: 157
Joined: Thu Jul 26, 2007 10:18 pm
Location: Phoenix, AZ
Top

Postby myoung » Tue Feb 08, 2011 7:08 pm

Cliffmeister2000 wrote:Mike, I might need to invite myself over! I'd love to meet your dad!


You're welcome anytime, Cliff. The door is always open, but don't let the HOA Patrol know because we have rules against leaving doors open.
Last edited by myoung on Tue Feb 08, 2011 11:09 pm, edited 1 time in total.
Mike Young
build thread: viewtopic.php?t=40459
User avatar
myoung
500 Club
 
Posts: 644
Images: 250
Joined: Sat Aug 07, 2010 11:21 am
Location: Nipomo, CA
Top

Postby myoung » Tue Feb 08, 2011 7:12 pm

aggie79 wrote:Nice use of the pavers. I am assuming that they are extras and that you didn't pull up part of your driveway for your build.


Desperate needs require desperate measures.
:)

Just kidding.
Mike Young
build thread: viewtopic.php?t=40459
User avatar
myoung
500 Club
 
Posts: 644
Images: 250
Joined: Sat Aug 07, 2010 11:21 am
Location: Nipomo, CA
Top

Postby myoung » Thu Feb 10, 2011 7:40 pm

With a little help from my Father who arrived this afternoon from Boston, we have placed the final piece of the sides in place. The upper front portion that slopes backward at a 22 degree angle is screwed and glued in place.
Image

Tomorrow, we will put the fixed portion of the roof in place and perhaps position the hinges for the pop top.
Image
Mike Young
build thread: viewtopic.php?t=40459
User avatar
myoung
500 Club
 
Posts: 644
Images: 250
Joined: Sat Aug 07, 2010 11:21 am
Location: Nipomo, CA
Top

PreviousNext

Return to Build Journals

Who is online

Users browsing this forum: No registered users and 11 guests