"The Test Mule" --11/22/11 Fab bench

...ask your questions in the appropriate forums BUT document your build here...preferably in a single thread...dates for updates, are appreciated....

"The Test Mule" --11/22/11 Fab bench

Postby RockyMountainTeardrops » Mon Jan 31, 2011 11:02 pm

Hello all,
For those of you who are following my other build, The Justintime, you know that I'm also planning an ultralight composite trailer.
Unlike the Justintime thread, this one is going in "real" time. I started this build just last week (1/25/11)

I hope that people will chime in here with advice....because like the title....I'm making this up as I go along.
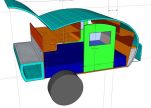
The design
A shrunk Grumman 2. (9'2" length).
63" outside width.
"A" frame trailer.
2K axle w/ standard springs.
750 lbs, dry weight.

Image
Image


Step one, making a "buck" of the door, so I can make a mold, so I can make parts.

Door design:
Is really is symmetrical...I just made a quick sketch for the measurements.
Image

3/4" MDF base:
Image

Sides and bottom:
Image

Top arch, MDF stacked to make the curve:
Image

This is the face skin, so Bondo and sanding is the name of the game.
Image

High fill primer and more Bondo:
Image

MDF is not perfectly flat.....wet sanded with a long board.....look at the ridges that show up:
Image

Wet sanded 800 grit:
(is was still a little wet, the marks at the top of the picture are not scratches)
Image


Now for the questions...
What kind of paint should I use for the top layer of the buck?
Automotive, plain acrylic/Krylon, or gel coat?
This will be sanded and buffed to a high gloss to get a mirror surface on the mold.

Lee
Last edited by RockyMountainTeardrops on Tue Nov 22, 2011 3:42 pm, edited 8 times in total.
User avatar
RockyMountainTeardrops
Super Teardrop Manufacturer
 
Posts: 99
Images: 233
Joined: Fri Oct 22, 2010 1:28 pm
Location: 4,000 above Denver, CO

Postby vtx1029 » Tue Feb 01, 2011 1:32 am

Great work so far :applause:

As far as what paint to use I've seen other guys just use black rattle can with good results. But that big of surface and with as much more work as you plan to do I'd set up a real spray gun and maybe buy a gallon of cheap auto paint.
User avatar
vtx1029
Teardrop Master
 
Posts: 251
Images: 70
Joined: Fri Apr 23, 2010 11:42 pm
Location: MN

Postby angib » Tue Feb 01, 2011 10:17 am

Lee, stay with high fill primer and use that as the surface coat. Personally I like to rub it down with all the wet-n-dry grades up to 1200 and finish it off with (automotive-type) cutting compound to give a perfect high gloss finish. This gives you a production-ready mould that doesn't need any further work on it.
User avatar
angib
5000 Club
5000 Club
 
Posts: 5783
Images: 231
Joined: Fri Apr 30, 2004 2:04 pm
Location: (Olde) England
Top

Postby RockyMountainTeardrops » Tue Feb 01, 2011 7:56 pm

*cough, cough*
Mental note...get new filters for the respirator....

Thanks for the ideas Andrew & VTX!
I decided to go with the high build primer.
Three coats.
Sand it through the grits tomorrow.

Quicky paintbooth:
Image

Next question.....What kind of laminate schedule for the mold?
I was thinking about a layer of 3/4oz chopped strand mat, then two layers of 10oz woven.
Maybe 24.5oz woven on the top and sides after the 10oz layers....and another layer of 10oz after the 24.5oz...

I don't think I need to worry about a surface veil layer..?


Decisions, decisions....:thinking:

Lee
User avatar
RockyMountainTeardrops
Super Teardrop Manufacturer
 
Posts: 99
Images: 233
Joined: Fri Oct 22, 2010 1:28 pm
Location: 4,000 above Denver, CO
Top

Postby RockyMountainTeardrops » Wed Feb 02, 2011 9:17 pm

Sanded through the grits today, 180, 220, 500, 800, 1,000, 1,200 then automotive polishing compound.

Sanded too deep along one side, thought it was going to be okay, but I could feel the roughness when I was waxing the plug.....had to clean the wax and do a touch-up. :x
Image


Strangely....you can see the screw head still, but I couldn't feel it (before painting).....I think it just sucked the paint dry.
More sanding...fun, fun.
Image

After reading about all the problems with getting a mold to release from the plug....I decided to spray it with PVA to make sure it'll come off of the plug.
I've got to get new filters....PVA is almost as bad as lacquer paint.
:?
Image

More later,
Lee
User avatar
RockyMountainTeardrops
Super Teardrop Manufacturer
 
Posts: 99
Images: 233
Joined: Fri Oct 22, 2010 1:28 pm
Location: 4,000 above Denver, CO
Top

Postby RockyMountainTeardrops » Sat Feb 05, 2011 9:57 am

Okay.....
Had trouble with dust and fuzz in the PVA, four tries before I got it "good enough".

Three coats of tooling gel-coat.
Image

One layer of surface veil, one of 1oz mat (what I had) and a 4oz woven over the flat panel.
All finished by 11:30 PM last night.
Image


And this morning?
Catastrophic failure.
Image

Since I can't keep the temp in the garage above 60° overnight....the resin didn't kick, and it softened and lifted the gel-coat.

Need to re-think how I'm going to deal with the temp issue.
I may have to buy a furnace... :(
(More money that I don't want to spend.)

Lee
User avatar
RockyMountainTeardrops
Super Teardrop Manufacturer
 
Posts: 99
Images: 233
Joined: Fri Oct 22, 2010 1:28 pm
Location: 4,000 above Denver, CO
Top

Postby angib » Sat Feb 05, 2011 10:58 am

I haven't seen that sort of failure before - what is the light blue colour?

You have already set up a 'tent' around your mould/workpiece so a domestic fan heater should be able to heat that space adequately to get the resin to kick (assuming you're using polyester resin).

One trick that I have seen used when polyester resin hasn't cured overnight is to warmit up if possible and then coat it with a layer of glass in 'hot mix' resin (that is, resin with three or four times the normal amount of catalyst). This will get really hot as it cures fast and that heat will often trigger the layers below to cure too - once they start curing, they will develop their own heat to cure fully.

Of course if you do a hot mix, you need to apply it to the job in a few minutes or less, as it will kick off really fast!
User avatar
angib
5000 Club
5000 Club
 
Posts: 5783
Images: 231
Joined: Fri Apr 30, 2004 2:04 pm
Location: (Olde) England
Top

Postby RockyMountainTeardrops » Sat Feb 05, 2011 11:44 am

I used two coats of black tooling gel-coat and one coat of blue regular gel-coat (I ran out of black due to a miscalculation of the quantities).

Electric heater I assume?
Styrene vapor is flammable...

I should have known better, the blue top coat had not kicked quite all the way (not sticky, but not hard either).
I was worried about leaving it overnight without a layer of reinforcement, so I put the fabric on it sooner than I should of, then compounded the problem by opening a window to try to air out the garage.

Lee
User avatar
RockyMountainTeardrops
Super Teardrop Manufacturer
 
Posts: 99
Images: 233
Joined: Fri Oct 22, 2010 1:28 pm
Location: 4,000 above Denver, CO
Top

Postby RockyMountainTeardrops » Sat Feb 05, 2011 12:59 pm

Well, the good news is it looks like I can save the plug.

The bad news is the surface finish is trashed.....so it's back to high build primer and sanding again.
*sigh* :disappointed:
User avatar
RockyMountainTeardrops
Super Teardrop Manufacturer
 
Posts: 99
Images: 233
Joined: Fri Oct 22, 2010 1:28 pm
Location: 4,000 above Denver, CO
Top

Postby aggie79 » Sat Feb 05, 2011 1:42 pm

In my garage I use one of those oil-filled electric heaters (looks like one of those old steam radiator heaters). It is pretty effective and doesn't have an open heating element.
Tom (& Linda)
For build info on our former Silver Beatle teardrop:
Build Thread

93503
User avatar
aggie79
Super Duper Lifetime Member
 
Posts: 5405
Images: 686
Joined: Tue Aug 07, 2007 5:42 pm
Location: Watauga, Texas
Top

Postby RockyMountainTeardrops » Thu Feb 10, 2011 12:47 pm

Ugh......
Screw heads are shrinking and showing.

Image

The cold weather is killing me.
I bought an electric heater (thanks for the idea Tom), so I can keep the temp over 60°.....but I think it's still too cold and it's taking days for the primer and body putty to finish curing and/or out-gassing, and it's causing issues with the surface.

At this point I think I'm going to put the painting and fiberglass molding on hold until I can get more heat 24/7.
I'm going to start the plug for the hatch, and after that.....I guess I'll start the bucks for the body.
Maybe I can do a side wall with some halogen lights suspended overhead to get some direct heat on the panel.

Time to start getting bids on building an addition to make a true workshop instead of this garage stuff.

It's a bummer....I feel like everything I'm doing is half steps, trying to cut corners to keep working through the winter, waiting for spring and better weather.

Here's some shots of an infusion test I did a while ago.
9,200 ft of altitude doesn't get as much vacuum as sea level....
Image

Resin front at 11min 26 sec
Image

Finished part.
4 layers of 10oz woven (two each side), 2mm Coremat.
Image

15 lbs concentrated load at 12" supports.
3/8" deflection.
Image

This part is pretty strong and is only 8.2 oz/sqft
That calculates to the outside skin of the entire camper at only 63 lbs!
Of course the floor will have to be stronger/heavier.....but that's a pretty good start.

Lee
User avatar
RockyMountainTeardrops
Super Teardrop Manufacturer
 
Posts: 99
Images: 233
Joined: Fri Oct 22, 2010 1:28 pm
Location: 4,000 above Denver, CO
Top

Postby asianflava » Thu Feb 10, 2011 1:24 pm

RockyMountainTeardrops wrote:The cold weather is killing me.


Yeah tell me about it. I painted some wheels and left them sitting in the garage for a week. When I loaded them into the truck to get tires put on them I accidentally banged one. The paint was still soft even though the can said 5 days for full cure. I left them in the truck and I can still smell the paint a week later.
User avatar
asianflava
8000 Club
8000 Club
 
Posts: 8412
Images: 45
Joined: Mon Aug 02, 2004 5:11 am
Location: CO, Longmont
Top

Postby pete42 » Thu Feb 10, 2011 6:06 pm

Lee I built a fiberglass airplane, well me and a friend.
we used styrofoam as a core and laid fiberglass over that.
for big items like a wing we used a hot wire and metal templates mounted to a big block of foam to cut the foam
it turned out very light and strong as heck have you thought about making plugs from foam?
as you found out resin is very temperture sensitive.
good luck at least you are building.
I'm just dreaming.
User avatar
pete42
Super Lifetime Member
 
Posts: 2203
Images: 13
Joined: Sat Nov 07, 2009 11:52 am
Location: SouthWest Ohio
Top

Postby vtx1029 » Fri Feb 11, 2011 12:39 am

I feel your pain with the cold :cry: The real sad thing is I have a new heater in my garage I just have to finish plumbing the gas and get the electrical done and I'd be warm, but....

Good work so far
User avatar
vtx1029
Teardrop Master
 
Posts: 251
Images: 70
Joined: Fri Apr 23, 2010 11:42 pm
Location: MN
Top

Postby RockyMountainTeardrops » Sat Feb 12, 2011 6:11 pm

asianflava wrote:Yeah tell me about it. I painted some wheels and left them sitting in the garage for a week. When I loaded them into the truck to get tires put on them I accidentally banged one. The paint was still soft even though the can said 5 days for full cure. I left them in the truck and I can still smell the paint a week later.

:o
That sucks.

pete42 wrote:...have you thought about making plugs from foam?

Not really needed for this build.
Everything is two dimensional...no complex curves like an airplane.

vtx1029 wrote:Good work so far

Thanks!

Weather is just too cold to attempt another fiberglass experiment....and I'm bummed at the screw heads showing....so I decided to do something else for the next few weeks.
After reading about the tooling for the Dart (for the fourth time) at Left Coast, I decided to start building carts and putting everything on wheels.
(They mentioned putting everything on wheels on their blog)

Quick trip to HFT and HD for supplies...
Tools, clamps, and anything else to be stored underneath, and the top for for a working area.
Image

Door plug on a cart.
Image

Cart for the hatch.
Image


Anybody have any pictures of their workbench carts?
I'm looking for ideas on how to add shelves or bins or...something underneath.

Lee
User avatar
RockyMountainTeardrops
Super Teardrop Manufacturer
 
Posts: 99
Images: 233
Joined: Fri Oct 22, 2010 1:28 pm
Location: 4,000 above Denver, CO
Top

Next

Return to Build Journals

Who is online

Users browsing this forum: No registered users and 16 guests