Thrifty Alternatives ..Building Foam Campers

Canvas covered foamies (Thrifty Alternatives...)

Moderator: eaglesdare

Postby GPW » Sat Feb 19, 2011 6:48 pm

QUOTE: " so lets say i go the varnish route, how do i seal the end pieces? " ... lots of varnish ... let it soak in really good several times /applications .. It won't be exposed per se, but every bit of sealing helps with trailer wood... Once again , you DO want to leave bare wood for the T2 to glue to .. So I wouldn't rush into things as yet ... you can always seal the floor later ... The foam Must stick to the floor ... the canvas/whatever , Must stick to the floor , inside and out... reinforcing , remember? ... bare wood needed for that ... Just click your red shoes together 3 times and keep saying ... "The skin is the strength of the trailer" ... "The skin is the strength of the trailer" ;)
There’s no place like Foam !
User avatar
GPW
Gold Donating Member
 
Posts: 14920
Images: 546
Joined: Thu Feb 09, 2006 7:58 pm
Location: New Orleans

Postby eaglesdare » Sat Feb 19, 2011 7:04 pm

thanks

i do understand the skin being my strenght. and i understand that the foam/canvas is attached to the floor. but in this case the bottom of the floor could be sealed, i would think, since nothing will be attached to the bottom. unless the varnish seeps too deep into the wood and may affect the glue on top. now i suppose that could happen.

temps don't look good for us tomorrow. so i think its going to be a while before we work more on it.
Louella
May the foam be with you.
User avatar
eaglesdare
Donating Member
 
Posts: 3168
Images: 13
Joined: Tue Aug 26, 2008 7:06 pm

Postby Wolffarmer » Sat Feb 19, 2011 8:18 pm

An inch is probably cutting it a bit close. Mostly it depends on how much your axle will go side to side and what happens when only one side goes over a bump. Mine is pretty close can't remember right now, and I get black marks occasionally though the side walls of the tires don't show any problems so I am not worried. But that is me and I have pulled it about 8,000 miles now.

Randy
"these guys must be afraid of the dark"
User avatar
Wolffarmer
Donating Member
 
Posts: 4612
Images: 309
Joined: Wed May 02, 2007 1:32 pm
Location: Idaho Rupert
Top

Postby GPW » Sun Feb 20, 2011 7:10 am

Wolf , my Tiny CT is too close ... gotta' get that fixed... either lengthen the axle or replace it with a longer one .. Image
There’s no place like Foam !
User avatar
GPW
Gold Donating Member
 
Posts: 14920
Images: 546
Joined: Thu Feb 09, 2006 7:58 pm
Location: New Orleans
Top

Postby eaglesdare » Sun Feb 20, 2011 9:13 am

GPW wrote:QUOTE: " so lets say i go the varnish route, how do i seal the end pieces? " ... lots of varnish ... let it soak in really good several times /applications .. It won't be exposed per se, but every bit of sealing helps with trailer wood... Once again , you DO want to leave bare wood for the T2 to glue to .. So I wouldn't rush into things as yet ... you can always seal the floor later ... The foam Must stick to the floor ... the canvas/whatever , Must stick to the floor , inside and out... reinforcing , remember? ... bare wood needed for that ... Just click your red shoes together 3 times and keep saying ... "The skin is the strength of the trailer" ... "The skin is the strength of the trailer" ;)


as i sit here typing with a swollen neck this morning, i tossed and turned all night and thought about this statement.

i do understand that the foam must be attached to the bare floor, got it.

so that is what i will do, now after the foam is attached/glued and the canvas is also attached, then i seal? so i am going to have to seal laying on my back under the trailer? the floor is going to be attached to the frame to attach the wall. at least that was how i was thinking.

i can't imagine doing it any other way. unless you build off frame. but then i would need more than myself and hubby to set it back onto the frame.
Louella
May the foam be with you.
User avatar
eaglesdare
Donating Member
 
Posts: 3168
Images: 13
Joined: Tue Aug 26, 2008 7:06 pm
Top

Postby eaglesdare » Sun Feb 20, 2011 9:16 am

i know we mentioned once before about "module" type build.

so could i completely canvas in each side individually and then once set up on the floor wrap entire thing? would that work?

i think i am sort of confused as to the step by step direction i should go, which i should be doing first and then next. kwim?
Louella
May the foam be with you.
User avatar
eaglesdare
Donating Member
 
Posts: 3168
Images: 13
Joined: Tue Aug 26, 2008 7:06 pm
Top

Postby Wolffarmer » Sun Feb 20, 2011 10:39 am

At first I would say to build the whole shell first then canvas it. But thinking about it you could cover the majority of the sides on the work bench, not covering the edges that will mate with another piece. Just do the majority of the sides. Then put the shell together and cover the top and overlap the sides. maybe lighty sand the old glue first if it is on the surface of the cloth

Randy
"these guys must be afraid of the dark"
User avatar
Wolffarmer
Donating Member
 
Posts: 4612
Images: 309
Joined: Wed May 02, 2007 1:32 pm
Location: Idaho Rupert
Top

Postby GPW » Sun Feb 20, 2011 10:59 am

Wolf Knows !!!
Eagle , that was one of the tricks to this very light build ... you could flip it over on it's side , if it was not attached to the trailer , and seal the bottom after everything else was assembled ... then bolt it on as a finished unit ... You've already got the floor built .. just unbolt it , prop it up on some crates and get on with the build ... you and hubby should be easily able to move the shell around , it won't be Heavy, just awkward..

Sequence...???
1. Floor
2. walls ... make some spacers and cross braces out of scrap foam to keep things square ... Just tack these in with a hot glue gun , to be removed later or incorporated into the build as a shelf or arch ..
3. roof.front back
4. cutouts for windows and door
5. Reinforce door and window openings (light wood framing) for attachment
6. Make/fit door ... do not hinge yet .. and allow for fabric covering if so desired (over foam and wood )
7. sand/prep outer surface , round edges (slightly)
8. covering - (see Covering v )
9. reinforcing the covering
10 .Painting and trim
11.Bolt up and test ride...


(COVERING) Covering seems to be really simple , just roll on some glue , stick the cloth on and smooth it out ... That's basically it !!! The outside is EASY , but to make things easier on yourself , you might try covering the inside of the shell before assembly... side walls, roof ,all pre covered inside , an we'll still be adding those long strips folded lengthwise for tying in the edges ...I'm going to do it aircraft style and used pinked edges on all the reinforcing strips , inside and out , to give a uniform look to the assembly ... the idea was all seams would be reinforced inside and out with these strips ... probably overkill , but why take a chance for a little bit of extra covering ... \
Hope that helps a little ...
There’s no place like Foam !
User avatar
GPW
Gold Donating Member
 
Posts: 14920
Images: 546
Joined: Thu Feb 09, 2006 7:58 pm
Location: New Orleans
Top

Postby eaglesdare » Sun Feb 20, 2011 11:31 am

yes it does help, thank you both.

not to argue or harbor on the same issue, but i don't think mine will be as light as yours then. the 2 pieces of floor is heavy as it is. so i don't think we will be doing exactly your way. however, i could see where we could do all the foam pices, covered in canvas and then attaching that whole shell to the floor.

the floor is not bolted down yet, hubby wasn't happy totally with it, so he will tweak it some more.

i know we will figure out a way that will work for us. thanks for all the help and step by steps. much appreciated.
Louella
May the foam be with you.
User avatar
eaglesdare
Donating Member
 
Posts: 3168
Images: 13
Joined: Tue Aug 26, 2008 7:06 pm
Top

Postby GPW » Sun Feb 20, 2011 11:48 am

In such cases , deferring to Hubby might be the best idea ... I'm sure he's got it figured out by now !!! :thumbsup:


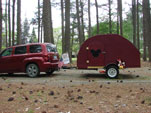
I found fishfinders TD to looks similar to the one we're building ... 8) Image
There’s no place like Foam !
User avatar
GPW
Gold Donating Member
 
Posts: 14920
Images: 546
Joined: Thu Feb 09, 2006 7:58 pm
Location: New Orleans
Top

Postby eaglesdare » Sun Feb 20, 2011 12:35 pm

GPW wrote:The foam we have experience with is made by Dow ... and T2 will NOT melt it ... http://building.dow.com/na/en/products/ ... idfoam.htm

These big box stores are convenient , but they really don't know what's going on with "experimental" things like this ... and you can get better materials and prices at something like an Insulating company that handles insulation for large projects like industrial coolers , etc...
The second problem is , the glue T2 cannot be used for construction , because it will not dry between two pieces of non-porus foam plastic (dries by evaporation ) so you'll need something like epoxy (or Gorilla glue) glue for joining the foam sheets .. which dries quickly and holds Very well ... For stitching pieces together , you can use a hot glue gun to "spot weld" ... but epoxy is the best for general construction ...

Now I know everybody's excited about using their old sheets for covering , and this would probably be fine for light duty (and Thrifty) there are a number of better alternatives... light weight canvas, or even light fiberglass cloth (2 oz.) attached with T2 will provide much more strength than a sheet ... just for those worried about towing at speed , we've built planes out of foam (for 10 years now ) that fly at speeds much faster than we could legally tow anything (or would want to @ 100mph +) ... These are constructed with Dow Blue foam , covered with everything from brown Kraft paper, thin cardboard (non corrugated type ), silk, and light 3/4oz. fiberglass ( some with no covering at all) ... None have had a structural failure at speed ... and as far as planes go the foam holds up well in a crash , with only localized damage , easily repaired , because the foam is a homogenous material and the bad pieces can be cut away and new pieces inserted , without regard to grain (such as wood )..
Best thing with any foam construction is to obtain some scraps for test samples ... and do some experimenting with different glues , and coverings to see which ones You like the best , and give you some familiarity with the material ... cutting , sanding , etc.

I have some 1/2" Dow blu-foam ... I guess I could make a scale model of a TD just to prove the concept ... Might be a fun evenings project . and should answer most questions ...

Anybody wanting to see some of my foam planes can find them at http://www.foamfly.com/gallery2/v/Photos/Glen/ and for further foam plane info ... http://www.rcgroups.com/foamies-scratchbuilt-428/ Many ideas of foam construction ... all applicable to foamie TD building ...


just curious which one of these would be what we want to use? i was going to check out the prices on here as compared to lowes. lowes green foam is $29.97 [i think] that is for the 2" 4x8 [again i think]
Louella
May the foam be with you.
User avatar
eaglesdare
Donating Member
 
Posts: 3168
Images: 13
Joined: Tue Aug 26, 2008 7:06 pm
Top

Postby eaglesdare » Sun Feb 20, 2011 12:38 pm

GPW wrote:In such cases , deferring to Hubby might be the best idea ... I'm sure he's got it figured out by now !!! :thumbsup:


I found fishfinders TD to looks similar to the one we're building ... 8) Image


hubby would have his own way of doing things, but he actually is going by what i am telling him, then tweaking it to work his way. so really it is a group effect from all of us. hubby for the most part is just dong the work we are suggesting he do. gotta love that though.
Louella
May the foam be with you.
User avatar
eaglesdare
Donating Member
 
Posts: 3168
Images: 13
Joined: Tue Aug 26, 2008 7:06 pm
Top

Postby GPW » Sun Feb 20, 2011 1:20 pm

Doing what he's told to do ... :o I'm somewhat familiar with that after 35 years ... :roll:
There’s no place like Foam !
User avatar
GPW
Gold Donating Member
 
Posts: 14920
Images: 546
Joined: Thu Feb 09, 2006 7:58 pm
Location: New Orleans
Top

Postby Wolffarmer » Sun Feb 20, 2011 1:46 pm

eaglesdare wrote:just curious which one of these would be what we want to use? i was going to check out the prices on here as compared to lowes. lowes green foam is $29.97 [i think] that is for the 2" 4x8 [again i think]


Wow, $29.97 for a sheet. While I can't remember what I saw last summer for a price but it was a lot more than that. Grab a bunch before they find out what we are paying here in Idaho. Make sure it is for a 4x8 foot sheet. I have seen 2x8 sheets.

Randy
"these guys must be afraid of the dark"
User avatar
Wolffarmer
Donating Member
 
Posts: 4612
Images: 309
Joined: Wed May 02, 2007 1:32 pm
Location: Idaho Rupert
Top

Postby GPW » Sun Feb 20, 2011 2:33 pm

Best shop around for the best price , which usually is Not the closest place ... but sometimes you get Lucky ....!!! 8)

Since I'm old and somewhat curmudgeonly , I always give the clerk "the business" and try to mule them down on the price ... ahh , the eccentricities of the retired... :roll: :lol:

It works !!! :D Easy to get 10-15% off... that's a tin of fish for the cat eh ... hahaha
There’s no place like Foam !
User avatar
GPW
Gold Donating Member
 
Posts: 14920
Images: 546
Joined: Thu Feb 09, 2006 7:58 pm
Location: New Orleans
Top

PreviousNext

Return to Foamies

Who is online

Users browsing this forum: No registered users and 10 guests