6 x 12 Made In Montana Cargo Conversion

Converting Cargo Trailers into TTTs

6 x 12 Made In Montana Cargo Conversion

Postby MtPhishPhan » Tue Mar 08, 2011 6:21 pm

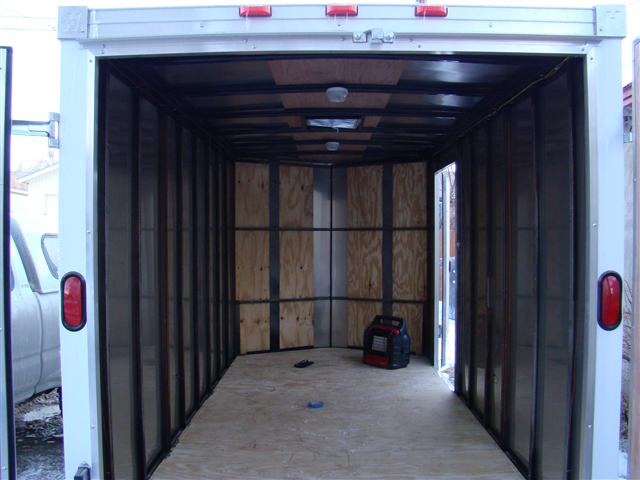
I just wanted to say thanks to everyone who has posted to this site, without it I could not have completed my own conversion. When I set out on this project I thought I had a unique, one of a kind idea. In the end, I am glad I was not alone, the help I have found here has been invaluable.

So now I am ready to give back. I have completed my conversion and posted pics in my gallery. If I did not post something right or you can't get to the pictures tell me and I'll post them directly in here as well. If you have any questions or need more pics of something just let me know. I've used the camper for a full year now so I have a few suggestions and things I would do different if I were to do it again. Once again, thanks to all of you who have posted your own builds, it has helped me tremendously.

ImageImage
MtPhishPhan
Teardrop Inspector
 
Posts: 7
Images: 14
Joined: Fri Feb 19, 2010 10:57 pm

Postby phlat » Tue Mar 08, 2011 6:50 pm

:) :) :)

Very nice. :thumbsup: :applause:
phlat
Teardrop Inspector
 
Posts: 17
Joined: Sun Jul 26, 2009 2:46 pm
Location: Kansas City Metro

Postby Nathan N » Tue Mar 08, 2011 6:57 pm

Looks very nice. I see the booth converts into a bed and then you have one across the rear?

What are some of the things you would do differently? I think each of these builds are a learning experience.

Thanks for sharing!
Nathan
User avatar
Nathan N
Lifetime member
 
Posts: 587
Images: 153
Joined: Mon Mar 24, 2008 6:55 pm
Location: mid-Missouri
Top

Postby MtPhishPhan » Tue Mar 08, 2011 9:23 pm

The biggest problem I've had is with the ceiling, I used some tan speckled egg pattern paneling I found at Lowes. It looked great but over the past year has absorbed moisture from condensation and started to warp. My ceiling is now all wavy. I'm in the process of taking that out but haven't decided on a replacement.

I was thinking about using some white, textured, plastic like panels they have at Lowes but they are normally attached with plastic rivets and adhesive and that isn't going to hold on the ceiling of a camper bouncing down a dirt road when it's 20 degrees in the middle of hunting season. I would just screw it but screw cover caps run 70 cents a pair so that would cost a small fortune. If anyone has any good ceiling ideas I'd sure love to hear them. What ever I use has to have some flex as the roof is slightly bowed.
MtPhishPhan
Teardrop Inspector
 
Posts: 7
Images: 14
Joined: Fri Feb 19, 2010 10:57 pm
Top

Postby Currahee » Wed Mar 09, 2011 1:24 am

That's lookin darn good, very inspirational.
Currahee
Teardrop Inspector
 
Posts: 3
Joined: Mon Mar 07, 2011 8:50 pm
Top

Postby Nathan N » Wed Mar 09, 2011 6:11 am

MtPhishPhan wrote:The biggest problem I've had is with the ceiling, I used some tan speckled egg pattern paneling I found at Lowes. It looked great but over the past year has absorbed moisture from condensation and started to warp. My ceiling is now all wavy. I'm in the process of taking that out but haven't decided on a replacement.

I was thinking about using some white, textured, plastic like panels they have at Lowes but they are normally attached with plastic rivets and adhesive and that isn't going to hold on the ceiling of a camper bouncing down a dirt road when it's 20 degrees in the middle of hunting season. I would just screw it but screw cover caps run 70 cents a pair so that would cost a small fortune. If anyone has any good ceiling ideas I'd sure love to hear them. What ever I use has to have some flex as the roof is slightly bowed.


The ceiling is why we ended up with the paneling we did. It was true ply and not press board with a face on it. I figured that would be better for the ceiling. Donna liked the looks and wanted it for the walls so that's what happened.

Someone had some thinner strips (in thickness, I think it was wood) that appeared to be 2 or 3 inches wide that they used to cover the screws along the ceiling rib. It was attractive in a contrasting stain color. I was going to do something similar but haven't yet. I just used brass screws along the ceiling ribs. Haven't camped too much in real cold weather but so far haven't had condensation dripping from the screws. I figured if I did I could retrofit the ceiling trim strips.

Nathan
User avatar
Nathan N
Lifetime member
 
Posts: 587
Images: 153
Joined: Mon Mar 24, 2008 6:55 pm
Location: mid-Missouri
Top

Postby Itsdoable » Wed Mar 09, 2011 7:20 pm

Here's a cheaper place to get snap-caps. Mine were rec'd within a week.

http://www.pro-dec.com/snap-caps
User avatar
Itsdoable
Teardrop Builder
 
Posts: 41
Joined: Wed Feb 09, 2011 7:36 pm
Location: Colorado
Top

Postby MtPhishPhan » Wed Mar 09, 2011 7:59 pm

I think I'll go with the real birch panels on the ceiling like I did on the walls, thanks for the suggestion. I originally wanted to break up the wood on the walls with something different but I think it will be fine.

Thanks for the link to the snap caps, they're over 2/3 cheaper and way more of a selection.
MtPhishPhan
Teardrop Inspector
 
Posts: 7
Images: 14
Joined: Fri Feb 19, 2010 10:57 pm
Top

Postby Kyle1911 » Mon Mar 14, 2011 9:04 am

Phish, I'm glad I read this post. I was about to buy a bunch of the paneling from Lowes. Probably the same stuff you used. Just wondering if you have insulation in your trailer? You said it warped from condensation. Was that from people being in the trailer, with no insulation, or just accumulated moisture over time? I want the "Factory built" look for the walls in my build, but I'm going half nuts trying to find paneling here in Washington State. I wonder if Luan, sealed, with vinyl wallpaper would do the trick? Thanks, Kyle
Kyle1911
Teardrop Advisor
 
Posts: 56
Images: 6
Joined: Thu Jan 20, 2011 5:40 pm
Location: Eastern Washington
Top

Postby MtPhishPhan » Mon Mar 14, 2011 12:15 pm

I used real 1/4" birch on the walls coated with 2 layer of polyurethane and they have had no problems. I have everything insulated except the doors and the floor, that is my next project. I camp from -10 to 80 above and use a Mr. Heater when it is cold, that's when most of the condensation occurred.

I just finished my ceiling again and this time used the birch. It was easier to work with and I think it came out better. With the screw caps I won't have any metal exposed to the outside and inside air so condensation should be reduced.

Anyone have any information on insulating the doors? I was thinking about having the blown foam thing done to the underside of the whole camper and was wondering if a guy cut a little whole in the door paneling if he could fill that up that way. Anyone have any experience with this?
MtPhishPhan
Teardrop Inspector
 
Posts: 7
Images: 14
Joined: Fri Feb 19, 2010 10:57 pm
Top

Doors

Postby drcurran » Mon Mar 14, 2011 2:46 pm

The only thing I can suggest with the door, is that the door on my CT is not completely hollow. There is "blocking" in the door so I'm thinking you would have to drill several holes and not sure how to know just where to drill them. Might look into removing the interior "skin" that way you would have a better idea of what you are dealing with. Good luck, keep us posted.
Dan
"I'm not as good as I once was, but I'm as good once as I ever was."
TK
User avatar
drcurran
Teardrop Master
 
Posts: 167
Images: 20
Joined: Wed Jul 23, 2008 3:59 pm
Location: Springfield, PA
Top

Postby MtPhishPhan » Mon Mar 14, 2011 2:57 pm

the door on my CT is not completely hollow. There is "blocking" in the door


Thanks for the info. I was hoping to get away from tearing it all down. It sounds like you have removed the skin of yours, did you insulate it? How hard was it to get everything off and did it all go back together solidly?
MtPhishPhan
Teardrop Inspector
 
Posts: 7
Images: 14
Joined: Fri Feb 19, 2010 10:57 pm
Top

Door

Postby drcurran » Mon Mar 14, 2011 3:35 pm

I only removed part of the interior skin (1/4 or 1/8 ply) to put an RV type handle on, but from doing this could see there was "blocking" in the door. Did not insulate - I've been in the planning stage for at least 3 years :)

Dan
"I'm not as good as I once was, but I'm as good once as I ever was."
TK
User avatar
drcurran
Teardrop Master
 
Posts: 167
Images: 20
Joined: Wed Jul 23, 2008 3:59 pm
Location: Springfield, PA
Top

Re: 6 x 12 Made In Montana Cargo Conversion

Postby crumvoc » Wed Dec 12, 2012 11:31 pm

very nice! curious about the bed, do you sleep cross-wise or diagonally since the trailer is only about 68" wide or so? Nice work, sir!
Living in the high-desert.
User avatar
crumvoc
Teardrop Master
 
Posts: 144
Images: 139
Joined: Sun Feb 26, 2012 11:06 am
Top

Re: 6 x 12 Made In Montana Cargo Conversion

Postby hankaye » Wed Dec 12, 2012 11:54 pm

MtPhishPhan, Howdy;

Dang!!! That's one good lookin' camper!
I live fulltime in an RV to fight the condensation I keep the
roof vents cracked a tiny bit so it can escape. May be just me
and the pooch(Rascal), but we're both healty and expel co2.
4 years and no problems so far. I used to live in the Sanpete
Valley in Ut. We had some good cold days -40* and stayed sub
zero for several days in a row the 3 winters I was there.

hank
Striving for a less complicated life since 1949 ...
Every day I beat my own previous record for number of consecutive days I've stayed alive.
hankaye
2000 Club
2000 Club
 
Posts: 2567
Images: 1
Joined: Thu Dec 06, 2012 5:35 pm
Location: S.W. New Mexico
Top

Next

Return to Cargo Trailer Conversions

Who is online

Users browsing this forum: No registered users and 2 guests