DD, on the road to LCG

...ask your questions in the appropriate forums BUT document your build here...preferably in a single thread...dates for updates, are appreciated....

Postby StPatron » Tue Mar 15, 2011 11:54 pm

Short update. I wasn't able to repair my drill, so it was time to punt again until I saved up enough cash to get a replacement. I made a shower curtain and worked on a few odds and ends.
Image
User avatar
StPatron
Donating Member
 
Posts: 748
Images: 297
Joined: Tue Dec 15, 2009 8:38 pm
Location: OK

Postby StPatron » Tue Mar 15, 2011 11:55 pm

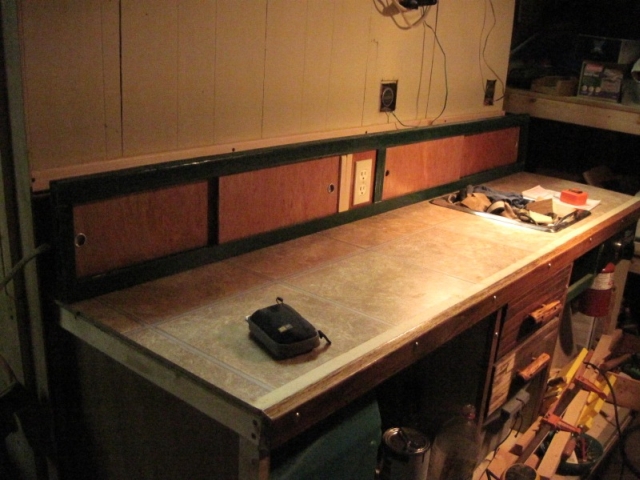
Finally, the drill arrived in the mail and it was back to work. I chose a Dewalt, very happy with it, nicest drill I've ever owned. I built a sliding door assembly for the electrical raceway and installed a galley electrical outlet. Upper cabinets will come later.
Image
User avatar
StPatron
Donating Member
 
Posts: 748
Images: 297
Joined: Tue Dec 15, 2009 8:38 pm
Location: OK

Postby StPatron » Tue Mar 15, 2011 11:59 pm

Oops! It's been so long since I updated my build thread I got rusty. :lol:

I got all but just a few of the spars installed and most of the blocking.
Image

Pulled the wires for the reading light and dome light, then started adding insulation.
Image

A cigar box, with cutout, will be used for a tissue holder. This is on the closet wall next to the bed. The cutout at the bottom will be a recessed storage area for eyeglasses, etc. Camo shower curtain and wooden cigar box tissue holder, can you tell this is a guy build? :lol:
Image

Trimmed a ceiling joint and added the dome light.
Image

I sure was hoping to debut the "Dumpster Diner" at Beavers Bend, but not having a drill was a setback. I still have a lot of work yet to do: upper galley cabinets, door and lock, hatch, window install, final skin, epoxy/paint and marker light and taillight wiring. Slowly but surely.

A big thanks goes to Scott for answering my PM questions and providing a wonderful build journal.
User avatar
StPatron
Donating Member
 
Posts: 748
Images: 297
Joined: Tue Dec 15, 2009 8:38 pm
Location: OK
Top

Postby aggie79 » Wed Mar 16, 2011 7:29 am

Gary,
It is great to see posts of your progress on the Dumpster Diner. The cigar box dispenser is a cool idea. It's a combination of artisan and "man cave" design.

I know you said you had planned on having the DD ready for Beavers Bend until you had the drill ordeal. Hopefully, if you don't have her ready, you'll still come to Beavers Bend anyways - at least for the day. This will be our 3rd year there, but the first with a teardrop. Everyone made us feel welcome even though we didn't have a TD or TTT.

Take care and thank you for posting pictures,
Tom
Tom (& Linda)
For build info on our former Silver Beatle teardrop:
Build Thread

93503
User avatar
aggie79
Super Duper Lifetime Member
 
Posts: 5405
Images: 686
Joined: Tue Aug 07, 2007 5:42 pm
Location: Watauga, Texas
Top

Postby StPatron » Wed Mar 16, 2011 11:43 am

Thanks, Tom. I won't know if I can make it to BB until Thurs or Fri. Fingers crossed. I have the Corian for you and some other gifts that I am hoping to deliver.
User avatar
StPatron
Donating Member
 
Posts: 748
Images: 297
Joined: Tue Dec 15, 2009 8:38 pm
Location: OK
Top

Postby jkidd6339 » Wed Mar 16, 2011 11:19 pm

Nice work Gary mines on the back burner while I get the boat ready.
User avatar
jkidd6339
Teardrop Master
 
Posts: 198
Images: 1
Joined: Sat Jan 24, 2009 1:16 am
Top

Postby 2bits » Thu Mar 17, 2011 12:18 am

Hey Gary, I like that sliding doors you have for your cabinets. Your bed looks sideways tho :lol: I have a feeling you designed it that way, I hope you can at least swing by Beaver's Bend for some pot luck and campfire!
Thomas

Image
User avatar
2bits
2bit Member
 
Posts: 5132
Images: 8
Joined: Thu Dec 27, 2007 6:04 pm
Location: Lake Tawakoni, TX
Top

Postby StPatron » Thu Mar 17, 2011 12:47 am

jkidd6339: It's a hack job but I think it'll work ok as long as it doesn't fall apart while going down the road. :lol:

2bits: Sideways bed? Hmm,, I thought something looked different. :lol:
If I don't make BB, I'll plan to venture across the state line for a gathering in the Lone Star State. Had to sell the amp but I came up with a related surprise for ya. It's got your name written all over it. That's all the hints I'm giving out.

I worked some more on DD today. Replaced the wood screws that were holding the dinette area electrical outlet and bracket hangers in place. Decided to swap them out with machine screws, washers and nuts for a more secure fit. Many trips back and forth from inside to outside of shop. Pink foam insulation is almost finished. Wrestling now with how to do the lowest spar and make sure that area is watertight and protected. Great weather lately for working outside.
User avatar
StPatron
Donating Member
 
Posts: 748
Images: 297
Joined: Tue Dec 15, 2009 8:38 pm
Location: OK
Top

Postby 2bits » Thu Mar 17, 2011 7:06 pm

Sounds good Gary! Thomas and Miller are both trade names so the possibilities are many! We will surely be having some Northern state gatherings!
Thomas

Image
User avatar
2bits
2bit Member
 
Posts: 5132
Images: 8
Joined: Thu Dec 27, 2007 6:04 pm
Location: Lake Tawakoni, TX
Top

Postby StPatron » Tue Mar 22, 2011 1:57 am

Finished some odds/ends today. I painted the upper bathroom cabinet door frame, built and mounted the door. It is made of Luan covered with a light colored piece of salvaged laminate on both sides with routed beveled edge and a magnetic catch. Will add a brass knob later. A piece of scrap white Corian with an added round-over upper edge was used for the transition area between the face panel and aluminum track slider. I also framed in the space for the vent, ran wires and cut the ceiling panel.
Image

Looking down thru the vent hole.
Image

I'm undecided if I want to add a door for the upper part of the closet. I considered a full-length door that would not only serve as a closet door but also as a bathroom/shower door. But, my closet door width and bathroom door width aren't equal. Maybe all's well that ends well. I think I'd still want some type of "door" on the shower area rather than it being open to view when the closet door was shut.

Here's the mocked-up upper closet door. I think the lower area open shelving will work good for shoe storage, etc. Is it possible to have too much cedar strip planking in the interior? :lol:
Image
The hatch spar is now installed. Two 1 x 2 pieces of oak glued together.
Image
User avatar
StPatron
Donating Member
 
Posts: 748
Images: 297
Joined: Tue Dec 15, 2009 8:38 pm
Location: OK
Top

Postby StPatron » Tue Mar 22, 2011 2:35 am

I was working inside the camper when "Cream" brought me a present, a bluejay she layed at the doormat. She was quite proud. Cream showed up at my place about the time I got the pop-up and has been my "shop kitty" from day one, always around even when the saws were loud. A feral cat that I trapped and had spayed. Very nervous since an opposum attacked her and almost took off her tail. With time and a lot of attention she is finally coming around and is a great pal.

Image
User avatar
StPatron
Donating Member
 
Posts: 748
Images: 297
Joined: Tue Dec 15, 2009 8:38 pm
Location: OK
Top

Postby StPatron » Tue Mar 22, 2011 2:54 am

2bits wrote:Sounds good Gary! Thomas and Miller are both trade names so the possibilities are many! We will surely be having some Northern state gatherings!


I'm really, really horrible at keeping secrets sometimes. Here's another clue. Tomas, Thomas? Close. And, it's black. Your color for both teardrops and,,,

Any guesses? You now have at least 4 clues. This should give it away. :lol:

Image
User avatar
StPatron
Donating Member
 
Posts: 748
Images: 297
Joined: Tue Dec 15, 2009 8:38 pm
Location: OK
Top

Postby StPatron » Thu Mar 24, 2011 12:10 am

I drew the remaining section of profile on hardboard (creating a template) then used the router trim bit to cut a plywood galley liner out of the old bed support ply. Not the best surfaced plywood, but it will suffice. It will be covered on the galley side with laminate and that surface is very nice. The outside will be buried within the wall. It's only structural.

I realize this style of construction is unusual and it's not one I would recommend. So why did I approach it like this? As you can see, I had very limited build space at the galley area, a narrow walkway. Erecting full-length sidewalls at the start would have compromised my ability to walk from one side of the build to the other. Before I built the galley counter and cabinets I was using that "deck" to walk on, lot of exercise! Carrying supplies around was difficult enough as it was.

I felt like this was a major milestone in the build, one I had agonized over. Not only am I now able to (almost) visualize the entire final profile but I can now firm up the counter and raceway areas and build/install the upper galley cabinets. Closer to hatch work also.

Larwyn: Your most-cluttered shop award is in peril!
Image
User avatar
StPatron
Donating Member
 
Posts: 748
Images: 297
Joined: Tue Dec 15, 2009 8:38 pm
Location: OK
Top

Postby grizz » Sat Mar 26, 2011 8:37 am

Great to see the progress.

I absolutely love the Harbinger fabric.

Is it fabric or a blanket ?

Image
Greetings from England.

Rian.


Hoping to get it all done in time.
User avatar
grizz
1000 Club
1000 Club
 
Posts: 1210
Images: 29
Joined: Mon Sep 21, 2009 2:37 pm
Location: Rochester, Kent, UK
Top

Postby StPatron » Sat Mar 26, 2011 12:24 pm

It's a throw blanket I found in a Goodwill store, 99 cents. I think every design in the world is available on them now.
User avatar
StPatron
Donating Member
 
Posts: 748
Images: 297
Joined: Tue Dec 15, 2009 8:38 pm
Location: OK
Top

PreviousNext

Return to Build Journals

Who is online

Users browsing this forum: No registered users and 14 guests