DD, on the road to LCG

...ask your questions in the appropriate forums BUT document your build here...preferably in a single thread...dates for updates, are appreciated....

Postby LDK » Fri Apr 01, 2011 6:10 am

Gary

Thanks alot for that link. Maybe I can save that bit after all. :thumbsup:
LDK
Gold Donating Member
 
Posts: 1419
Images: 1
Joined: Fri Jan 22, 2010 8:29 pm

Postby StPatron » Wed Apr 06, 2011 12:18 am

I've spent a few days putting final touches on the wiring that will be hidden in the roof, soldering/heatshrinking all connections and routing the wiring in plastic sheathing. I made some modifications to a salvaged computer power supply and will use that for my A/C to D/C converter. 9 amps of 12 volt power should be plenty. This will power my 12 volt lights/stereo/fan when plugged into shore power. I will use a rechargeable battery pack for trips where I won't have shore power, later upgrading to a tongue-mounted deep cycle battery.

The galley hatch ribs are now installed along with most of the blocking. Here are the 5 ribs prior to the blocking install:
Image

The hatch build seems to be going good so far. Not as difficult as I had anticipated. I like using a template and then router cutting with a pattern bit. That works better for me than free-handing with a jigsaw. I then shimmed the two end ribs in place (using lots of clamps) with appropriate clearances for weather stripping, hinge and sidewall clearance. Added oak top and bottom framing and then blocking.
User avatar
StPatron
Donating Member
 
Posts: 748
Images: 297
Joined: Tue Dec 15, 2009 8:38 pm
Location: OK

Postby aggie79 » Wed Apr 06, 2011 10:11 am

Gary,

The Diner's hatch framing looks great! The hatch will be done before you know it.

At Beavers Bend, I had a cobbled together electrical system. I used an old 12V battery from one of those "senior scooters" and a car battery charger we've had for years. It ran the vent fan, interior light, and galley light for the whole weekend. This simple setup has me rethinking my more complicated permanent system.

Take care,
Tom
Tom (& Linda)
For build info on our former Silver Beatle teardrop:
Build Thread

93503
User avatar
aggie79
Super Duper Lifetime Member
 
Posts: 5405
Images: 686
Joined: Tue Aug 07, 2007 5:42 pm
Location: Watauga, Texas
Top

Postby StPatron » Wed Apr 06, 2011 1:32 pm

So, that's what happened to my scooter battery that weekend. :lol:

I like your battery/charger idea, another option. There's lots to be said for a simple system that is dependable.
User avatar
StPatron
Donating Member
 
Posts: 748
Images: 297
Joined: Tue Dec 15, 2009 8:38 pm
Location: OK
Top

Postby StPatron » Tue Apr 12, 2011 10:25 pm

With the endwall and hatch framing completed, it was time to raise the hatch in order to resume work on the galley and endwall interiors. Worried that I might rack the frame, I applied a luan skin to stabilize it. Another set of hands would've helped.

Image
My plan called for beginning attachment of the skin at the hinge end but after wrestling with that, I opted to start at the bottom. I didn't have any suitable clamping areas at the top and was working solo. That will mean I will have to add seam blocking later, but that's ok.

Image
Acres of sun and rain protection! A proud moment.

Image
I am happy with my mini-rib "sandwich", the recess area will provide lots of room for weatherstripping and the overhang will be added rain protection insurance.

Image
Hatch supports next, a prop failure would be ugly. :lol:
User avatar
StPatron
Donating Member
 
Posts: 748
Images: 297
Joined: Tue Dec 15, 2009 8:38 pm
Location: OK
Top

Postby S. Heisley » Tue Apr 12, 2011 10:27 pm

You should be proud, Gary. That turned out nice! :thumbsup:
User avatar
S. Heisley
Super Lifetime Member
 
Posts: 8866
Images: 495
Joined: Mon Sep 17, 2007 10:02 am
Location: No. California
Top

Postby StPatron » Tue Apr 12, 2011 11:22 pm

Thank you for another of your very generous compliments, Sharon.

DD is not going to be a showpiece by any stretch of the imagination but I think it will get the job done, having me camping in a bit more luxury than what I'm used to. I remain completely satisfied with my layout and amenities, anxious to get her on the road.
User avatar
StPatron
Donating Member
 
Posts: 748
Images: 297
Joined: Tue Dec 15, 2009 8:38 pm
Location: OK
Top

Postby LDK » Wed Apr 13, 2011 5:53 am

Hey Gary

Looks like you did a fine job on the hatch framing. On my hatch frame I had to tweak it some because of measurement error. I haven't skinned or hinged it yet. I'm still debating on how to do it. :thinking:
LDK
Gold Donating Member
 
Posts: 1419
Images: 1
Joined: Fri Jan 22, 2010 8:29 pm
Top

Postby StPatron » Wed Apr 13, 2011 11:20 am

LDK wrote:I haven't skinned or hinged it yet. I'm still debating on how to do it. :thinking:


I hear ya. I used some old door hinges just to hold it in place until I work out the details. I can already tell that I will need to beef up the doubled oak spar, it flexes. I will be using the plastic "living hinge" and following the application advice of Madjack. A nice thing about this forum is that there are many examples to review before making a final decision. I've learned to research the builds of some of my favorites (2bits, aggie79, Planovet, Madjack and others) along with the GenBen plans before cutting wood. A wealth of excellent material here.
User avatar
StPatron
Donating Member
 
Posts: 748
Images: 297
Joined: Tue Dec 15, 2009 8:38 pm
Location: OK
Top

Postby aggie79 » Wed Apr 13, 2011 5:05 pm

S. Heisley wrote:You should be proud, Gary. That turned out nice! :thumbsup:


Gary,

Sharon said it all - that is one nice hatch! :applause: :thumbsup: :applause:

I really like all the counter space you have in your galley. I wish I had that length to work with.

Great job again on the hatch!

Take care,
Tom
Tom (& Linda)
For build info on our former Silver Beatle teardrop:
Build Thread

93503
User avatar
aggie79
Super Duper Lifetime Member
 
Posts: 5405
Images: 686
Joined: Tue Aug 07, 2007 5:42 pm
Location: Watauga, Texas
Top

Postby StPatron » Sat Apr 16, 2011 10:53 pm

The hatch props are now installed and work pretty well. I might tweak them a bit later. The design features I desired were:

1. Plenty strong to support the large hatch.
2. Raising/lowering would need to be a one-person job.
3. Pinned at each end to avoid wind lifting.
4. Raised hatch height would allow suficient head clearance.

Many of the designs used for teardrop builds were unsuitable due to the monstrous size of my hatch and the solo positioning requirement. I decided on using a gravity-drop method, securing the props to the hatch, so they would fall into near position when the hatch was raised.

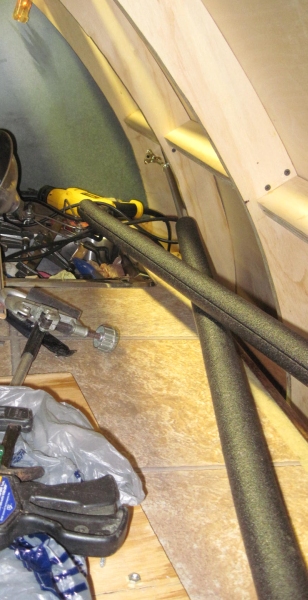
They are plenty strong.  The only hassle is when stepping underneath the hatch to seat the props in the base "cups".  As I walk further underneath the hatch, the "ceiling" becomes higher due to the hatch curvature.  I'm at about the max. of my reach when manipulating the props into position.  That will be the tweaking part, moving the base cups closer to the countertop edge so they are within closer reach while I'm still holding the (lower) bottom hatch edge.

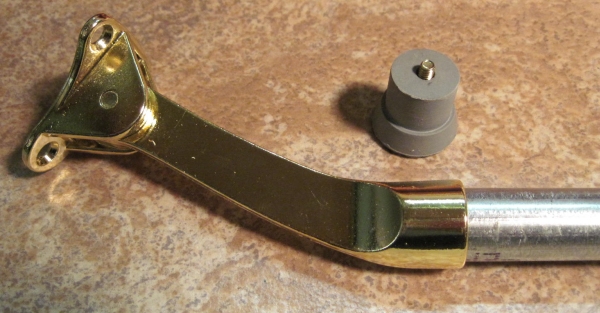
I used kick-down door stops and after removing the rubber foot the 1/2" EMT conduit fit perfectly inside the rubber foot cup.  That was a nice surpise, I had expected to cut/grind the stops in order to insert the conduit. I drilled and bolted the conduit to them (no pic):
Image 

Base cups were fashioned using 3/4" grey electrical conduit (perfect fit for the 1/2" EMT conduit, large enough and not any slop) and secured with machine screws/nuts/straps to the endwalls.  A cap was used on the end.  The curbside "cup" is 4" deep and the streetside "cup" is 3" deep.  When raising the hatch I insert the curbside prop first, then with it captured I insert the streetside prop:
Image 
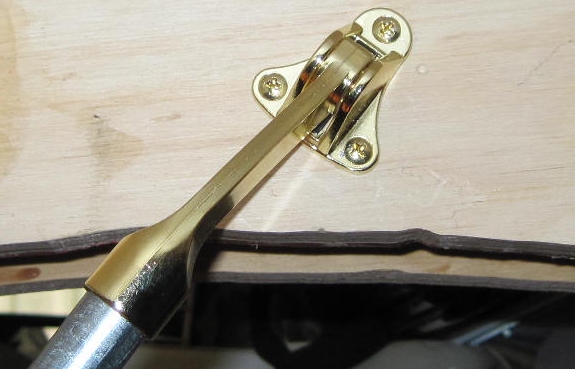
The door stop was screwed to the hatch rib.  (Don't know WHO cut that crooked rib,,, yikes! Might add a hatch liner after all.) :lol:
Image
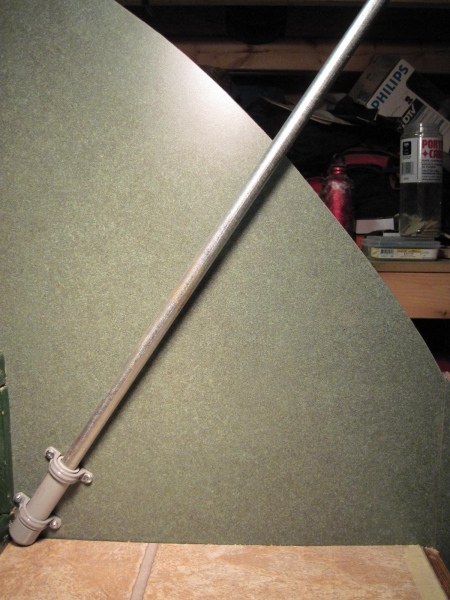
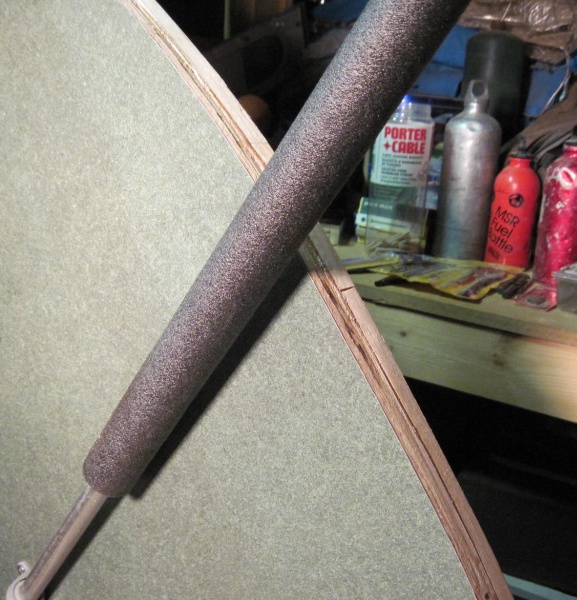
Foam pipe insulation was added to the conduit:
Image
When lowering the hatch, I raise it up and the props come out of the cups.  Then, I swing one toward the countertop, then the other.  As the hatch closes, they slide across the countertop.  I might add a couple of spring clips to the underside of the hatch so I can clip them in place, haven't decided.  The folded, travel position was checked for clearance.  Ok.
Image
User avatar
StPatron
Donating Member
 
Posts: 748
Images: 297
Joined: Tue Dec 15, 2009 8:38 pm
Location: OK
Top

Postby StPatron » Sat Apr 16, 2011 11:09 pm

aggie79 wrote:I really like all the counter space you have in your galley. I wish I had that length to work with.


There's always build #2, Tom. :lol:
User avatar
StPatron
Donating Member
 
Posts: 748
Images: 297
Joined: Tue Dec 15, 2009 8:38 pm
Location: OK
Top

Postby High Desert » Sun Apr 17, 2011 12:33 am

Lookin' good Gary! I like your use of the door stops, that's slick. And with the size of that hatch you won't need an canopy if you don't want one. Lots of shade and cover with that baby 8)
Shaun

"it's not the years honey, it's the mileage"
High Desert
Platinum Donating Member
 
Posts: 8780
Images: 27
Joined: Wed Apr 08, 2009 1:46 pm
Location: SW Washington state
Top

Postby StPatron » Sun Apr 17, 2011 1:31 am

Thanks, Shaun. I stole the doorstop idea from someone. Can't remember who it was or I'd credit them. They did a counter mount and inserted 3/4" EMT conduit over the entire leg of the stop, then pinned the prop.

I've been looking for the largest hatch contest but am having no luck. I think I have it wrapped up! :lol:

I'm reminded of a Ronco ad. It's your multi-purpose two-in-one hatchawning.

Let me know if you're needing some shade in Nevada, I'll park east/west and raise 'er! Hmm, a hammock suspended underneath? I'd be within easy reach of the cooler. Hope the FAA doesn't make me put a light on it,,, :lol:
User avatar
StPatron
Donating Member
 
Posts: 748
Images: 297
Joined: Tue Dec 15, 2009 8:38 pm
Location: OK
Top

Postby LDK » Sun Apr 17, 2011 7:44 am

Hey Gary

I think there is a guy named Tom Swenson that did his props that way. That is a very good way of doing it and I might do mine that way too. :thumbsup:
LDK
Gold Donating Member
 
Posts: 1419
Images: 1
Joined: Fri Jan 22, 2010 8:29 pm
Top

PreviousNext

Return to Build Journals

Who is online

Users browsing this forum: No registered users and 9 guests

cron