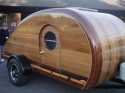
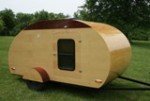
I'm abandoning my current plans of using a wood veneer on my roof after a disaster with the hatch. (Operator error, not veneer error)
I'm strongly considering going with a fiberglass cloth over the entire roof/hatch and using a tinted epoxy to get the color I want. The initial wet out would be un-tinted but subsequent would be tinted a tan. I've found some epoxy pigment from US Compsites. Seal the epoxy with a varnish for UV protection. Raka has various weights of fiberglass cloth. I'm thinking this will be the best approach... but a few questions.
Questions:
1) Any flaws with this plan?
2) Any thoughts on the weight of the cloth? I'm thinking 6oz... my only other option is a 12oz given my width of 62+ inches.
3) Will fiberglass/epoxy mask minor imperfections in the surface?
Aluminum is out. I've considered vinyl but hard to find in wider widths and right color. EPDM sounds interesting but only white or black in the wider widths. Mildly concerned about imperfections telegraphing through.
http://www.uscomposites.com/pigments.html
Appreciate input...
Fiberglass/Epoxy Roof ?
11 posts
• Page 1 of 1
-
GeoDrop - Donating Member
- Posts: 243
- Images: 2
- Joined: Mon Sep 07, 2009 9:45 pm
- Location: Northeast Kansas
![]() by Rock » Mon Apr 04, 2011 4:52 pm
by Rock » Mon Apr 04, 2011 4:52 pm
6 oz is plenty and overkill if it doesn't have much of a structural requirement. I used 6 oz that I had left over from my kayak. And my glass is structural for lots of the camper.
I have not used a tint in a translucent type epoxy application. I did tint some epoxy jet black to fill some cracks in the veneer. All I can say is stick with something manufacturer recommended - in other words if it's Raka use only a tint sold or recommended by Raka. If in doubt call them and ask.
As far as surface imperfections - whether it's a cosmetic blemish (stain, etc) or an actual imperfection in the surface - dent, crack, surface mis-match - it will all show through.
I can attest that this approach is a huge amount of work to get right - but you've come this far (as I keep telling myself )
)
Eric
I have not used a tint in a translucent type epoxy application. I did tint some epoxy jet black to fill some cracks in the veneer. All I can say is stick with something manufacturer recommended - in other words if it's Raka use only a tint sold or recommended by Raka. If in doubt call them and ask.
As far as surface imperfections - whether it's a cosmetic blemish (stain, etc) or an actual imperfection in the surface - dent, crack, surface mis-match - it will all show through.
I can attest that this approach is a huge amount of work to get right - but you've come this far (as I keep telling myself
)
Eric
- Rock
- Teardrop Master
- Posts: 273
- Images: 48
- Joined: Tue Oct 14, 2008 10:38 am
- Location: Fremont, OH