A little (more) progress...Finished? Update 7/9

...ask your questions in the appropriate forums BUT document your build here...preferably in a single thread...dates for updates, are appreciated....

A little (more) progress...Finished? Update 7/9

Postby jdaan » Sun Apr 17, 2011 9:06 pm

I'm finally posting a little progress. Being mostly a lurker, I've only made a few posts in the past, in other sections. For the sake of creating a build journal, I'll re-post a few pics here and start a new thread.

Image
Frame

Image
outer framing on the sidewalls

Image
One of the shots I took to remember where I ran the wires

Justin
Last edited by jdaan on Mon Jul 09, 2012 12:08 pm, edited 6 times in total.
Justin
Build Thread: Here
Image
User avatar
jdaan
Donating Member
 
Posts: 67
Images: 46
Joined: Sun Jul 29, 2007 5:51 pm
Location: McMinnville, OR

Postby jdaan » Sun Apr 17, 2011 9:16 pm

Some progress today.

Image
Inner skin glued on, finally have the walls glued to the floor and galley.

Image
View of the galley, with it all put together.

Image
View of the interior, after the sides were put up.

Image
Side profile. It's the ultralight profile with a slightly different door shape.

Justin
Justin
Build Thread: Here
Image
User avatar
jdaan
Donating Member
 
Posts: 67
Images: 46
Joined: Sun Jul 29, 2007 5:51 pm
Location: McMinnville, OR

Postby jdaan » Sun Apr 17, 2011 9:23 pm

And now for a question...

I'm planning to have the hatch start from the counter top up to the top of the cabinets, leaving the section below the counter covered. However, I'm also planning to have the fuse block and all the wiring terminate in the section under the counter, so I need occasional access. I was thinking about a second hatch covering the bottom section, but wasn't sure how to go about it. Has anyone done something like this? Any tips?

Image
A repeat of the above pic, showing what I'm talking about.

Justin
Justin
Build Thread: Here
Image
User avatar
jdaan
Donating Member
 
Posts: 67
Images: 46
Joined: Sun Jul 29, 2007 5:51 pm
Location: McMinnville, OR
Top

nice

Postby mvperini » Sun Apr 17, 2011 10:16 pm

I can not answer your question but your teardrop looks very nice and the weather is starting to change for the good i an sure tired of the rain...
the wife and i live in lafayette , oregon only 30 miles from portland. we are going to south beach state park on april 22 next weekend to a vintage trailer rally, come down for the day


Mike and Zel
Image

1947 Kenskill teardrop kamper 4X10>
1951 Boles Areo 16ft Canned Ham>
1956 Roadmaster 20ft> Restored
1959 airstream 18ft restoration complete
1953 Pontiac house car
mvperini
500 Club
 
Posts: 821
Images: 0
Joined: Sun Aug 19, 2007 9:38 am
Location: LAFAYETTE, OREGON
Top

Postby jdaan » Sun Apr 17, 2011 10:50 pm

Hi Mike. A little sun for a change is very welcome. My wife and I live in McMinnville and actually met you at your place to look at your Kenskill a few years ago. I'll do my best to make it to the rally this weekend.

Justin
Justin
Build Thread: Here
Image
User avatar
jdaan
Donating Member
 
Posts: 67
Images: 46
Joined: Sun Jul 29, 2007 5:51 pm
Location: McMinnville, OR
Top

Postby LDK » Mon Apr 18, 2011 5:48 am

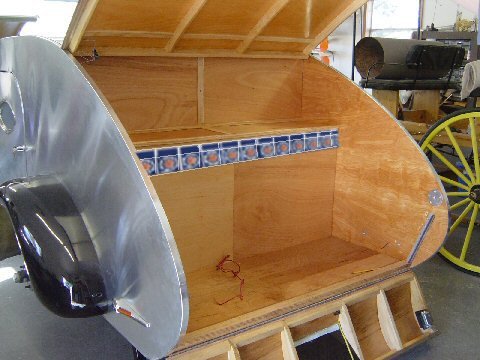
jdaan wrote:And now for a question...

I'm planning to have the hatch start from the counter top up to the top of the cabinets, leaving the section below the counter covered. However, I'm also planning to have the fuse block and all the wiring terminate in the section under the counter, so I need occasional access. I was thinking about a second hatch covering the bottom section, but wasn't sure how to go about it. Has anyone done something like this? Any tips?

Image
A repeat of the above pic, showing what I'm talking about.

Justin


I'm sure someone on here has done something similar. It seems to me that you might just hinge the counter or part of it or you could hinge the lower half so it could drop away from the counter. :thinking: I'm sure you'll come up with something. BTW your teardrop is looking real nice. :thumbsup:
LDK
Gold Donating Member
 
Posts: 1419
Images: 1
Joined: Fri Jan 22, 2010 8:29 pm
Top

Postby aggie79 » Mon Apr 18, 2011 9:40 am

Justin,

Your teardrop is looking great! And the build quality is amazing.

I know I've seen a two-part hatch on this board, but can't seem to remember who did it. I do remember one example, though. My teadrop design is heavily based upon three teardrops built simultaneously at the "Three Texas Teadrop Trailers" blog:

http://romeonovember.blogspot.com/2006_04_01_archive.html

The third of the three - "Charlie" - had a drop down lower hatch. This is a picture of it.

Image

These guys built some amazing teardrops.

Take care,
Tom
Tom (& Linda)
For build info on our former Silver Beatle teardrop:
Build Thread

93503
User avatar
aggie79
Super Duper Lifetime Member
 
Posts: 5405
Images: 686
Joined: Tue Aug 07, 2007 5:42 pm
Location: Watauga, Texas
Top

Postby jdaan » Mon Apr 18, 2011 9:36 pm

Tom - That's a great blog. Thanks for the tip, and for the compliment. I've been following your build and it's very inspiring.

I'm a little reluctant to cut into the counter top to put in a hinge, or hatch, for a space that I hope to only need to access a few times. I've been thinking I might want to hinge the lower panel at the top, under the counter, and have it open upward. It seems easier to figure out how to seal it up that way, and look and act like a fixed panel when I don't need to open it.

Justin
Justin
Build Thread: Here
Image
User avatar
jdaan
Donating Member
 
Posts: 67
Images: 46
Joined: Sun Jul 29, 2007 5:51 pm
Location: McMinnville, OR
Top

Postby Miriam C. » Mon Apr 18, 2011 10:20 pm

:applause: :thumbsup: You have a great start to a really Beautiful TD.... :thumbsup: You can lift the counter for access or you can always make a hatch on the bottom and hinge it! Have the top hatch go over the bottom or meet it. You could also make sliding drawers from the side. Lots of ways to do this.
“Forgiveness means giving up all hope for a better past.â€
User avatar
Miriam C.
our Aunti M
 
Posts: 19675
Images: 148
Joined: Wed Feb 15, 2006 3:14 pm
Location: Southwest MO
Top

Postby jdaan » Tue Apr 26, 2011 8:49 pm

I got some work done this weekend. Bought a bunch of 5x5 baltic birch for the ceiling and roof skins. I was a little worried about bending around the profile after reading some stories here, but it went just fine.
Image
I had to throw in an extra spar where the two sheets met, so the spacing is a little odd. It'll all be hidden soon.
Image
Interior front. I pre-finished the birch plywood before installing, figuring it would be easier to apply to a flat sheet rather than above my head. The lower, unfinished sheet in the photo is where I goofed and cut the finished sheet across the grain, rather than with it. After 20 minutes of trying to bend it smoothly around the radius, I realized my mistake. The next sheet with the horizontal grain worked much better.
Image
Looking front, with the cut-out for the fan.
Justin
Build Thread: Here
Image
User avatar
jdaan
Donating Member
 
Posts: 67
Images: 46
Joined: Sun Jul 29, 2007 5:51 pm
Location: McMinnville, OR
Top

Postby jdaan » Tue Apr 26, 2011 8:54 pm

Final shot of the top, making sure the wires running up the sides were long enough to reach the fan and overhead light. After reading the ongoing debates on splicing wires, I want to make sure any splices are accessible after everything is closed up.
Image

Next is insulating and installing the roof skin. I've also started cutting the spars for the hatch, but I'm waiting on my hinge to arrive before getting too far with that.

Justin
Justin
Build Thread: Here
Image
User avatar
jdaan
Donating Member
 
Posts: 67
Images: 46
Joined: Sun Jul 29, 2007 5:51 pm
Location: McMinnville, OR
Top

Postby jdarkoregon » Tue Apr 26, 2011 10:38 pm

Justin

Total Quality in your craftsmanship, great looking project you have there,

its exciting to see this kind of quality

John
Innovation is essential
The world can be better
ImageImage
User avatar
jdarkoregon
Donating Member
 
Posts: 1237
Images: 47
Joined: Mon Aug 22, 2005 7:07 pm
Location: Oregon, Sublimity
Top

Postby jdaan » Tue May 17, 2011 10:25 pm

Time for a small update. Insulated the top, added a spar to bulk up the hinge spar, and installed framing for the vent. I also spent some some time ordering parts and picking up some things. "Better than hurricane hinge", aluminum trim, door hardware, and louvered "Serro Scotty" windows from Vintage Technologies. I decided to go with mirror polish anodized aluminum for the exterior, and picked up 4 sheets from a local sign supply company. After researching aluminum polishing on this forum, I decided it might be worth the extra $ to have something that won't need that much upkeep. The aluminum trim is all mill finish, and I was considering polishing it before installation, maybe coating it with Sharkhide as well. Any thoughts? I'm not sure it's really worth the effort, but it does look a little dull next to the mirror polish sheet. Nothing too interesting for pics, but here's a few:
Image

Image
Justin
Justin
Build Thread: Here
Image
User avatar
jdaan
Donating Member
 
Posts: 67
Images: 46
Joined: Sun Jul 29, 2007 5:51 pm
Location: McMinnville, OR
Top

Postby CliffinGA » Tue May 17, 2011 10:33 pm

Great job Justin on your tear. I personally like the mirror finish but don't want to be blinded every time I look at the tear :lol:. I plan on doing the mill finish on mine, plus its half the price of the mirror finish. Keep up the good work bud.

Cliff :thumbsup:
In God we trust, shoot the rest and he will sort out!

My Build:

viewtopic.php?f=50&t=42628
User avatar
CliffinGA
1000 Club
1000 Club
 
Posts: 1499
Images: 207
Joined: Sat Nov 14, 2009 1:29 pm
Location: Jefferson, GA
Top

Postby aggie79 » Wed May 18, 2011 9:52 am

Justin,

I really like the design of your teardrop and your craftsmanship. You ought to be very proud of your work.

jdaan wrote:I decided to go with mirror polish anodized aluminum for the exterior, and picked up 4 sheets from a local sign supply company. After researching aluminum polishing on this forum, I decided it might be worth the extra $ to have something that won't need that much upkeep. The aluminum trim is all mill finish, and I was considering polishing it before installation, maybe coating it with Sharkhide as well. Any thoughts? I'm not sure it's really worth the effort, but it does look a little dull next to the mirror polish sheet.

Justin


As you can gather from my response to your other thread, I installed the same polished aluminum. So, I may be biased, but I think the polished look is classic and not having to maintain the look with the anodized aluminum is icing on the cake.

I was going to polish out my trim, but ran out of time trying to ge my teardrop campable in time for a gathering. After seeing the trim installed in the "not polished" stage, I like the contrast and will leave it as is (other than to clean the mill stains and sealant.)

Image

If you do polish the trim after it is installed, you'll need to protect the aluminum skin so you don't polish out the anodizing.

Take care,
Tom
Tom (& Linda)
For build info on our former Silver Beatle teardrop:
Build Thread

93503
User avatar
aggie79
Super Duper Lifetime Member
 
Posts: 5405
Images: 686
Joined: Tue Aug 07, 2007 5:42 pm
Location: Watauga, Texas
Top

Next

Return to Build Journals

Who is online

Users browsing this forum: No registered users and 7 guests