Thrifty Alternatives ..Building Foam Campers

Canvas covered foamies (Thrifty Alternatives...)

Moderator: eaglesdare

Postby HandyAtLeast » Wed May 04, 2011 5:40 pm

Okay, I found a scrap piece of 1.5" foam. Its 15"x21" and I'm going to put a 12" radius in it to 90 degrees.

Image

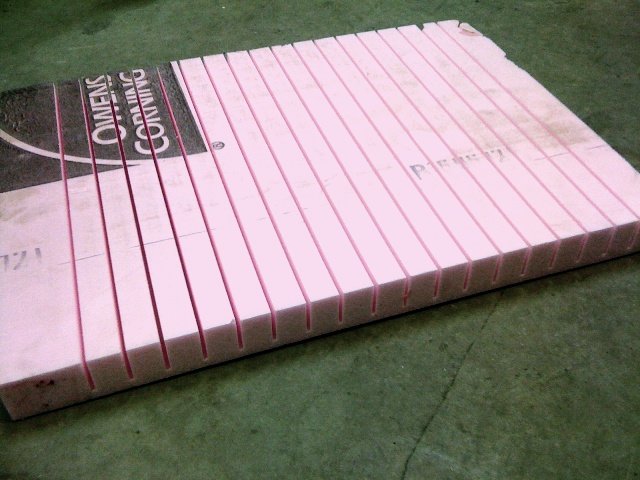
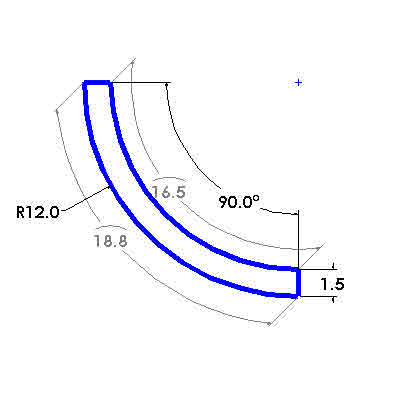
I calculated a differece of about 2.3". So, using a table saw, I cut 18 kerfs spaced 1" apart. Tomorrow I will glue it up with Gorilla glue and tape it in place until it dries. Just bending it seems to make a perfect 12" radius to 90 degrees. The glue will fill the voids at the bottom of the kerf cuts also.

Image
I make stuff, and it's all designed on Post-Its... the small ones.
User avatar
HandyAtLeast
Teardrop Builder
 
Posts: 41
Images: 22
Joined: Tue Apr 12, 2011 12:54 pm
Location: Puget Sound

Postby RAYVILLIAN » Wed May 04, 2011 6:21 pm

Hey guys I had a piece of 1" foam with luan on one side and cloth on the other. this cloth is put on with latex primer instead of T2 but it is a 8" by 2" piece I tore the luan off the back side and as you can see it is bent double with out breaking.

Image

Gary
Where ever we raise the hatch is home.
Darn blank states keep getting further away and we keep traveling slower ain't never gona get this map full.
111961Image
User avatar
RAYVILLIAN
Lifetime member
 
Posts: 1434
Images: 109
Joined: Thu Aug 05, 2004 9:33 pm
Location: Rayville MO

Postby mikeschn » Wed May 04, 2011 6:26 pm

Gary I can't even bend luan that much without it cracking. You must have some pretty special stuff!

If with kerfing I can bend some foam to a 24" radius, I'll be happy.

Mike...
The quality is remembered long after the price is forgotten, so build your teardrop with the best materials...
User avatar
mikeschn
Site Admin
 
Posts: 19202
Images: 475
Joined: Tue Apr 13, 2004 11:01 am
Location: MI
Top

Postby RAYVILLIAN » Wed May 04, 2011 6:39 pm

It's just plain old pink foam with bed sheet put on with bulls eye interior/exterior primer like I do the poor mans fiberglass. The one I showed yesterday had sheet on both sides. this was laying on my desk so I decided to tear the luan off the one side and see what it would do and you can see the results. 6" radius shouldn't be a problem.

Gary
Where ever we raise the hatch is home.
Darn blank states keep getting further away and we keep traveling slower ain't never gona get this map full.
111961Image
User avatar
RAYVILLIAN
Lifetime member
 
Posts: 1434
Images: 109
Joined: Thu Aug 05, 2004 9:33 pm
Location: Rayville MO
Top

Postby GPW » Thu May 05, 2011 5:40 am

With the tension loads being absorbed by the skin , the foam will collapse on the compression side, it's mostly air inside ... With the skin on both sides , it can't move ...
Gary Ray , could you expound on using that primer for cloth attachment .... That sounds pretty interesting ... 8)
There’s no place like Foam !
User avatar
GPW
Gold Donating Member
 
Posts: 14920
Images: 546
Joined: Thu Feb 09, 2006 7:58 pm
Location: New Orleans
Top

Postby GPW » Thu May 05, 2011 6:50 am

After reading about hatches , and how they're constructed ... I got to wondering ... :thinking: The ribbed plywood hatch on my 6X12 TD was HEAVY ..cumbersome to use /prop up... Now I'm wondering about a bent foam hatch ... cloth covered as usual ... One of the benefits of foam is when it's bent with heat , it stays in that position permanently ... I've made Many cambered wings in the past , airfoil shaped ... they keep their shape forever... 1' foam would be all you need for a hatch really ... that would be easy to heat and bend to a hatch shape ... Sure would be light , and if it hit you in the head , wouldn't leave a flat spot ... :o Just more ideas ... :roll:

You might even be able to use a cloth hinge of some type which would eliminate any water leakage into the galley , and negate the need for an expensive metal hinge ... Just paint the cloth hinge with a rubberized coating for flexibility ... :thinking:
There’s no place like Foam !
User avatar
GPW
Gold Donating Member
 
Posts: 14920
Images: 546
Joined: Thu Feb 09, 2006 7:58 pm
Location: New Orleans
Top

Postby eaglesdare » Thu May 05, 2011 6:55 am

GPW wrote:After reading about hatches , and how they're constructed ... I got to wondering ... :thinking: The ribbed plywood hatch on my 6X12 TD was HEAVY ..cumbersome to use /prop up... Now I'm wondering about a bent foam hatch ... cloth covered as usual ... One of the benefits of foam is when it's bent with heat , it stays in that position permanently ... I've made Many cambered wings in the past , airfoil shaped ... they keep their shape forever... 1' foam would be all you need for a hatch really ... that would be easy to heat and bend to a hatch shape ... Sure would be light , and if it hit you in the head , wouldn't leave a flat spot ... :o Just more ideas ... :roll:


mine is a hybrid. foam and some ribs
Image
Louella
May the foam be with you.
User avatar
eaglesdare
Donating Member
 
Posts: 3168
Images: 13
Joined: Tue Aug 26, 2008 7:06 pm
Top

Postby GPW » Thu May 05, 2011 6:57 am

Eagle , that's so COOL !!! 8) :thumbsup:
There’s no place like Foam !
User avatar
GPW
Gold Donating Member
 
Posts: 14920
Images: 546
Joined: Thu Feb 09, 2006 7:58 pm
Location: New Orleans
Top

Postby RAYVILLIAN » Thu May 05, 2011 7:03 am

Sure GPW I think that I use it the same way you use the T2.

First remove the clear film off the foam, I don't think that the paint will stick if you don't. Than I use an old 6" thick bristle paint brush and slop on a thick coat of paint, than work the bed sheet on using the same brush much like you would wallpaper, trying to get all the bubbles out.
Than apply a second coat of paint to fill in the weave and let it dry. I usually apply a third coat of the primer after that is dry but you might not have to if your just using it to bend the foam.
I use Zinher's Bullseye 123 interior/exterior latex primer now but when I started working with this I just used what ever paint I had around.

Gary

Ps I did have a sample of this get wet and you could peal the cloth off when it was wet but when it dried it stuck back down as good as it was before it got wet. When I use this as a covering I finish it off with a couple of coats of oil base porch paint to seal it in and keep the water off.
Where ever we raise the hatch is home.
Darn blank states keep getting further away and we keep traveling slower ain't never gona get this map full.
111961Image
User avatar
RAYVILLIAN
Lifetime member
 
Posts: 1434
Images: 109
Joined: Thu Aug 05, 2004 9:33 pm
Location: Rayville MO
Top

Postby eaglesdare » Thu May 05, 2011 7:08 am

i covered with canvas over the hinged area. i did not put the first full t2 on that section. but i did roll the diluted t2 on top and primed and painted on the top part. it does bend up and down.

Image
Louella
May the foam be with you.
User avatar
eaglesdare
Donating Member
 
Posts: 3168
Images: 13
Joined: Tue Aug 26, 2008 7:06 pm
Top

Postby GPW » Thu May 05, 2011 7:10 am

Gary, Thanks for that !!! My foam didn't have a plastic skin , but the surface was very smooth ... Not you got me wondering if the alcohol based Bullseye primer would work , without melting the foam .... I routinely use the 91% rubbing alcohol to remove the printing on the foam ... never any melting or damage with that .... and that primer might be waterproof ... :thinking:


Eagle , great to see you already have that sorted ... :thumbsup:
There’s no place like Foam !
User avatar
GPW
Gold Donating Member
 
Posts: 14920
Images: 546
Joined: Thu Feb 09, 2006 7:58 pm
Location: New Orleans
Top

Postby HandyAtLeast » Thu May 05, 2011 11:17 am

Okay, I glued up the 1.5" foam. You can see that it is slightly past 90 degrees from the taping. I'm curious to see what kind of spring back will occur; not much I expect. Then I'm going to skin it with cloth and glue and do a stress test of some kind (the "standing on it while drinking a Coke test").

GPW, I was also thinking about this for a hatch and a cloth hinge. Another great benifit to this method.

Image

Makes a very clean bend, anyway.
I make stuff, and it's all designed on Post-Its... the small ones.
User avatar
HandyAtLeast
Teardrop Builder
 
Posts: 41
Images: 22
Joined: Tue Apr 12, 2011 12:54 pm
Location: Puget Sound
Top

Postby GPW » Thu May 05, 2011 3:37 pm

HAL, that's really Great !!! If you heated the outside , it would retain that shape ... Looks like bent roofs and hatches will be no problem with some kerf cuts . :thumbsup: Now , the sky truly is the limit as far as designs we can do in a Foamie ... :D
There’s no place like Foam !
User avatar
GPW
Gold Donating Member
 
Posts: 14920
Images: 546
Joined: Thu Feb 09, 2006 7:58 pm
Location: New Orleans
Top

Postby swampjeep » Thu May 05, 2011 4:07 pm

GPW wrote:HAL, that's really Great !!! If you heated the outside , it would retain that shape ... Looks like bent roofs and hatches will be no problem with some kerf cuts . :thumbsup: Now , the sky truly is the limit as far as designs we can do in a Foamie ... :D


I would think with glue in the kerfs, there would be no need to heat it to keep the shape, and as far as 'doing it in a foamy, well... hopefully the wife agees LOL
User avatar
swampjeep
Teardrop Master
 
Posts: 203
Images: 3
Joined: Mon Apr 04, 2011 7:51 pm
Location: waterford mi
Top

Postby GPW » Thu May 05, 2011 4:42 pm

SJ , yeah , the glue alone should hold the bend ... COOL !!!

Ps while I was at the guitar factory today (my one day a week R&D job) I mentioned the trailers and Vinney suggested we COULD make vertical kerf cuts too for some compound bending ... just crumbs for thought ... :o
Last edited by GPW on Thu May 05, 2011 7:20 pm, edited 1 time in total.
There’s no place like Foam !
User avatar
GPW
Gold Donating Member
 
Posts: 14920
Images: 546
Joined: Thu Feb 09, 2006 7:58 pm
Location: New Orleans
Top

PreviousNext

Return to Foamies

Who is online

Users browsing this forum: Google [Bot] and 0 guests