The rear cabinets are installed, the ceiling is installed, and all the electrical is hooked up and working properly. I also tried connecting the battery and that seems to be working properly. The final test was to plug in the shore power while the battery was connected and supplying power. Had the fire extinguisher handy...did not need it!
The first two pictures are of the bump out sitting in position on the trailer tongue, then being attached. A later pictures shows the bump out coated with the fence post paint, which will be under the final aluminum roof. The bump out will give us extra room for supplies and clothes, and is accessible from the sliding doors inside the cabin.
The next picture shows the sliding doors to the bump out, with the fans above that. The following picture shows the clothes cabinets at the rear of the cabin.
This picture shows the inside side wall of the cabin. Three interesting points in this picture. Number one is the combination smoke/CO2 detector. Enough warnings were given in a sticky about the dangers of CO2 that I thought it worth the money to invest in the combination detector. Second is the outside porch light switch directly above the detector. There is a switch on both sides so the porch lights can be switched on after dark from the inside if we hear something we want to check out. Third, and something that I'm sure some people have already noticed and questioned...the freaking cabinet doors are on upside down! God only knows when or how they got reversed, but they are upside down now! The cabinets are in correct...it is just the doors. I have not bothered to fix them yet as all my efforts are being directed to getting this thing ready for camping. They are fully functional as is, and they can be corrected later. My highest priority is getting the Shack road ready for camping season.
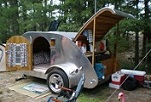
Next comes the roof which I started attaching yesterday. Right now there is no construction adhesive holding it down, only screws. Once the plywood has been in a place for a couple of days and has a little bit of memory I will remove the roof, lay down adhesive, and reattach it with screws while the adhesive dries. The roof took quite a bit of coaxing to bend into shape. At one point I heard a fiber break in the plywood so I immediately backed off the pressure and threw a really hot towel up there and let it sit for about a half hour before continuing. There were no more broken fibers or even creaks coming out of the roof after that. For alignment reasons I let the plywood overhang the sides by about an inch. Once the roof is glued and screwed into it's final resting place I will come by with a router and edge bit and take the plywood off even with the sides.
That's my update for today. I hope people are injoying by build journal.
I am happy with my progress.....