Silly Foamie Ideas

Canvas covered foamies (Thrifty Alternatives...)

Moderator: eaglesdare

Postby jakie » Fri Jun 24, 2011 12:06 am

GPW. I love this design! The trundle bed, or folding couch bed like the squidget, plus the dinette area, and separate potty room, (for us middle agers, male and female), and the storage area in the nose, is exactly what I would like to camp in. The galley area is for those totally inclement days when cooking outside seems too much bother. In only 15 feet plus tongue. Amazing! :applause:
I was going to build a gen benroy....now...foamie here I come
User avatar
jakie
Teardrop Builder
 
Posts: 44
Images: 5
Joined: Fri May 19, 2006 4:43 pm
Location: Beaumont, Alberta Canada

RE: Wall Attachment

Postby mezmo » Fri Jun 24, 2011 12:20 am

Hi GPW,

Looking at your proposed wall attachment method for the FoamStream,
it looks like you're running into the old problem of insufficient attachment
that Mike S. encountered on his standy.

It appears that only the 7 ribs are attached to the side of the floor
mechanically and are thus in shear and then everything else hangs off
of them. Would it be better to have the floor extend out under the wall
bottoms and attach the ribs to a cleat mounted on the floor, with fillers
between them to give a uniform surface to the foam wall sections, and
then have the outside fabric wrap under the bottom of the floor for the
exterior anchoring? I would think that'd be a more secure attachment
and a better way to handle wall loads and make the walls and floor
into more of a single unit [of sorts] once all the final gluing and fabric
applications are done.

Also, how are you approaching the interior wall finishing? It seems that
may be an integral factor here too. Maybe pre-install the interior fabric
before attaching the foam walling to the ribs? It probably all depends
on the look you want - covered ribs or exposed wood finished ribs etc..

I know this is all new territory - exploring as we go - so nothing is set
yet on the various method(s).

Just curious,
Norm/mezmo
If you have a house - you have a hobby.
User avatar
mezmo
1000 Club
1000 Club
 
Posts: 1817
Images: 194
Joined: Fri Jan 01, 2010 4:11 am
Location: Columbia, SC

Postby GPW » Fri Jun 24, 2011 5:34 am

Jakie, Thanks !!! Still have some details to work out ...

Norm , That does make sense ... To let the floor support the wall ... :thumbsup: 
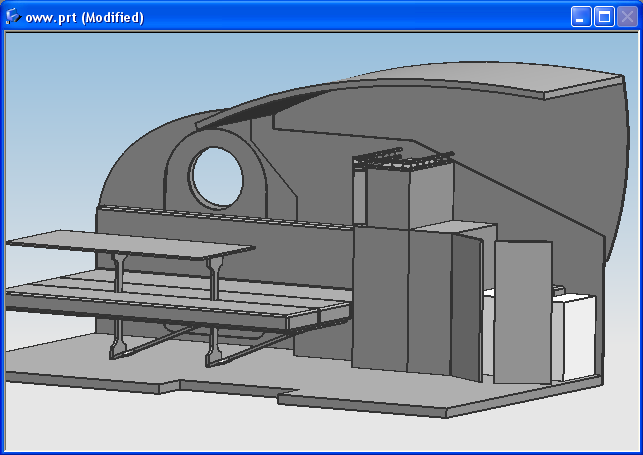
May have to make another drawing ...
I was thinking about pre covering the inside of the foam panels like we did with the little one ... I had thought about either painting the inside or maybe even a wallpaper type covering ... But I still don't know ... Doing all that after , covering between the ribs would be a PIA , but allow a better joining of the foam to the ribs ... The plan was to make the entire wooden frame over a couple foam bulkheads , like on Tink's Dad's drawing , then just add the foam ... Each rib would be placed so they would overlap the seams of the foam panels , or fall out in the middle ... so I need to have a clean glue to foam join where the vertical panels join together and at the middle ribs ...
Since the stringers would float on top (inside ) the ribs , there would be some room to fit the covering behind them ... Either that or make some decorative interior panels and screw them over the stringers ... as an interior wall .... sort of ... Sorta' thinking like the inside will look like a conestoga wagon or the inside of a dirigible ... :o

I admit spending too much time pondering the Jules Verne trailer ... :roll: Going for a Vintage interior look ... For what that's worth ... :thinking:
There’s no place like Foam !
User avatar
GPW
Gold Donating Member
 
Posts: 14920
Images: 546
Joined: Thu Feb 09, 2006 7:58 pm
Location: New Orleans
Top

Postby GPW » Fri Jun 24, 2011 5:43 am

This does look better huh ??? Thanks !!! Image

Having built a good many rib/and stringer constructions in model planes , they seem flimsy until covered ... once again the skin is the strength and incorporates the framing together ... The addition of the foam panels over the framing , plus the canvas skin should make it quite rigid ... :thinking:

EDIT:Just thinking I'd lose 4" of inside width this way ... :o Probably worth it for the extra strength .... The profile was designed to use full sheets of foam , no cutting (save the kerfs) , no waste ... 6 sheets for the outside of the 12' tube section ... Maybe just make the floor wider huh ... ???
Last edited by GPW on Fri Jun 24, 2011 9:17 am, edited 2 times in total.
There’s no place like Foam !
User avatar
GPW
Gold Donating Member
 
Posts: 14920
Images: 546
Joined: Thu Feb 09, 2006 7:58 pm
Location: New Orleans
Top

Postby GPW » Fri Jun 24, 2011 8:36 am

Yet another drawing to better define the details ... Image
There’s no place like Foam !
User avatar
GPW
Gold Donating Member
 
Posts: 14920
Images: 546
Joined: Thu Feb 09, 2006 7:58 pm
Location: New Orleans
Top

Postby GPW » Fri Jun 24, 2011 9:31 am

I can just imagine the inside would look something like this, save the ships wheel and mutton chops.... :lol:
Image
There’s no place like Foam !
User avatar
GPW
Gold Donating Member
 
Posts: 14920
Images: 546
Joined: Thu Feb 09, 2006 7:58 pm
Location: New Orleans
Top

I love the submarine theme!!

Postby Blotto Bros » Fri Jun 24, 2011 2:29 pm

This will finally let me put to good use that old periscope and klaxon I just had to buy at an auction years ago.

The periscope will let me check for bears before exiting the trailer....and wire the klaxon to reverse lights as a backup warning.....now I just need to figure out the torpedo door port a potty emptying system!
Even those souls that are found must occasionally become lost to appreciate what they have.
User avatar
Blotto Bros
Silver Donating Member
 
Posts: 174
Images: 51
Joined: Sat Mar 19, 2011 4:11 pm
Location: Jacksonville, FL
Top

Postby Dusty82 » Fri Jun 24, 2011 5:07 pm

...kind of gives an altogether different meaning to "Fire 1!" and "Fire 2!" don't it...?

Sorry, but somebody had to say it!
TV: 2004 Jeep Liberty Sport

Currently stuck in a tent.
User avatar
Dusty82
The 300 Club
 
Posts: 313
Joined: Thu Jan 28, 2010 8:15 pm
Location: Southern Oregon
Top

Postby GPW » Fri Jun 24, 2011 5:47 pm

:lol: :lol: :lol: You guys are just too Funny !!! :lol: :lol: :lol:
There’s no place like Foam !
User avatar
GPW
Gold Donating Member
 
Posts: 14920
Images: 546
Joined: Thu Feb 09, 2006 7:58 pm
Location: New Orleans
Top

RE:Widening The Floor

Postby mezmo » Sat Jun 25, 2011 2:09 am

Hi GPW,

That second wall attachment drawing is exactly what I was suggesting.
Your comments after it, say it all.

All you'd need to do is to widen the floor the thickness needed for the 2
wall thicknesses. That shouldn't interfere with the number of foam sheets
needed at all. It'd just use a little more plywood - you'd have to cut it to
6ft [your dimension on the rough plan] anyway - so just cut it to 6ft 4in or
whatever the dimension works out to be.

The extra floor width to accommodate the wall widths could be
accomplished by using a 2x4 on the floor perimeter under the top sheet of
plywood on the floor. [The 2x4 to be sealed, or use a rot resistant wood
etc.] It wouldn't be that much extra weight and would provide a solid base
to attach the the walls and the cletes to, as well as a beefy place to
through-bolt the Foamie body to the frame.

Just feedback.

Cheers,
Norm/mezmo
If you have a house - you have a hobby.
User avatar
mezmo
1000 Club
1000 Club
 
Posts: 1817
Images: 194
Joined: Fri Jan 01, 2010 4:11 am
Location: Columbia, SC
Top

Postby GPW » Sat Jun 25, 2011 5:54 am

Thanks Norm !!! Just a couple "adjustments" and we'll be OK !!! :D
There’s no place like Foam !
User avatar
GPW
Gold Donating Member
 
Posts: 14920
Images: 546
Joined: Thu Feb 09, 2006 7:58 pm
Location: New Orleans
Top

Postby mikeschn » Sat Jun 25, 2011 6:53 am

tinksdad wrote:Image


Dad,

Did you ever see this arrangement... I used this in my Escape Hatch a few years ago... It's actually Rayvillian's invention, and everyone that uses it has to send him a nickel! ;)

Image


Image

Mike...
The quality is remembered long after the price is forgotten, so build your teardrop with the best materials...
User avatar
mikeschn
Site Admin
 
Posts: 19202
Images: 475
Joined: Tue Apr 13, 2004 11:01 am
Location: MI
Top

Postby LDK » Sat Jun 25, 2011 6:05 pm

This thread kinda went viral. :lol:
LDK
Gold Donating Member
 
Posts: 1419
Images: 1
Joined: Fri Jan 22, 2010 8:29 pm
Top

Postby Conedodger » Sun Jun 26, 2011 4:59 am

I think its called Foamieitus

:?
Conedodger
Teardrop Master
 
Posts: 129
Joined: Thu May 12, 2011 2:24 pm
Location: United Kingdom
Top

Postby GPW » Sun Jun 26, 2011 5:34 am

Cone , actually , the word is ... AFFORDABLE !!! :thumbsup:
There’s no place like Foam !
User avatar
GPW
Gold Donating Member
 
Posts: 14920
Images: 546
Joined: Thu Feb 09, 2006 7:58 pm
Location: New Orleans
Top

PreviousNext

Return to Foamies

Who is online

Users browsing this forum: jgmahoney and 7 guests