Taking the Plunge - Progressing on the build

Converting Cargo Trailers into TTTs

Postby B@tt » Mon Jun 20, 2011 8:10 pm

pete42 wrote:I know lots of people say not having Windows is the same as sitting in the trailer at night. True BUT I want to look out,
one of the things on my list of things to do if and when I every start a CT build is to have the windows low enough to see out when sitting down.
I hope you haven't replaced the paneling the windows will need framing.
looking good keep going.

pete


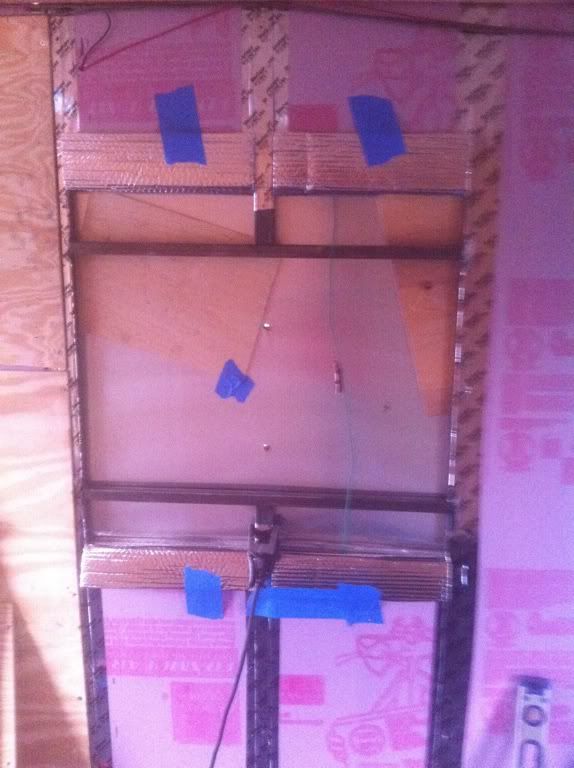
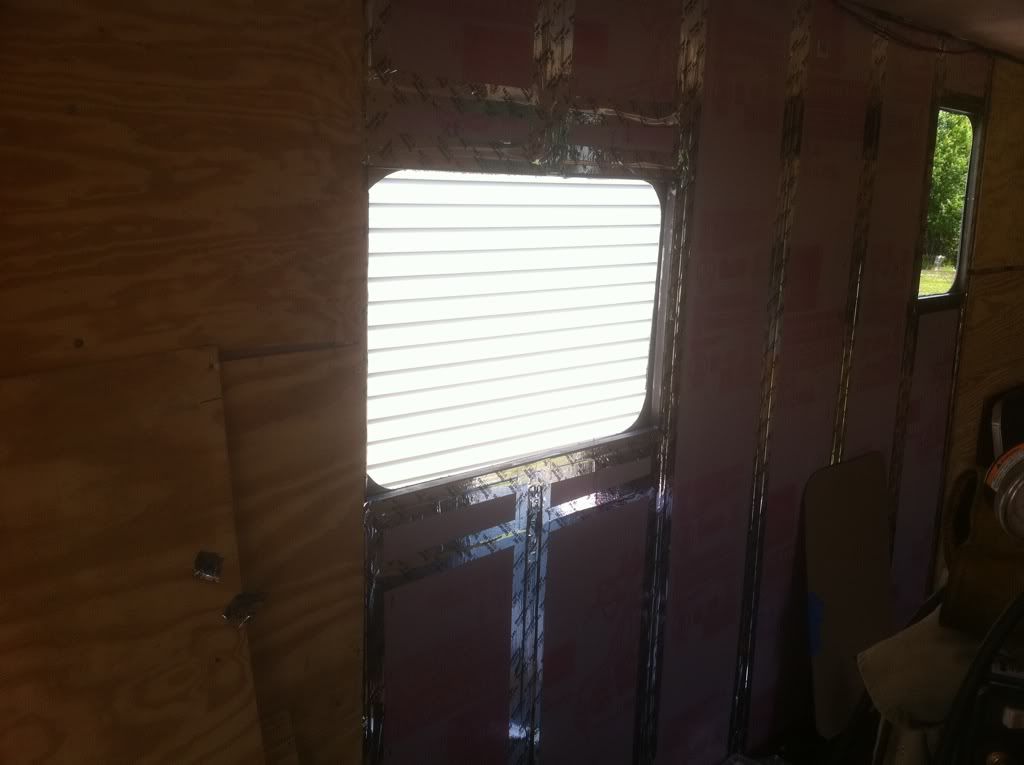
While I respect Pete's opinions, not all window need framing. Depending on your CT frame studs, the size of your windows, and the rigidity of your insulation, it is possible to install windows without framing them in.

The window I installed fit right between the 24" frame studs. That and the 3/4" rigid insulation sandwiched by the outer skin, inner ply and the window rings is plenty to hold the window in place without having to frame it in further.

If you must cut a frame stud to fit a window then of course framing is now required, and I would think framing with steel square (or at least angle) welded in place would be the preferred method.

Good luck and enjoy your build.

Batt
B@tt
Teardrop Advisor
 
Posts: 67
Joined: Mon Apr 11, 2011 9:30 pm
Location: Mountain Home, Id

Postby pilgrim » Mon Jun 20, 2011 8:33 pm

Hey thanks for the info Batt! I had wondered if that was possible but I do have to cut a wall stud to get the window to fit. The Wells Cargo has studs on about 16" centers and the windows I bought are 24" wide. I had planned to use angle and wood to make it all happen. Now I know for sure that this is the way to go. I'm also going to install one of the Fan-tastic vents and I plan to frame that out also for the roof. There's always a little more to do if things are done right!

Pilgrim
The road less traveled usually has fewer potholes.
User avatar
pilgrim
Teardrop Builder
 
Posts: 41
Images: 31
Joined: Fri Jun 10, 2011 9:51 pm
Location: Northwest Montana

Postby 8ball_99 » Mon Jun 20, 2011 10:41 pm

IMO, I'd also say you need to frame the holes for the windows. I've seen a bunch of threads on here where guys cut the metal wall studs and just frame the hole back with some wood. Its just not a good idea. One you weaken the wall but also one of the best things about a cargo trailer camper is the fact the wall studs are metal. Around a window or door is about the worst place in the world to replace the metal structure with wood.
Here is a couple pictures of how I installed mine. I also had to cut my studs for the windows to fit. My studs are 16" OC
Image
Image
8ball_99
500 Club
 
Posts: 623
Joined: Sun Mar 07, 2010 12:34 am
Top

Postby pilgrim » Tue Jun 21, 2011 8:44 am

Thanks for the info and photos! What I had planned was to use some metal angle for the frame bracing but with wood attached just for stiffener. I had also thought if I did it that way maybe I can have a little more room to play with since the wood can be easily trimmed. But now that I see what you've done I'll see if I can get some square tubing locally and do a more professional looking install like yours. Thanks for the help. :thumbsup:

Pilgrim
The road less traveled usually has fewer potholes.
User avatar
pilgrim
Teardrop Builder
 
Posts: 41
Images: 31
Joined: Fri Jun 10, 2011 9:51 pm
Location: Northwest Montana
Top

Postby pete42 » Tue Jun 21, 2011 11:02 am

B@TT is right no frame members need cut if your window will fit between them.

Fantastic fan must be the way to go I have never heard a bad word about them.

The trailer I'm looking at is all aluminum and the vents and windows which will be installed at the factory are all framed with aluminum tubing.
I told them I may want an AC unit later on so make the roof vent area strong enought to carry one.

pete
User avatar
pete42
Super Lifetime Member
 
Posts: 2203
Images: 13
Joined: Sat Nov 07, 2009 11:52 am
Location: SouthWest Ohio
Top

Postby pilgrim » Tue Jun 21, 2011 12:33 pm

Man Pete that's the way to go! :thumbsup:

We've had our trailer for about 5 years now and have enjoyed just camping it like a tent many times. I had always thought these CT's would make a good rig but I sure had no idea how popular it was. About a year or two after I bought mine I began to notice that some factories were coming out with a camper version - which of course made me think that the idea I had was not so bad after all. Now to see that you can order one with windows and the whole bit ready to go for conversion makes me think that these companies are on the ball!

Oh yeah, got the vent ordered so I can finish the ceiling.

Pilgrim
The road less traveled usually has fewer potholes.
User avatar
pilgrim
Teardrop Builder
 
Posts: 41
Images: 31
Joined: Fri Jun 10, 2011 9:51 pm
Location: Northwest Montana
Top

Postby 8ball_99 » Tue Jun 21, 2011 3:15 pm

Just have a look in your yellow pages. 1" square tubing is Very common. Almost any welding shop or steel supply place will have it in stock and in several different gauges. 16gauge is all you need. Its around 26 bucks for a 20' Piece. I removed some screws from the skin of the trailer and put some scrap plywood between the studs and siding while I welded the brack in. Just to make sure I didn't hurt the skin or the paint.
8ball_99
500 Club
 
Posts: 623
Joined: Sun Mar 07, 2010 12:34 am
Top

Postby pilgrim » Tue Jun 21, 2011 4:10 pm

Turns out my neighbor has a welder and has contacts to get the tubing. How easy is that? I never thought to ask him but he's been over to watch the progress on the build every day so when he came over today I told him what I needed to do and we've got it all set up. If everything else goes this well then this thing is in the bag!

Thanks for the tip on undoing the metal. I had planned to do that so the sheeting on the outside didn't get burned but the plywood is a good idea and it looks like that's what pictured above by 8ball_99's post. Good stuff!

We're definitely on our way.

Pilgrim
The road less traveled usually has fewer potholes.
User avatar
pilgrim
Teardrop Builder
 
Posts: 41
Images: 31
Joined: Fri Jun 10, 2011 9:51 pm
Location: Northwest Montana
Top

Postby David_L6 » Wed Jun 22, 2011 10:25 am

Thanks for all the pictures, explanations, and tips. :thumbsup: I check this thread daily for ideas on how to do my trailer.
User avatar
David_L6
Donating Member
 
Posts: 150
Images: 16
Joined: Wed Jun 01, 2011 10:09 pm
Location: Northwest Louisiana
Top

Postby Pyrofish » Wed Jun 22, 2011 11:06 am

As do I :thumbsup: Thanks for the updates and pics!
User avatar
Pyrofish
Teardrop Master
 
Posts: 182
Images: 14
Joined: Thu Jun 02, 2011 8:53 am
Location: Mims, Fl
Top

Postby pilgrim » Wed Jun 22, 2011 11:07 am

Thanks! I have learned so much from this site, of course I'm still learning!

I was able to get the ceiling started yesterday. I installed the 1 1/2" blueboard and lathe. What I'm going to do is put 3/4" blueboard in between the lathe for a total of 2 1/4" of insulation. We love to winter camp and believe we need all we can get. I still have at least 2-3" of clearance (I'm 6') so I'll still be able to walk around without a problem.

Here's a photo of what this all looks like (before the 3/4" blueboard):
Image

I'll be camping in it for 4 days starting tonight so I won't back on this site until I return. I'll give you a full report! ;)
The road less traveled usually has fewer potholes.
User avatar
pilgrim
Teardrop Builder
 
Posts: 41
Images: 31
Joined: Fri Jun 10, 2011 9:51 pm
Location: Northwest Montana
Top

Postby pilgrim » Sun Jun 26, 2011 7:19 pm

Well, back from camp. Just put a cot inside to sleep on and arranged a few things so it was livable. I used a space heater since there was electricity on site and was as warm as I wanted (even more). We had a couple of rainy and cool nights but everything was pleasant. To be honest I slept like a baby, guess it was just the psychology of being out in the new rig.

I'll be back on the build this week if all goes well and post photos as it comes along. Hopefully the windows will get here this week and I do have a tracking number for the vent so I'll keep a watch on that.

Thanks everyone for the interest in my project. It helps keep me on track.
The road less traveled usually has fewer potholes.
User avatar
pilgrim
Teardrop Builder
 
Posts: 41
Images: 31
Joined: Fri Jun 10, 2011 9:51 pm
Location: Northwest Montana
Top

Postby pete42 » Sun Jun 26, 2011 8:28 pm

Good deal on camping.
You don't have to be finished before you go.
I know I will take so long to finish I will go Make-shift before everything is done.

pete
User avatar
pete42
Super Lifetime Member
 
Posts: 2203
Images: 13
Joined: Sat Nov 07, 2009 11:52 am
Location: SouthWest Ohio
Top

Postby pilgrim » Tue Jun 28, 2011 10:36 am

Yeah, this is going to take a some time to finish without doubt. Waiting on parts right now and of course building in my spare time makes for slower than desired progress. But it's all good - I'm having a blast anyway.

One of the biggest things I face is trying to work everything we want into the space and still leave room for the bike to slide in. We don't want to use a fold down or drop down bed because we want a booth area and need the storage. I worked late into the night last night making measurements and the issue may finally be resolved. If I had a sport bike or was just trying to work in the off-road bike then it wouldn't be an issue but the Harley, now that's a different story. One decision that has helped is to go ahead and use a different wheel chock then just tie down the frame in the center. I'm going to do a mock up with just some frame work and try it all out before committing.

Pilgrim
The road less traveled usually has fewer potholes.
User avatar
pilgrim
Teardrop Builder
 
Posts: 41
Images: 31
Joined: Fri Jun 10, 2011 9:51 pm
Location: Northwest Montana
Top

Postby B@tt » Tue Jun 28, 2011 11:38 am

pilgrim wrote:One of the biggest things I face is trying to work everything we want into the space and still leave room for the bike to slide in. We don't want to use a fold down or drop down bed because we want a booth area and need the storage. I worked late into the night last night making measurements and the issue may finally be resolved. If I had a sport bike or was just trying to work in the off-road bike then it wouldn't be an issue but the Harley, now that's a different story. One decision that has helped is to go ahead and use a different wheel chock then just tie down the frame in the center. I'm going to do a mock up with just some frame work and try it all out before committing.

Pilgrim


Simple fix there. Get a sportbike! :D I can fit two of them in my 6x14 with the fold up bed in the stored position.
B@tt
Teardrop Advisor
 
Posts: 67
Joined: Mon Apr 11, 2011 9:30 pm
Location: Mountain Home, Id
Top

PreviousNext

Return to Cargo Trailer Conversions

Who is online

Users browsing this forum: No registered users and 4 guests