Wire through spar holes, glue to affix, insulation channel?

Anything electric, AC or DC

Wire through spar holes, glue to affix, insulation channel?

Postby jmedclay » Fri Jul 01, 2011 8:34 pm

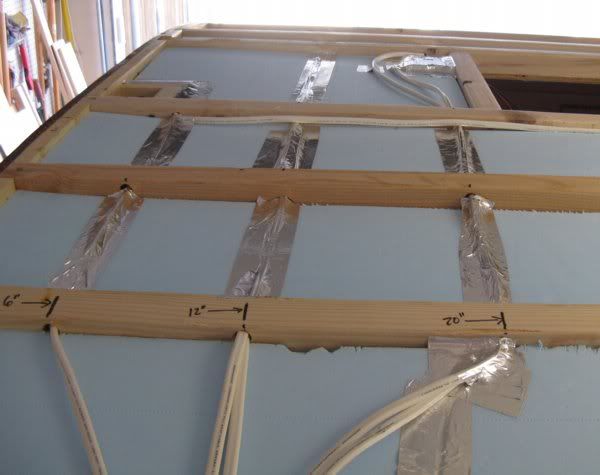
Wiring rough-in starts tomorrow. I'm using good, stranded, marine primary wire and plan on routing it through the roof/front spars via small holes. Overkill perhaps, but is or TiteBond glue (or Elmers, or something else) non-destructive to the insulation? The context is that I'd like to use a small dab to secure the wires to the spar-holes to prevent movement and subsequent chafing over time/travel. Anyone know?

I won't be using conduit but will insulate the cavities, though I may make a bit of a channel around the wires to facilitate convective heat transfer and cooler conductors.

Any sage advice?
jmedclay
Teardrop Master
 
Posts: 107
Images: 104
Joined: Fri Dec 15, 2006 7:08 pm
Location: North Florida

Postby wannabefree » Fri Jul 01, 2011 11:01 pm

Marine wire is usually 2 insulated wires in a polyethylene jacket. The jacket is very tough and is not going to wear through. However, Titebond won't hurt your wire, but why not something more flexible like silicone or caulk? What will cause wear is something hard and sharp. Drill clean holes and you won't have a problem
In anything at all, perfection is finally attained not when there is no longer anything to add, but when there is no longer anything to take away.
-- Antoine de Saint-Exupery
User avatar
wannabefree
The 300 Club
 
Posts: 380
Images: 82
Joined: Fri Jul 11, 2008 11:00 pm
Location: Phoenix

Postby planovet » Sat Jul 02, 2011 8:20 am

I ran mine through holes drilled in the spars but I did not use anything to secure it in the holes.

Image
ImageMark (& Cindi)
Visit our website: Little Swiss Teardrop

I was wondering why the water balloon was getting bigger... and then it hit me.

ImageImageImageImage
User avatar
planovet
The Cat Man
 
Posts: 5583
Images: 3
Joined: Tue Nov 27, 2007 4:48 pm
Location: Plano, Texas
Top

RTV Silicone

Postby Engineer Guy » Sat Jul 02, 2011 8:34 am

Having spent much of my Career around Electronics Manufacturing, I can mention 1st person that the Adhesive of choice is good ole RTV Silicone. Garden variety, exterior-use Silicone is fine and inexpensive for the amount you get. We used it to hold Heat Sinks; Circuit Boards; Indicator Lamps; you name it.

My own A-R technique is to put a 'ring' of it where needed. Then, you can razor it out if needed. No need to fill the entire Spar hole... Dabs of it also can serve to stick down Wiring midway through Wiring runs.
~Reality proceeds with or without your consensus~
User avatar
Engineer Guy
The 300 Club
 
Posts: 480
Images: 118
Joined: Wed Mar 17, 2010 5:19 pm
Location: W. CO
Top

Postby eamarquardt » Sat Jul 02, 2011 10:45 am

I like conduit. The big box stores sell 1/2", 3/8" (I think), and 1/4" clear poly tubing. I've used it as conduit and it works well. It's much easier to modify or change wiring when you have conduit run. The poly tubing is cheap and can be sized for the number and gauge of wires you need to run.

I've run a #12 bare wire through 25 feet of 1/4 vinyl tubing several times. This is a bit tougher than using the poly tubing. I blew dental floss through the tubing then used the dental floss to pull the wire. Took a bit of effort but saved over $50 as I repaired a TIG welder power cable rather than buying new.

When drilling holes in your spars, drill as close to the center as possible to retain as much strength as possible.

Hope this helps.

Cheers,

Gus
The opinions in this post are my own. My comments are directed to those that might like an alternative approach to those already espoused.There is the right way,the wrong way,the USMC way, your way, my way, and the highway.
"I'm impatient with stupidity. My people have learned to live without it." Klaatu-"The Day the Earth Stood Still"
"You can't handle the truth!"-Jack Nicholson "A Few Good Men"
"Some people spend an entire lifetime wondering if they made a difference in the world. The Marines don't have that problem"-Ronald Reagan
User avatar
eamarquardt
Silver Donating Member
 
Posts: 3179
Images: 150
Joined: Sat Nov 11, 2006 11:00 pm
Location: Simi Valley, State of Euphoria (Ca)
Top

Postby madjack » Sat Jul 02, 2011 8:09 pm

I usually squeeze a dab of whatever caulk I have on hand...nothing special, just stick the caulk gun upto the hole and give it a little squeeze..................
madjack 8)
...I have come to believe that, conflict resolution, through violence, is never acceptable.....................mj
User avatar
madjack
Site Admin
 
Posts: 15128
Images: 177
Joined: Thu Dec 02, 2004 5:27 pm
Location: Central Louisiana
Top

Postby jmedclay » Sun Jul 03, 2011 8:24 am

Thanks for the info, guys. I may have jumped the gun on the wire: I got individual Ancor stranded conductors, 105C insulation, no Romex type sheath. Should I run them in nylon loom or some other sort of sheath, or is it perfectly OK to run them without, assuming protection from chafing at the holes via clean holes and caulk, RTV, or wood glue?

I'll anchor the runs with wire ties on anchor pads regardless of other details. Loom looks like a good choice, but interested in your ideas/experiences.
jmedclay
Teardrop Master
 
Posts: 107
Images: 104
Joined: Fri Dec 15, 2006 7:08 pm
Location: North Florida
Top

Postby jmedclay » Sun Jul 03, 2011 9:20 am

Thanks Gus.
The vinyl tubing - is that the sort of thick walled Tygon type, or something else?
Poly tubing?? I'll go look; thin wall?
John

Yes, center of spars, smallest hole that will do the job. Actually, I glued reinforcing scabs on each side of the spars where the holes will be drilled. They span a inch or so each side of the hole location.

[quote="eamarquardt"]I like conduit. The big box stores sell 1/2", 3/8" (I think), and 1/4" clear poly tubing. I've used it as conduit and it works well. It's much easier to modify or change wiring when you have conduit run. The poly tubing is cheap and can be sized for the number and gauge of wires you need to run.

I've run a #12 bare wire through 25 feet of 1/4 vinyl tubing several times. This is a bit tougher than using the poly tubing. I blew dental floss through the tubing then used the dental floss to pull the wire. Took a bit of effort but saved over $50 as I repaired a TIG welder power cable rather than buying new.

When drilling holes in your spars, drill as close to the center as possible to retain as much strength as possible.

Hope this helps.

Cheers,

Gus[/quote]
jmedclay
Teardrop Master
 
Posts: 107
Images: 104
Joined: Fri Dec 15, 2006 7:08 pm
Location: North Florida
Top

Postby eamarquardt » Sun Jul 03, 2011 11:10 am

I got 1/2" od at HD a week or so ago but I don't see it on their web site. Lowe's has the 1/4" on their web site and they probably carry the 1/2 and maybe even 3/8 but I'm sure it's available on line somewhere. Here is a link to Lowe's 1/4":

http://www.lowes.com/pd_15275-104-SPEB2 ... Id=3130913

The polyethylene tubing has a slightly thinner wall and has more room for the wire than the same size vinyl tubing. Also, it is more round and easier to route the wires through than the vinyl tubing.

They make electrical "strain reliefs" that the 1/2' slips right into so you can make liquid tight seals if you like. Not "code" for a/c wiring but cool for d/c stuff.

Nice job on reinforcing your spars where you drill through them.

Hope this helps.

Cheers,

Gus
The opinions in this post are my own. My comments are directed to those that might like an alternative approach to those already espoused.There is the right way,the wrong way,the USMC way, your way, my way, and the highway.
"I'm impatient with stupidity. My people have learned to live without it." Klaatu-"The Day the Earth Stood Still"
"You can't handle the truth!"-Jack Nicholson "A Few Good Men"
"Some people spend an entire lifetime wondering if they made a difference in the world. The Marines don't have that problem"-Ronald Reagan
User avatar
eamarquardt
Silver Donating Member
 
Posts: 3179
Images: 150
Joined: Sat Nov 11, 2006 11:00 pm
Location: Simi Valley, State of Euphoria (Ca)
Top

Postby jmedclay » Sun Jul 03, 2011 3:32 pm

Thanks for the info Gus.

While you were posting that I was at HD and saw their various tubing offerings but picked up the 3/8 split loom; thought I could squeeze it and get it to cooperate in an oval hole. Wrong. Short version - going to exchange it for the PE you mentioned. Removing the material associated with a 9/16 diameter hole is more than I'm comfortable with. It will be fiddly but I'll drill a 3/8 hole and hog it out in the transverse directions. The un-split PE is workable that way. So, making progress, if a bit of a grunt.

Since I couldn't do much on the electrical installation front, I installed insulation and the exterior skin on the front of the TD, where no electrical service exists.

John
jmedclay
Teardrop Master
 
Posts: 107
Images: 104
Joined: Fri Dec 15, 2006 7:08 pm
Location: North Florida
Top

Postby dh » Mon Jul 04, 2011 2:03 am

You mentioned zip tie anchor pads. Just my $0.02, but the sticky backing doesn't like to stay stuck too long. At work we stick them on (to metal surfaces) then rivit it through one or both of the holes in the pad depending on where it is and what it has to hold. If your skin is too thin for fasteners, I'd epoxy them down.
Ignorant doesn't know any better, Stupid knows better but does it anyway.

My build page: http://www.tdbuildlog.blogspot.com/
User avatar
dh
Gold Donating Member
 
Posts: 1647
Joined: Fri Aug 14, 2009 7:08 pm
Location: North East Arkansas
Top

Postby LDK » Mon Jul 04, 2011 7:04 pm

I'm glad I read this thread because I just got through running my wires through the spars today.
Image
Image
I'll now use silicone or caulk in the spar holes as added insurance.
LDK
Gold Donating Member
 
Posts: 1419
Images: 1
Joined: Fri Jan 22, 2010 8:29 pm
Top

Postby jmedclay » Tue Jul 05, 2011 7:50 pm

Thank you all for the helpful information. I also found this treatment to be useful:
http://forum.woodenboat.com/showthread. ... nd-Trailer

Between all of the info thats been kicked around I've settled on using heat shrink around the bundles where they go through the spars, and then use some caulk to anchor each bundle to the spar. I'll use expandable braided sleeving for the runs between spars and then use small one ear clamps and properly anchored wire ties to affix while allowing some movement due to expansion/contraction.

http://shop.genuinedealz.com/Marine%20E ... ck=8667854

I thought I'd solder the spade terminals but have been warned off of that and so will use crimp connectors with dielectric grease and double heat shrink covers for protection and strain relief

The holes have been bored though there is probably some rat-tail filing for final fit.

Front part of the roof has been insulated and skinned. the nose curve all the way aft is open for wiring and insulation. I feel good about the general direction and installation details now. Thanks again for the help.
jmedclay
Teardrop Master
 
Posts: 107
Images: 104
Joined: Fri Dec 15, 2006 7:08 pm
Location: North Florida
Top

Postby aggie79 » Fri Jul 08, 2011 8:43 am

I did similar to Planovet. Drill holes for cabling in center of spars. Install first layer of insulation. Add cabling and tape temporarily in place. (I also added tape markings at spars and labeled dimensions followed by pictures for future reference.) Add second layer of insulation leaving gaps to form a "chase" around cabling. I then came back later and a filled the chases with spray foam insulation. After it cured, I trimmed it flush.

Here are a few pics:

Image

Image

Image

Image

Take care,
Tom
Tom (& Linda)
For build info on our former Silver Beatle teardrop:
Build Thread

93503
User avatar
aggie79
Super Duper Lifetime Member
 
Posts: 5405
Images: 686
Joined: Tue Aug 07, 2007 5:42 pm
Location: Watauga, Texas
Top

Postby jmedclay » Wed Jul 13, 2011 9:38 pm

Great How-To Photos, all. Very helpful.

I got all of the holes drilled/dressed, first layer of insulation cut/fit, and the wiring for each circuit fit, cut and labeled. The bundle of heat shrink and poly loom is here too. I still have to select the reading lights, and install the tiny LED "night light" and switch. Layout for the power gear has been settled, so this WE should see substantial progress. I need to get some spade/crimp connectors for the 12 outlets.

Hopefully ready for fall and cooler weather; the temperature here is "sauté".
jmedclay
Teardrop Master
 
Posts: 107
Images: 104
Joined: Fri Dec 15, 2006 7:08 pm
Location: North Florida
Top

Next

Return to Electrical Secrets

Who is online

Users browsing this forum: No registered users and 2 guests