Wood Exterior trim - How to ?

Anything to do with mechanical, construction etc

Wood Exterior trim - How to ?

Postby CliffinGA » Thu Aug 18, 2011 8:54 pm

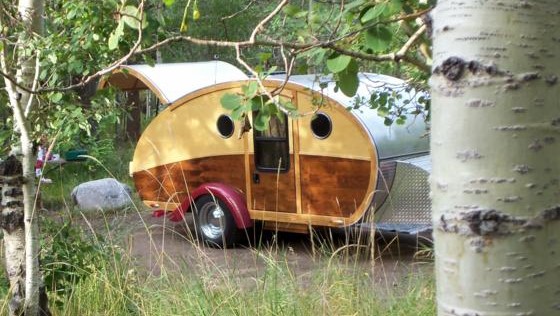
Ok all thinking of maybe doing it as a woody and with this in mind I have put it together so I can install wood trim to cover the holes for the spars and at the bottom of the sides. My question is how exactly everyone has made their wood trim especially on a benroy?

Cliff
In God we trust, shoot the rest and he will sort out!

My Build:

viewtopic.php?f=50&t=42628
User avatar
CliffinGA
1000 Club
1000 Club
 
Posts: 1499
Images: 207
Joined: Sat Nov 14, 2009 1:29 pm
Location: Jefferson, GA

Postby Wolfgang92025 » Thu Aug 18, 2011 9:51 pm

Cliff,

I made a cardboard template first.
Place piece of cardboard on side of trailer, and trace the outline. Cut the outer edge with a razor knife and test fit, trim if necessary. I made a homemade scribe with a pencil on on end the width of the wood trim. Now trace the second line using the scribe on your cardboard template and cut out. test fit again. If you are happy, trace cardboard trim outline onto your wood trim piece. I cut mine oversize on a band saw. I glued several pieces together to make a longer trim piece. I used a belt sander (lay the sander on it's side on a table) to sand the outside contour till I was happy. Keep test fitting until desired results are achieved. (remember, if you take of too much, you have to be very creative, or start over) I would then retrace the inside contour and cut and or sand until I had what I liked.
You can see how I joined the sections on the link below.

http://www.tnttt.com/viewtopic.php?t=28640&postdays=0&postorder=asc&start=90
Wolfgang

Image
User avatar
Wolfgang92025
Lifetime member
 
Posts: 1098
Images: 660
Joined: Fri Apr 18, 2008 10:16 pm
Location: Salt Lake City area, Utah

Postby toypusher » Fri Aug 19, 2011 6:03 am

Wolfgang92025 wrote:
http://www.tnttt.com/viewtopic.php?t=28640&postdays=0&postorder=asc&start=90


I noticed that you just used a 'butt' joint. I would like to suggest if someone is doing this to use a "biscuit" joint. You way of clamping it is genius though I think! :thumbsup: Another possiblility would be pocket hole screws on the backside. Just my opinion here though.
User avatar
toypusher
Site Admin
 
Posts: 43040
Images: 324
Joined: Fri Jan 28, 2005 12:21 pm
Location: York, PA Area
Top

Postby Wolfgang92025 » Fri Aug 19, 2011 8:09 pm

Kerry,

I did use 1/8" luan as a biscuit along 80% of the edge. Even with the biscuit, one have to handle the stuff gingerly. Their was a couple of times I dropped the piece on the floor and spoke a some well chosen words afterwards as I picked up multiple pieces. If you get my drift..... :cry: :cry:
But it did turn out nice in the end. :thumbsup:
Wolfgang

Image
User avatar
Wolfgang92025
Lifetime member
 
Posts: 1098
Images: 660
Joined: Fri Apr 18, 2008 10:16 pm
Location: Salt Lake City area, Utah
Top

Postby CliffinGA » Fri Aug 19, 2011 9:27 pm

Thanks Wolfgang for the response and the great idea's for the clamps. I was already thinking of ways ro make some69" clamps and I should be abvle to combine the way you did the ends of yours with a 2x4 all the way across the top to make a bar clamp. Kerry I was thinking like you that pocket drilling may be easier for me that doing butt joints. Wolfgang I will also be rereading your build journal so I can get some more ideas. I appreciate your help guys.

Cliff :thumbsup:
In God we trust, shoot the rest and he will sort out!

My Build:

viewtopic.php?f=50&t=42628
User avatar
CliffinGA
1000 Club
1000 Club
 
Posts: 1499
Images: 207
Joined: Sat Nov 14, 2009 1:29 pm
Location: Jefferson, GA
Top

Postby Senior Ninja » Fri Aug 19, 2011 11:51 pm

I tweaked my flat pieces in the shower and allowed cold water to run over them for maybe half an hour. I could then easily bend the into place with both glue and finish nails from the nail gun. The vertical pieces were carefully cut from sheets of quarter inch plywood.
Steve
Building the TD was the best thing I ever made.
Senior Ninja
Donating Member
 
Posts: 608
Joined: Fri Apr 28, 2006 4:16 pm
Location: Bakersfield, Kahlifornia
Top

Postby CliffinGA » Sat Aug 20, 2011 4:46 am

That makes sense Steve, did you kind of start prebending them first while under the water? Also Steve since your in Bakersfield do you know a man out there that has 2 beautiful old Bright Yellow 20's model Fords one a coupe and the other a roadster with the rumble seat and had what looks like a wazat tear in the same color? His name is Frank Barker, he's my uncle. Just curious is all.

Cliff
In God we trust, shoot the rest and he will sort out!

My Build:

viewtopic.php?f=50&t=42628
User avatar
CliffinGA
1000 Club
1000 Club
 
Posts: 1499
Images: 207
Joined: Sat Nov 14, 2009 1:29 pm
Location: Jefferson, GA
Top

Postby Senior Ninja » Mon Aug 22, 2011 10:02 am

Cliff,
Yes, I did sort of began the bend, then the water took over and they just kind of slumped into place.
I'm sorry I have not met your Uncle, yet. I just returned to Bakersfield after a five year absence. Still kind of feeling my way. Lots of stuff has happened in my
life recently, but am looking forward to getting back to visiting car shows.
Steve
Building the TD was the best thing I ever made.
Senior Ninja
Donating Member
 
Posts: 608
Joined: Fri Apr 28, 2006 4:16 pm
Location: Bakersfield, Kahlifornia
Top

Postby Billy K » Sat Aug 27, 2011 10:21 pm

In my build journal (Started..pg 3) you can see how I attached 1/8" plywood as trim.

I cut the outer profile with my router, using the same pattern as the walls and then scribed the inner radius..jig sawed and sanded...

My thinkin here ... trim is mostly for color and eye appeal, why add bunches of stress to my abiliies and/or brain?? :? :lol:

I like the way lots of folks do their trim; wanted a different style was all.
"...influence is no government." - George Washington
Billy K
Teardrop Master
 
Posts: 276
Joined: Sun Dec 06, 2009 8:03 pm
Location: Kokomo,IN
Top

Postby CliffinGA » Sun Aug 28, 2011 6:53 am

Thanks Billy just went through your builf thread and was curious as to what you sealed your exterior with? Epoxy or what?

Cliff
In God we trust, shoot the rest and he will sort out!

My Build:

viewtopic.php?f=50&t=42628
User avatar
CliffinGA
1000 Club
1000 Club
 
Posts: 1499
Images: 207
Joined: Sat Nov 14, 2009 1:29 pm
Location: Jefferson, GA
Top

Postby Billy K » Sun Aug 28, 2011 8:00 am

Cabot deck stain (blue label) and (so far) 4 coats of Cabot Spar Varnish Semi Gloss; is the seal recipe.

Don't know yet what others will say or how it'll hold up...but, simple enough to do.

The cabinets and interior are yet to come but, the walls all have the same treatment.

At 5x8, 1 deck stain and 1.25 spar, so far....Glad you ask, I should have that info in the build thread..
"...influence is no government." - George Washington
Billy K
Teardrop Master
 
Posts: 276
Joined: Sun Dec 06, 2009 8:03 pm
Location: Kokomo,IN
Top

Postby David S » Tue Aug 30, 2011 9:23 pm

Not sure if this is what you want but here is the wood trim on mine.I let the top skin hang over 1 in. on each side then started gluing 1/4" thick strips of the walnut 1 at a time.I must say though this is very time consuming but you end up seamless curve
Image
this was taken before I put the wood across the bottom that covers the frame .everything is disassembled for applying poly right now I hope to have more pics after this weekend
Image
User avatar
David S
Donating Member
 
Posts: 218
Images: 53
Joined: Wed Aug 05, 2009 9:18 pm
Location: Rose Hill Kansas
Top

Postby Roly Nelson » Fri Sep 02, 2011 11:22 pm

Well Cliff, perhaps my const pics will give you a clue regarding my trim installation on my woody. Click on the link below. Good luck
8) :thumbsup: Roly
See the little 1/2 Nelson Woody constructions pics at: http://gages-56.com/roly.html
User avatar
Roly Nelson
L'il Ol' Woody Builder
 
Posts: 2971
Images: 13
Joined: Sun Jan 30, 2005 12:45 pm
Location: Wildomar, Calif
Top


Return to Teardrop Construction Tips & Techniques

Who is online

Users browsing this forum: No registered users and 2 guests