Don & Christi's 6 x 10 Cargo Conversion

Converting Cargo Trailers into TTTs

Postby d30gaijin » Thu Sep 01, 2011 6:35 pm

GPW wrote:Don , can you trace the wires down and see where they go (maybe on a PC board with identifying letters /numbers ) ... can't be all that difficult , just a thermostat eh ??? :thinking:


GPW,

Yep, the controller is actually a PC board on the A/C unit itself. The schematic that Eric Botts of Airxcel sent me is now starting to make sense... I hope. :NC

Don
User avatar
d30gaijin
Titanium Donating Member
 
Posts: 594
Images: 139
Joined: Sat Jun 12, 2010 9:27 pm
Location: Boise, Idaho

Out Camping... Finally!

Postby d30gaijin » Mon Sep 05, 2011 8:52 pm

Finally got out camping for the first time this year. Took the 16.5' Jayco out for Labor Day Weekend. It was so nice to get away and sit by the mighty Snake River at Three Island Crossing in Idaho right on the Oregon Trail, a major crossing for immigrants heading west in the 1800's via wagons.

At Three Island Crossing the State of Idaho has beautiful replicas of original wagons used by immigrants to make the trip from St. Louis to the Oregon Territory, and one can still see the original route they took to cross the Snake River via the three Islands there. When seen in perspective it is absolutely amazing what our forefathers and foremothers endured to head west to the promised land.

It was a very nice and relaxing weekend for Christi and I. She spotted/identified two new birds for her life list and I got a few, maybe not so good, photos of them. Be that as it may, we had a great time and are now looking forward to a CT trip to Hagerman, Idaho in October, hopefully we can get the same secluded spot on the Snake River that we enjoyed so much in the CT October of last year.

Don
Image
Last edited by d30gaijin on Tue Sep 06, 2011 7:03 pm, edited 1 time in total.
User avatar
d30gaijin
Titanium Donating Member
 
Posts: 594
Images: 139
Joined: Sat Jun 12, 2010 9:27 pm
Location: Boise, Idaho

Postby GPW » Tue Sep 06, 2011 9:34 am

Don, be sure to check that front cap window ... They used a dry fit window on mine , which leaked (post warranty) and caused de-lamination and subsequent floor rot under the dinette , now removed... ... grrrr!!!
There’s no place like Foam !
User avatar
GPW
Gold Donating Member
 
Posts: 14920
Images: 546
Joined: Thu Feb 09, 2006 7:58 pm
Location: New Orleans
Top

Postby d30gaijin » Tue Sep 06, 2011 6:43 pm

GPW wrote:Don, be sure to check that front cap window ... They used a dry fit window on mine , which leaked (post warranty) and caused de-lamination and subsequent floor rot under the dinette , now removed... ... grrrr!!!


GPW,

I am not sure what you mean when you refer to a "dry fit window" at the front? :oops: If you mean a sealed only by the rubber gasket around the window mine is sealed with a silicone caulking compound all around. The window sits over the storage area under the bench seat that I have to get into each time I set the trailer up for towing since that's where my equalizer bars and other tools are stored. I've never seen any water leakage in that area but will keep an eye out for same based on your experience with Jayco. :thumbsup:

Don
User avatar
d30gaijin
Titanium Donating Member
 
Posts: 594
Images: 139
Joined: Sat Jun 12, 2010 9:27 pm
Location: Boise, Idaho
Top

Progress!!!

Postby d30gaijin » Tue Sep 06, 2011 7:01 pm

Made a bit of progress today on the 6x10 CT. Received our Big Kahuna shower late last week but it had to sit in the box until we returned from our Labor Day trip in the 16.5' Jayco. I also ordered a pair of Marinco 12v DC female plug-in adapters i.e., cigarette lighter type plugs (I truly appreciate their stuff. It isn't cheap but everything I have bought from them is of excellent quality/marine grade stuff.) I installed one outboard for external use of the Big Kahuna shower (see pic below) and the other will be installed internally for anything we might need 12v DC power for inside the CT.

I truly have to get busy on the CT since we're hoping to make a trip in early October for three or four days of boondocking.

OH! And if you're wondering why the orange colored Big Kahuna shower tank, well it was on sale for $10 less than the blue job, not to mention that blue and orange are Boise State University Bronco football team colors and we are Boise State Bronco fans, as are nearly everyone in Boise... GO BRONCOS!!! 8)

Don
Image
User avatar
d30gaijin
Titanium Donating Member
 
Posts: 594
Images: 139
Joined: Sat Jun 12, 2010 9:27 pm
Location: Boise, Idaho
Top

Postby GPW » Wed Sep 07, 2011 6:13 am

Don , if yours is sealed , you got a “good one “ :thumbsup:

CT coming along Nicely !!! 8)
There’s no place like Foam !
User avatar
GPW
Gold Donating Member
 
Posts: 14920
Images: 546
Joined: Thu Feb 09, 2006 7:58 pm
Location: New Orleans
Top

Postby d30gaijin » Wed Sep 07, 2011 8:01 pm

GPW wrote:Don , if yours is sealed , you got a “good one “ :thumbsup:

CT coming along Nicely !!! 8)


GPW,

Your CT or mine... re: coming along nicely? ;)

Gonna go to Home Depot tomorrow to look for some birch or ash plywood to fill in the forward galley area below the galley shelf to the CT floor and between the reefer. I will tack it in place for now then cut cabinet door openings once I find some cabinet doors that are suitable (I need access to the water storage area on the right of the reefer and electrical area on the left of the reefer). I really want to get the galley area finished off then move on to wall paneling and completing/filling in the area between the Luan roof paneling and the sidewall paneling i.e., the upper corners I still need to insulate and panel over but can't do that until I decide on and install the wall paneling. From there I will decide what to do in terms of over the galley storage/cabinets. I suspect I will be building my own cabinets, not something I relish with my very limited woodworking skills. Be that as it may, I need to get the forward area done first then deal with the rest of the CT.

We're getting there but still have a ways to go. :oops:

Don
User avatar
d30gaijin
Titanium Donating Member
 
Posts: 594
Images: 139
Joined: Sat Jun 12, 2010 9:27 pm
Location: Boise, Idaho
Top

Postby GPW » Thu Sep 08, 2011 8:33 am

Don, Yours !!! Mine’s just storing wood right now (multitasking) ;)
You ever get that thermostat figured out ??

Cabinets ... :o I try to avoid them myself ... making Good cabinets can be very challenging , requiring specialized tools .. especially Doors .. :shock:

I’m still thinking shelves , with retainer bars (and bungee cords ) , and perhaps a “curtainâ€
There’s no place like Foam !
User avatar
GPW
Gold Donating Member
 
Posts: 14920
Images: 546
Joined: Thu Feb 09, 2006 7:58 pm
Location: New Orleans
Top

Postby Wolfscout » Thu Sep 08, 2011 9:31 am

If you use those wire shelves.. you can bungee cord milk crates on them nicely. Great for propane bottles and many other items.
Larry Fulmer, Jr.

2016 8X20 Homestead Patriot CTC
CTC 2

'90 6x12 Wells Cargo Trailer Conversion
my 1st build= CTC 1 FB album history.
User avatar
Wolfscout
500 Club
 
Posts: 511
Images: 32
Joined: Tue Jun 14, 2011 5:01 pm
Location: Newberry, S.C.
Top

Postby GPW » Thu Sep 08, 2011 9:34 am

Hmmm ??? Wire shelves ... Grate idea !!! :thumbsup:
There’s no place like Foam !
User avatar
GPW
Gold Donating Member
 
Posts: 14920
Images: 546
Joined: Thu Feb 09, 2006 7:58 pm
Location: New Orleans
Top

Postby d30gaijin » Thu Sep 08, 2011 7:11 pm

[quote="GPW"]Don, Yours !!! Mine’s just storing wood right now (multitasking) ;)
You ever get that thermostat figured out ??

Cabinets ... :o I try to avoid them myself ... making Good cabinets can be very challenging , requiring specialized tools .. especially Doors .. :shock:

I’m still thinking shelves , with retainer bars (and bungee cords ) , and perhaps a “curtainâ€
User avatar
d30gaijin
Titanium Donating Member
 
Posts: 594
Images: 139
Joined: Sat Jun 12, 2010 9:27 pm
Location: Boise, Idaho
Top

Postby glwt06 » Thu Sep 08, 2011 11:44 pm

Hi Don,

It's been a little while since I read up on your build.

It's funny that the Habitat for Humanity store is mentioned. I was just in my local store and they had some nicer looking cabinets from what looked like a kitchen set. I stood looking at them thinking that I could have made my trailer look a lot cleaner if I had used pre-built doors.

I agree with your goal of a professional appearing build. Used cabinets look like a smart way to go.

Paul
User avatar
glwt06
Teardrop Inspector
 
Posts: 16
Joined: Mon Jun 20, 2011 2:28 pm
Location: Michigan
Top

Postby GPW » Fri Sep 09, 2011 8:50 am

New cabinets of good quality are prohibitively expensive ... even small ones :o Drawer units are a good thing to look for too . Drawers are just tedious to make .. Pre built (recycled) drawer with slides can easily be installed in a homemade carcass ... That and some good doors and you can build a professional cabinet that fits the CT exact ... :thumbsup:

Don , is it me or is that countertop leaning ? Trick photography?
There’s no place like Foam !
User avatar
GPW
Gold Donating Member
 
Posts: 14920
Images: 546
Joined: Thu Feb 09, 2006 7:58 pm
Location: New Orleans
Top

Recyclin'

Postby Engineer Guy » Fri Sep 09, 2011 10:43 am

I think this whole Recycling idea came up early in this Thread cuz the couple of places near us are real treasure troves. I especially like the finish and patina on some of the old Cabinets, and the stylin' Retro Knobs. No OSB, and construction is usually solid.

At some lil City-owned Duplexes down the Road, they just yanked out a entire Kitchen Suite. I was salivating at some of the free, old Cabinets, but the timing was wrong to grab and store them now.

Even here at our City House, a Standard Cabinet was used for the Vanity in a 1/2 Bath. Filler pieces stained to match were used on either side; the obvious way to make do.
~Reality proceeds with or without your consensus~
User avatar
Engineer Guy
The 300 Club
 
Posts: 480
Images: 118
Joined: Wed Mar 17, 2010 5:19 pm
Location: W. CO
Top

Postby d30gaijin » Fri Sep 09, 2011 6:08 pm

GPW wrote:New cabinets of good quality are prohibitively expensive ... even small ones :o Drawer units are a good thing to look for too . Drawers are just tedious to make .. Pre built (recycled) drawer with slides can easily be installed in a homemade carcass ... That and some good doors and you can build a professional cabinet that fits the CT exact ... :thumbsup:

Don , is it me or is that countertop leaning ? Trick photography?


GPW,

It is trick photography. I'm good at that, meaning half the time I can't hold the camera level. :x

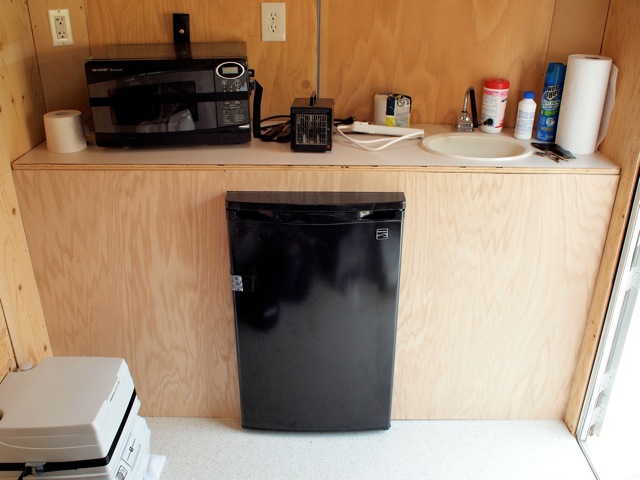
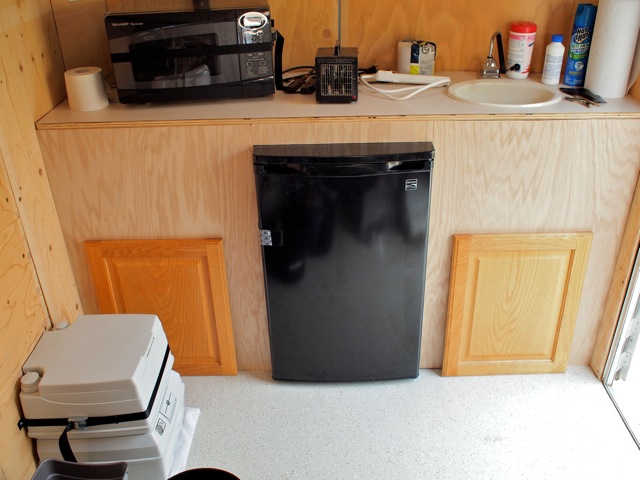
OK, so got up this morning and headed for the Habitat for Humanity "Reuse Store" as they label it. Was looking at used bathroom vanities when a gent from the store asked what I was looking for. I told him what I was doing and that all I need are some vanity doors. He said, "Oh, well I think we can help you out. Right this way." They had a boatload of cabinet doors of all shapes, colors, wood types, sizes, etc. I bought a very nice pair of what I thought were oak doors (the wife says they'er alder) for $4 each in beautiful condition minus the hardware, nice tongue and groove fabrication, very solid doors. From there I headed for Home Depot and bought a 4x8 sheet of very nice oak 3/4" plywood with no blemishes (expensive stuff!) then headed back home to get some work done on the CT. The pics below show what I accomplished today... remember, my woodworking skills aren't all that great so I go slow, measure twice, cut a little oversize then fit try, trim as necessary until I am happy with what I have done.

The first pic shows the filled in galley area, the second pic the same with the two cabinet doors I bought at Habitat for Humanity sitting in front (in spite of the pic the doors are the same color, they look different colors in the photo because of the light coming from the right side through the open CT side door. The door on the right is closest to the true color of both doors).

Tomorrow I will remove it all and cut the openings for the cabinet doors and go buy the hardware to install the doors. The doors will be stripped of finish and then we'll stain the oak wood enclosure and the doors to match each other, apply a finish and then reinstall.

I am truly happy to be back making some progress on our CT conversion after having to lay-off for so many months.

Don
Image
Image
User avatar
d30gaijin
Titanium Donating Member
 
Posts: 594
Images: 139
Joined: Sat Jun 12, 2010 9:27 pm
Location: Boise, Idaho
Top

PreviousNext

Return to Cargo Trailer Conversions

Who is online

Users browsing this forum: No registered users and 3 guests