Galley Seal "Hiccup"

Anything to do with mechanical, construction etc

Galley Seal "Hiccup"

Postby Moho » Tue Sep 20, 2011 6:30 pm

I wanted to get everyones thought's on this construction method for sealing the galley hatch on my build. I "overlooked" :oops: how I would seal the galley hatch and this is the solution I came up with, based on where I stand now in construction.

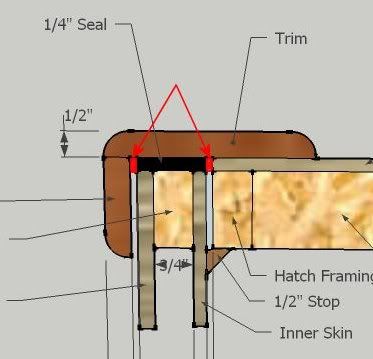
I'm thinking it shouldn't have any problems, however I just wanted to get your thoughts before I commit to more of my framing and such. Keep in mind this is a woody and the trim is 1/2" thick (actual thickness).

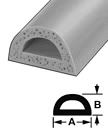
One thought I had was to eliminate the 2 seals and go to just one by lowering the side trim and moving the 1/4" seal to the outside edge.

I also considered moving the top trim over to create a "drip edge" of sorts.

Thoughts?

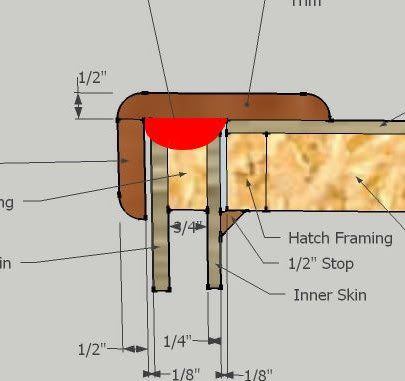
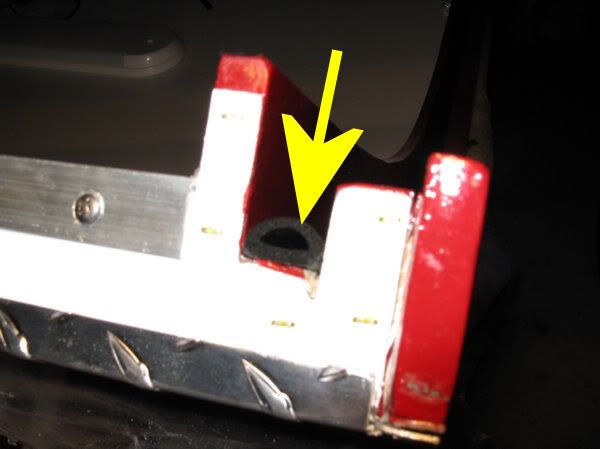
Below is a cross section of the hatch.

Image
User avatar
Moho
Teardrop Master
 
Posts: 244
Images: 69
Joined: Tue Sep 13, 2011 8:17 am
Location: Indianapolis, IN

Postby Miriam C. » Tue Sep 20, 2011 6:46 pm

8) Yep, you have over-built it! ;) Looks good to me really!
“Forgiveness means giving up all hope for a better past.â€
User avatar
Miriam C.
our Aunti M
 
Posts: 19675
Images: 148
Joined: Wed Feb 15, 2006 3:14 pm
Location: Southwest MO

Postby madjack » Tue Sep 20, 2011 7:14 pm

...looks pretty good to me...keep in mind, you want about a 50% compression on your seals for best results...I would also consider placing a seal between the top trim on the hatch and the body...in other words, don't give water any place to pool up or try to enter.........
madjack 8)
...I have come to believe that, conflict resolution, through violence, is never acceptable.....................mj
User avatar
madjack
Site Admin
 
Posts: 15128
Images: 177
Joined: Thu Dec 02, 2004 5:27 pm
Location: Central Louisiana
Top

Postby Moho » Tue Sep 20, 2011 7:19 pm

Yeah it's there, just hard to see in the diagram. Labeled 1/16" seal. My biggest concern was honestly the amount of stress on the top trim piece over time. Shouldn't be alot of pressure, but there will be some.
User avatar
Moho
Teardrop Master
 
Posts: 244
Images: 69
Joined: Tue Sep 13, 2011 8:17 am
Location: Indianapolis, IN
Top

Postby 48Rob » Wed Sep 21, 2011 6:52 am

My biggest concern was honestly the amount of stress on the top trim piece over time. Shouldn't be alot of pressure, but there will be some.


You could solve that issue/concern with a small stop on each side on the interior wall, placed to allow, as Jack said, 50% compression.
It would contact the hatch framing, allowing only a set amount of stress/contact on the hatch trim.

Rob
Waiting for "someday" will leave you on your deathbed wondering why you didn't just rearrange your priorities and enjoy the time you had, instead of waiting for a "better" time to come along...
User avatar
48Rob
Super Lifetime Member
 
Posts: 3882
Images: 4
Joined: Thu Nov 17, 2005 6:47 pm
Location: Central Illinois
Top

Re: Galley Seal "Hiccup"

Postby bobhenry » Wed Sep 21, 2011 7:04 am

[quote="Moho"]I also considered moving the top trim over to create a "drip edge" of sorts.

Thoughts?

It looks kinda tight. You might want to think about swelling of the wood during high moisture situations.

It is a great design feature though, and darn sure won't leak unless you are UNDERwater! :thumbsup:
Growing older but not up !
User avatar
bobhenry
Ten Grand Club
Ten Grand Club
 
Posts: 10368
Images: 2623
Joined: Fri Feb 09, 2007 7:49 am
Location: INDIANA, LINDEN
Top

Re: Galley Seal "Hiccup"

Postby Moho » Wed Sep 21, 2011 7:39 am

48Rob wrote:You could solve that issue/concern with a small stop on each side on the interior wall, placed to allow, as Jack said, 50% compression.
It would contact the hatch framing, allowing only a set amount of stress/contact on the hatch trim.

Thats a great idea, especially to help with any swellling or slight warping of surfaces. I will add that to the design.

bobhenry wrote:
It looks kinda tight. You might want to think about swelling of the wood during high moisture situations.


That brings up a good point. My woodworking experience is limited to guitars, where tolerances are hundredths or thousandths of an inch. To me a 1/16 of an inch is huge (still trying to convince the wife that it is too) :R

What size of gaps have you all found works best on galley hatches and doors to allow for swelling?
User avatar
Moho
Teardrop Master
 
Posts: 244
Images: 69
Joined: Tue Sep 13, 2011 8:17 am
Location: Indianapolis, IN
Top

Postby bobhenry » Wed Sep 21, 2011 8:00 am

I'll stick my neck out......

You have 2 surfaces moving towards each other so I would allow an 1/8 as a minimum on either side of the wall.

Image
Growing older but not up !
User avatar
bobhenry
Ten Grand Club
Ten Grand Club
 
Posts: 10368
Images: 2623
Joined: Fri Feb 09, 2007 7:49 am
Location: INDIANA, LINDEN
Top

Postby planovet » Wed Sep 21, 2011 8:33 am

bobhenry wrote:I'll stick my neck out......

You have 2 surfaces moving towards each other so I would allow an 1/8 as a minimum on either side of the wall.


I would agree with this if the trim is one piece. You will need a little wiggle room due to things swelling and warping when you don't want it to.

But, I have the feeling the trim is in two pieces due to the 1/16" seal he has between the two pieces.

IF it was me, I'd do the trim in one piece, get rid of the 1/16" seal between the pieces and add the gap.
ImageMark (& Cindi)
Visit our website: Little Swiss Teardrop

I was wondering why the water balloon was getting bigger... and then it hit me.

ImageImageImageImage
User avatar
planovet
The Cat Man
 
Posts: 5583
Images: 3
Joined: Tue Nov 27, 2007 4:48 pm
Location: Plano, Texas
Top

Postby Moho » Wed Sep 21, 2011 9:18 am

planovet wrote:
bobhenry wrote:IF it was me, I'd do the trim in one piece, get rid of the 1/16" seal between the pieces and add the gap.


Good point, that solves it. Just like the edited photo shows, creates a drip edge, seals the hatch. Completely didn't consider that. Back to the build!! :applause: Thanks

Corrected Profile Below for future builders with same technique

Image
User avatar
Moho
Teardrop Master
 
Posts: 244
Images: 69
Joined: Tue Sep 13, 2011 8:17 am
Location: Indianapolis, IN
Top

Postby madjack » Wed Sep 21, 2011 9:37 am

...although I used an AL RV insert trim, that is very similar to what I did on mine...I do have a question as to how the hatch<>hinge<>body interfaces/meets up.........
madjack 8)
...I have come to believe that, conflict resolution, through violence, is never acceptable.....................mj
User avatar
madjack
Site Admin
 
Posts: 15128
Images: 177
Joined: Thu Dec 02, 2004 5:27 pm
Location: Central Louisiana
Top

Postby Moho » Wed Sep 21, 2011 12:12 pm

Doing it as below, the trim and brace will be mirrored on the galley side.

Image
User avatar
Moho
Teardrop Master
 
Posts: 244
Images: 69
Joined: Tue Sep 13, 2011 8:17 am
Location: Indianapolis, IN
Top

Postby planovet » Wed Sep 21, 2011 2:42 pm

I would recommend that you go ahead and fill the entire gap with the seal (filled in red). Maybe you were anyway but the picture showed gaps.

Image

My setup is somewhat similar and I used a "D" seal for the gap. I think it compresses better than a flat seal and seals better. I have never had a leak with mine.

Image

Here is a picture of mine. It's difficult to see it but it's a 3/4" gap with a 3/4" D seal in it.

Image

Image

Image
ImageMark (& Cindi)
Visit our website: Little Swiss Teardrop

I was wondering why the water balloon was getting bigger... and then it hit me.

ImageImageImageImage
User avatar
planovet
The Cat Man
 
Posts: 5583
Images: 3
Joined: Tue Nov 27, 2007 4:48 pm
Location: Plano, Texas
Top

Postby Moho » Wed Sep 21, 2011 4:06 pm

Good point on the side gaps. I had planned to use a D seal :) 
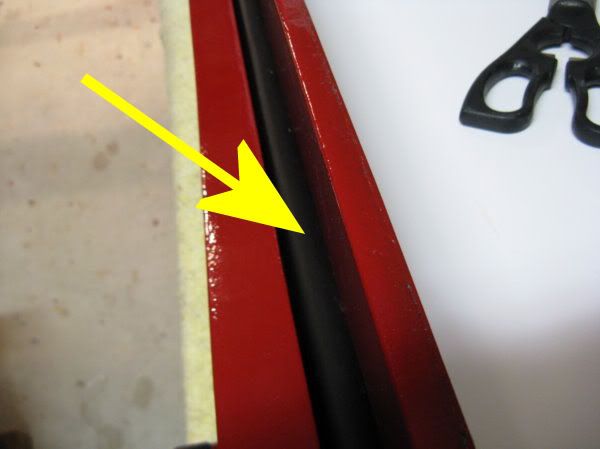
Thanks for the pics as well
User avatar
Moho
Teardrop Master
 
Posts: 244
Images: 69
Joined: Tue Sep 13, 2011 8:17 am
Location: Indianapolis, IN
Top


Return to Teardrop Construction Tips & Techniques

Who is online

Users browsing this forum: No registered users and 1 guest