galley drawers are done

Anything to do with mechanical, construction etc

galley drawers are done

Postby BillZ » Wed Sep 21, 2011 8:37 am

The original galley had some cloth/fiber drawers below the cabinet and storage crates below the drawers:

Image

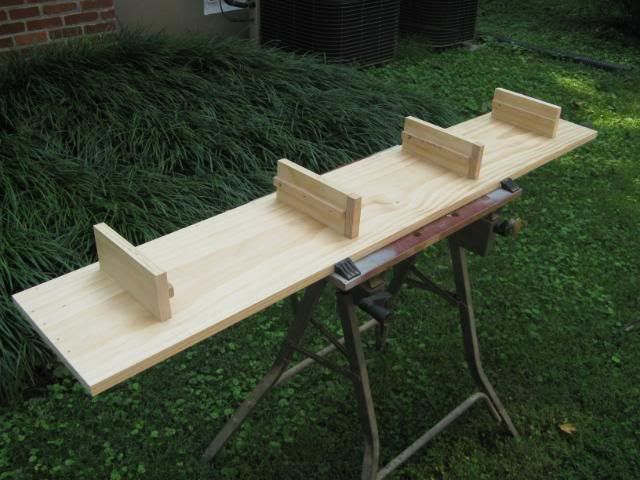
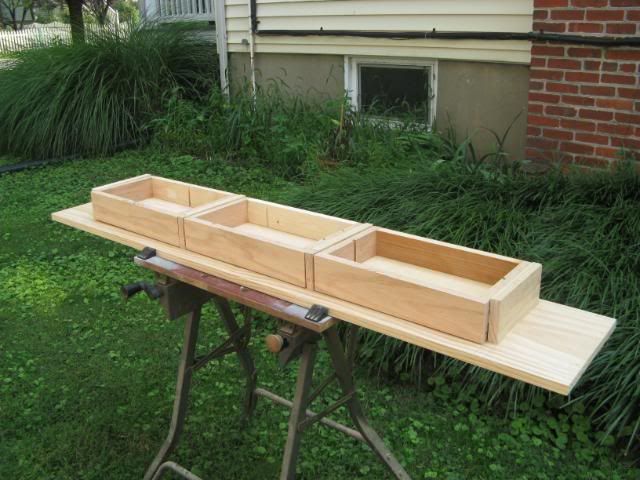
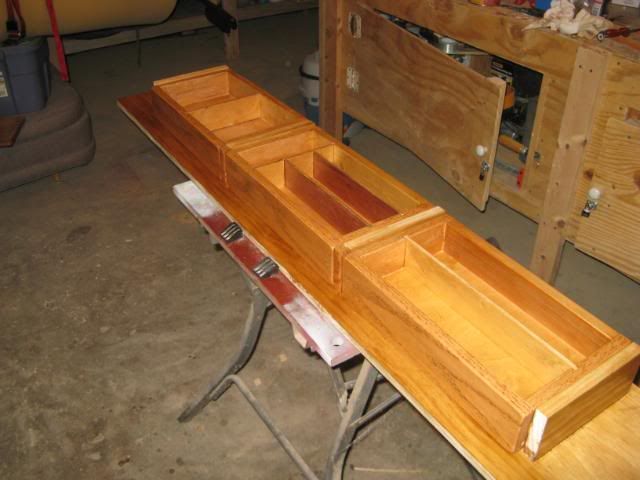
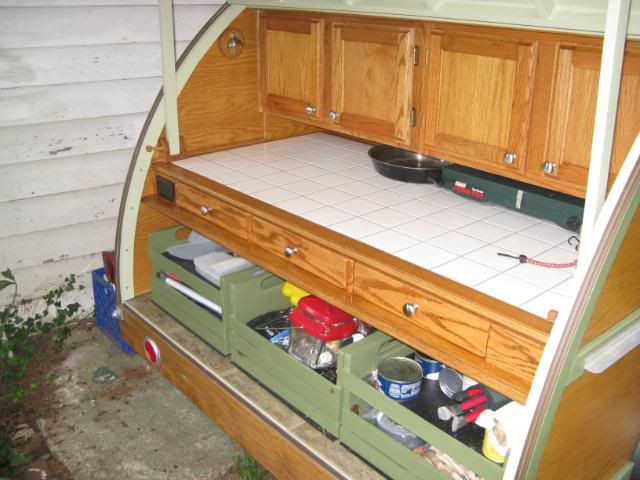
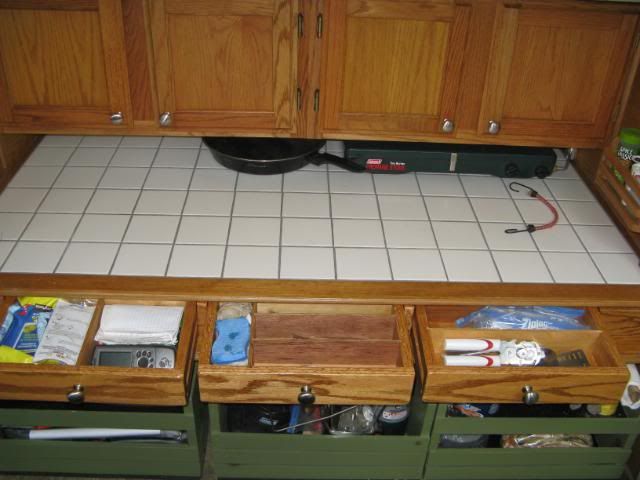
I am in the process making wooden drawers and underneath that, cabinets with one large drawer. The shelf that the original drawers sat on was screwed from underneath onto cleats at the back and sides. I removed it and used as a template to make a slightly deeper shelf to allow maximum depth for the lower cabinets. Once I had the new shelf, I took measurements and removed, then built the drawers on it in my workshop. When it was finished, the whole piece was screwed into place.

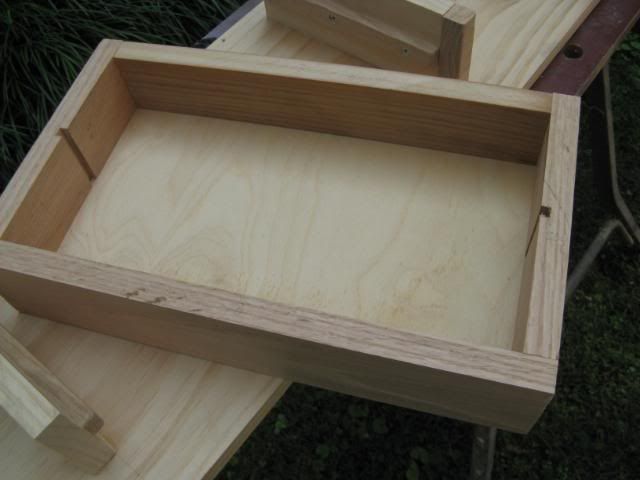
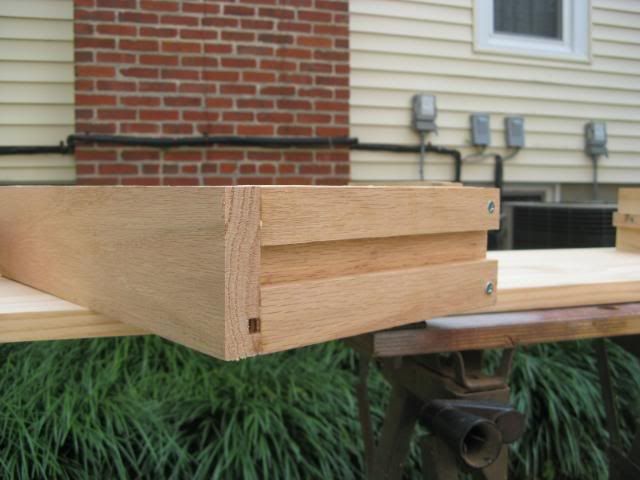
The drawers are 3 sided oak with pine backs. I used oak to match the upper cabinets, and so I could have a hardwood daddos for oak sliders that I screwed onto the drawer separators. I just figured out how to make daddos and I went a little crazy.

Image

Image

Image

Image

Image

Last night I got new brushed nickle knobs from CliffinGA, Thanks Cliff!
and installed the new drawers. I replaced the upper cabinet knobs to match.

Image

Image

Thanks to the forum and it's members for helping me out with my questions! :D
User avatar
BillZ
The 300 Club
 
Posts: 308
Images: 0
Joined: Tue Feb 16, 2010 7:39 pm
Location: College Park, Maryland

Postby absolutsnwbrdr » Wed Sep 21, 2011 8:54 am

Looks great Bill! Your modifications are well thought out and blend in with the trailer as if they were originally designed to be there!

:applause:
Zach
Coming Soon...
Image Image
User avatar
absolutsnwbrdr
Donating Member
 
Posts: 2657
Images: 412
Joined: Mon Jan 25, 2010 6:10 pm
Location: Hanover, PA

Postby Nobody » Wed Sep 21, 2011 10:37 am

Nice job Bill! Did all that oak add any significant weight to the rear of your TD, or change the towing characteristics?
Harvey -

- - - - - - - - - - - - - - - -

Doing the right thing ain't always easy but, . . . it's always right!
User avatar
Nobody
1000 Club
1000 Club
 
Posts: 1196
Images: 342
Joined: Wed Jan 25, 2006 1:09 pm
Location: Benton, Arkansas
Top

Postby BillZ » Wed Sep 21, 2011 11:02 am

Nobody wrote:Nice job Bill! Did all that oak add any significant weight to the rear of your TD, or change the towing characteristics?


Thanks!
The only oak I have added so far is the drawers themselves and a couple of trim pieces. The shelf that the drawers are on is pine, like the original. No more than about 15 pounds extra weight. The lower cabinets I have planned will be a simple front frame with a couple of oak doors and a pine divider and shelf. the crates will be out so that is weight saved.

I doubt that I will add more than 25-30 pounds to the galley when it's all done.
User avatar
BillZ
The 300 Club
 
Posts: 308
Images: 0
Joined: Tue Feb 16, 2010 7:39 pm
Location: College Park, Maryland
Top

Postby S. Heisley » Wed Sep 21, 2011 8:34 pm

Good Job, Bill! :thumbsup: :applause: The cabinet knobs and new drawers look like they were always there. Excuse the pun; but, they fit right in! :lol:
User avatar
S. Heisley
Super Lifetime Member
 
Posts: 8871
Images: 495
Joined: Mon Sep 17, 2007 10:02 am
Location: No. California
Top

Postby DMcCam » Thu Sep 22, 2011 9:33 am

Well done Bill! I'll bet your new additions are going to make you smile every time you open the hatch. :D

Cheers,

Dave
User avatar
DMcCam
Gold Donating Member
 
Posts: 883
Joined: Wed Jan 06, 2010 8:30 pm
Location: Reno, Nevada
Top

Postby gregp136 » Thu Sep 22, 2011 10:42 am

Excellent Job! The drawer for our galley was one of the biggest challenges for my capentry skills.

Greg(and Laurie)
Image
User avatar
gregp136
The 300 Club
 
Posts: 329
Images: 100
Joined: Sun Jan 03, 2010 8:11 am
Location: West Allis, Wisconsin
Top

Postby BillZ » Thu Sep 22, 2011 2:13 pm

gregp136 wrote:Excellent Job! The drawer for our galley was one of the biggest challenges for my capentry skills.

Greg(and Laurie)


I hear that. Other than rebuilding a damaged drawer in the kitchen, this was my first crack at drawer construction. I went real slow and measured often.

I still have to figure out the stops to prevent them from pulling out all the way. My original idea of gluing a thin strip underneath the counter that will catch the back of the drawer won't work because the dividers inside the drawers are in the way.

So, I'll mull over it for a few days and see what comes up.

:thinking:

The wife and I are attending our first Tearjerker's gathering this weekend-should get some good ideas there.
User avatar
BillZ
The 300 Club
 
Posts: 308
Images: 0
Joined: Tue Feb 16, 2010 7:39 pm
Location: College Park, Maryland
Top

Postby Kharn » Thu Sep 22, 2011 3:05 pm

What's taking up the spaces to the left and right of the drawers?
User avatar
Kharn
500 Club
 
Posts: 655
Images: 1
Joined: Sun Jul 17, 2011 1:54 pm
Top

Postby BillZ » Thu Sep 22, 2011 5:35 pm

Kharn wrote:What's taking up the spaces to the left and right of the drawers?


The left side is an electrical outlet. It's hard to see in the pic. I made a space on the right to keep things symmetrical. In the future I will make use of the space on the right but I want to keep a clean look on the front. Maybe an "invisible" drawer.
User avatar
BillZ
The 300 Club
 
Posts: 308
Images: 0
Joined: Tue Feb 16, 2010 7:39 pm
Location: College Park, Maryland
Top

Postby Verna » Thu Sep 22, 2011 6:03 pm

BillZ wrote:I still have to figure out the stops to prevent them from pulling out all the way. My original idea of gluing a thin strip underneath the counter that will catch the back of the drawer won't work because the dividers inside the drawers are in the way.


Bill, for your drawer stop, how's about taking a small piece of oak, say 1/2" long by 1" long, about 1/4" to 1/2" thick, drilling a hole in the middle. Then screw it to the inside of the back of the drawer where it will catch the lip of the cabinet above, but you can turn it so it's out of the way when you want to take the entire drawer out. I can make a mock-up if I didn't explain it well enough.

Verna
Verna
Indianapolis, IN
User avatar
Verna
Gold Donating Member
 
Posts: 1407
Images: 49
Joined: Mon Aug 08, 2011 11:11 am
Location: Indianapolis, IN
Top

Postby Billy K » Sat Oct 01, 2011 8:10 pm

Yeah, what Verna said.

Could just be a 1x2 say 2" long... screw through the center of the block to hold it straight up and down... reach in flip it sideways.. and out comes the drawer...
"...influence is no government." - George Washington
Billy K
Teardrop Master
 
Posts: 276
Joined: Sun Dec 06, 2009 8:03 pm
Location: Kokomo,IN
Top

Postby Kharn » Sat Oct 01, 2011 8:22 pm

Instead of a screw, I've seen a wooden or plastic tab attached to the back of the drawer. The runners on the cabinet sides are cut back enough that when the drawer is 100% extended they are no longer in the dados, the drawer can be lifted up, the tab falls below the face of the frame and the drawer can be removed.

The main problem with this method is that when someone pulls the drawer all the way out to the tab, it will noticeably sag as it is resting its weight on the face of the cabinet instead of on the runners, and can be difficult to put back into place if the face and the runners are not precisely spaced.
User avatar
Kharn
500 Club
 
Posts: 655
Images: 1
Joined: Sun Jul 17, 2011 1:54 pm
Top

Postby Mikka » Sun Oct 02, 2011 6:41 am

Very nicely made. Just one question, I would like to know why you choosed wooden slides over metal? are you not afraid that with humidity the wood will expand and make it a challenge to open the drawers?
May be it's not an issue in your area, but up here it would certainly be one.
Just curious to see if besides varnish you specially treated the wood.
Mikka
Teardrop Advisor
 
Posts: 63
Joined: Wed Mar 30, 2011 6:24 pm
Top

Postby BillZ » Wed Oct 05, 2011 7:56 am

Mikka wrote:Very nicely made. Just one question, I would like to know why you choosed wooden slides over metal? are you not afraid that with humidity the wood will expand and make it a challenge to open the drawers?
May be it's not an issue in your area, but up here it would certainly be one.
Just curious to see if besides varnish you specially treated the wood.


Wood runners was just personal preference. I thought it would fit better with the overall construction theme.

I didn't treat the runners or the daddos with anything but stain because I knew that poly or urethane would create more friction. I did wax the wood at points of contact and they slide very well. The drawer fronts are treated with spar urethane.

As far as swelling, I tried to leave enough wiggle room to allow for it but only time will tell. Our last camping trip was in the middle of record rain for the area and everything on the camper was swelling. The drawers still worked fine.

Verna wrote: Bill, for your drawer stop, how's about taking a small piece of oak, say 1/2" long by 1" long, about 1/4" to 1/2" thick, drilling a hole in the middle. Then screw it to the inside of the back of the drawer where it will catch the lip of the cabinet above, but you can turn it so it's out of the way when you want to take the entire drawer out. I can make a mock-up if I didn't explain it well enough.


There isn't more than a very fine lip under the counter. Maybe 1/16"-1/8"
I bought some plastic plumbing pipe hanging strip and will try to make tabs to attach to the back of the drawers. Hopefully they will catch enough to work as stops.
User avatar
BillZ
The 300 Club
 
Posts: 308
Images: 0
Joined: Tue Feb 16, 2010 7:39 pm
Location: College Park, Maryland
Top

Next

Return to Teardrop Construction Tips & Techniques

Who is online

Users browsing this forum: No registered users and 4 guests