II know this has been discussed a lot here. It seems like epoxy of some kind is the most popular method to keep moisture out of the end grain of the plywood. However are there construction methods that also aid in waterproofing? I am thinking of building with 3/4" ply side walls. Then I began to think about how to join the walls and floor (again many ways to do this). But it really comes down to 2 methods either the wall plywood sits on top of the floor which means the end grain of the floor ply is exposed all the way around the perimiter, however the exterior siding (I am thinking FRP) will cover this end grain. The second way to do it is to have the side walls sit on the outside of the floor which gives you the floor end grain covered by the wall but then the wall end grain is left exposed to the bottom.
The same techniques can be applied to the roof side. My educated guess is that having the walls on top of the floor is the most weather proof option. On the bottom you could even build up some hardwood blocking and extend the skin even further below the edge of the floor.
Thanks
Stan
Teardrops n Tiny Travel Trailersor t n ttt for short (tnttt.com) |
Plywood edge weather proofing with construction techniques
4 posts
• Page 1 of 1
Plywood edge weather proofing with construction techniques
![]() by Chef_Stan » Thu Sep 29, 2011 5:50 am
by Chef_Stan » Thu Sep 29, 2011 5:50 am
- Chef_Stan
- Teardrop Builder
- Posts: 34
- Joined: Sun Jun 19, 2011 8:42 pm
- Location: Canterbury, CT
![]() by bobhenry » Thu Sep 29, 2011 6:53 am
by bobhenry » Thu Sep 29, 2011 6:53 am
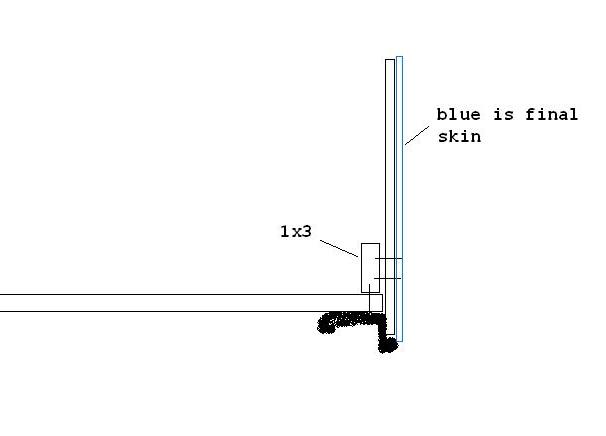
I looked at this and decided the floor might roller coaster a bit so I chose to use a good straight 1x3 - 1x4 as a cleat to keep the floor straight and add strength to the wall. The 3/4 inch void created allowed me a place to run my electrics and install a layer of 3/4 blue foam insulation.
Before you put on the final skin a very liberal coat of fence post goop or bed liner or other heavy bodied glop of choice will add the weather protection you are looking for.
Before you put on the final skin a very liberal coat of fence post goop or bed liner or other heavy bodied glop of choice will add the weather protection you are looking for.
Growing older but not up !
-

bobhenry - Ten Grand Club

- Posts: 10368
- Images: 2623
- Joined: Fri Feb 09, 2007 7:49 am
- Location: INDIANA, LINDEN