Mitch's 7X16 (aka:Newbe with 7x16 conversion started)

Converting Cargo Trailers into TTTs

Postby Stainless » Sun Oct 30, 2011 7:43 pm

mskobier wrote:Yes, I saw that thread. However, in my opinion, they never reached a definative conclusion.

I worked in automotive electronics for a couple years, so maybe I can offer some real-world experience.

I would never use those silly scotch lock clamp-style connectors for anything I cared about. I've seen more of those fail than I could count. Even just wrapping wire and then heat shrinking without any solder is a better solution than those things. Soldered connections can break over time if it's in a wiring run that has to be flexible, like harness between a vehicle and trailer. If it doesn't have to be flexible, like in-wall wires, solder is the best option. Otherwise, butt connectors are ugly but work pretty well if they're crimped correctly.

Hope this helps.

S
Stainless
Teardrop Builder
 
Posts: 31
Joined: Sat Sep 24, 2011 10:22 pm
Location: Calgary

Postby mskobier » Sun Nov 13, 2011 12:08 pm

All,
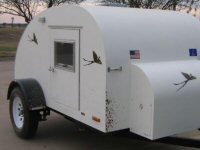
Well the great camping expedition did not work out as planned. Due to some scheduling conflicts, We opted to just move the CT to the back side of the property, and set it up as if we were out camping somewhere. We have a small (24") tractor rim we use a a fire pit. Moved it to a reasonable distance from the CT and brought a bit of firewood over from the stack.

Well, after getting everyting ready, my wife and grandkids arrived, and the camping trip started. A couple of neighbors came over to enjoy the fire with us. The temps were in the low 40's with a very slight breeze. Just enough breeze to keep the smoke from the fire blowing away from the CT. We had hot dogs and smores, and enjoyed a very nice camp fire. Around 8:00 pm, the neighbors headed home, and we got ready for bed. The propane furnace had the CT nice and warm as we got ready for bed. My wife and I were on the top, and the grandkids were under the sleeping platforms on the floor. I had purchased one of the small led lights from Wallyworld ($5.00) to serve as a nightlight for the kids. It was a little too much light, so I placed a shop towel over it to reduce the light. Anyway, about this time, the grandkids began worrying that the sleeping platforms would collapse, and squash them. After a little reassurance from my wife and I, and a few bed time prayers, we all went sound to sleep.

The things I learned from this trip.

I need to get a couple of better sleeping pads for the grandkids, and an additional sleeping pad for my wife. she complained the one she used was too hard, and the grandkids on the floor need better sleeping pads.

I also discovered that the magnet based work lights I have will stick to the steel frame of the trailer through the aluminum skin. We had a table set up next to the trailer for the food stuff, and the work light stuck to the side of the trailer worked great. It also did not put any drain on the CT battery.

I used a pair of auto jack stands to stabilize the CT. It made the trailer feel very solid. I must get a set of camper screw jacks to install for stabilizers. One more thing to add to the list.

After powering the furnace and inside lights, the CPE generator and battery charger I aquired was able to fully recharge the battery in a couple of hours. Nice to be able to recharge the battery without having to run the truck. I will eventually get the 35 amp WFCO power center installed. I must finish installing the lower cabinets first.

After the camping trip, I also performed a test I had been wanting to try. I went out to the trailer when the outside temps were around 30 degrees. The propane furnace had been truned off at the end of the camping trip, so the inside temp was the same as the outside temp. I fired up the CPE generator and plugged in a small 1500 watt ceramic heater we have to see if it would warm the trailer up. I was pleasantly supprised that it would warm the trailer up from approx 30 degrees to a comfortable temp. It took it a couple of hours to do it, but it did. Last winter, before I insulated the CT, the same electric heater was completely useless and would not warm the trailer up at all. Nice to see that some of my work payed off.

On another topic, I did replace the sleeping platform decking with 3/8 ACX. Much more solid feeling. I did have to shim the wall hinges and latch out about 1/4 inch so everything would clear.

Well, that will probably be the last camping trip for this year. I may try it again when the temps get really cold (>10 degrees) to ensure that the furnace will keep the CT warm at that low of temp. That should not be a problem, but I do want to test it to verify.

Thats all for now. I really need to get the lower cabinets and refrigerator installed. Hopefully in the next few weeks.

later
Mitch
mskobier
Silver Donating Member
 
Posts: 105
Images: 87
Joined: Sat Oct 30, 2010 5:53 pm
Location: Tri-Cities, Wa

Postby mskobier » Sun Jan 01, 2012 9:32 pm

All,
Well another great adventure with the CT happened today. We went to Juniper Dunes Wilderness area today to ride ATV's and just get out and get some fresh air. The riding conditions were excellent with the sand being moist from rain a few days ago. We took all of the ATV's so the grandkids and adults could ride. The temps were expected to be in the low 40's, so it was quite chilly with a good breeze. Of course, we dressed for the temps and everything was fine. After a ride, it was nice to return to a nice and toasty warm CT to warm up. We did eventually build a nice camp fire that family and friends got to sit around and enjoy. We seriously considered staying overnight, but the grandkids have school tomorrow, so we came home just before dark. Needless to say, a great time was had by all!

Happy New Year everyone!!!
Mitch
mskobier
Silver Donating Member
 
Posts: 105
Images: 87
Joined: Sat Oct 30, 2010 5:53 pm
Location: Tri-Cities, Wa
Top

Re: Mitch's 7X16 (aka:Newbe with 7x16 conversion started)

Postby mskobier » Fri Sep 14, 2012 5:34 pm

All,
Its been quite a while since I have updated the the group and the pictures on my album. I did a lot of mods to the original configuration of the frontsection of the CT. We just returned from a 12 day camping trip in the CT and everything worked well. I definately learned a lot and am considering some more changes to improve the unit. I just uploaded a bunch of pics to show the current configuration of the trailer. Please take a look at my album and let me know what you think.

We finally decided that we would keep the trailer dry, and not have an onboard water system. That decission allowed me to remove the on board water tank I had installed and never hooked up. The removal of the tank required removing the furnace and repositioning it. I ended up mounting the furnace in a 12" wide cabinet with the electrical pannel mounted above it. I compartmentalized the cabined with the lower compartment housing the furnace, the middle housing the electrical system, and maintained the top compartment as a standard drawer.To install the furnace this way, I had to fabricate a 90 degree intake and exhaust system. I welded up the extra tubing from the original install into a 90 degree elbow and fabricated a sheet metal duct to enclose the exhaust pipe. IT takes a little more jockying to get everything lined up properly, but its not really difficult. The next time I am in the lower compartment, I'll take some pictures to show how I did it. I know the factory design is for a straight out exhaust. I have a much older and larger model of the same furnace that I did the same mod to thathas been in use in my boxcar shop for several years with no problems. I did ensure that the inside air was directed over the new duct to help remove any extra heat. It also pre heats the return air just a little bit.

The electrical system is a standard WFCO 35 amp power system. The only reason I went with that large of system was so I could recharge the battery as quickly as reasonable. I installed four recepticales for the AC system with two on each end of the counter, one behind the microwave and one below the counter for the fridge. I also installed a few sets of Anderson Power Pole connectors for my radio gear and a cigarette ligher jack for charging cell phones or other items that can be powered from this type of connection.

The counter top is a composite assembly. The actual counter top is only 1/2 plywood with 3/4" plywood about 2.5" around the edges to space the counter top up a bit. The edge is 1.5"x.75" Oak with radiused edges then glued and screwed to the edge of the counter top. I then glued a sheet of formica on top to finish. I still need to apply varnish to two of the cabinets and the edge trim. There is still a little bit of trim work to do, but that will come in time. Using the 1/2" plywood allowed me to save quite a bit of weight over a standard kitchen grade counter top. I also had to shorten the depth of the cabints by about 3 inches so I can maintain the minimum length for the ATV's. All in all, it did not turn out too bad. I still need to come up with a suitable back splash and install the two burner stove. Hopefully over the winter I will get those tasks completed.

So here are a few pictures. Again please look at the album to see what else Ihave done.

Mitch

Image

Image

Image
mskobier
Silver Donating Member
 
Posts: 105
Images: 87
Joined: Sat Oct 30, 2010 5:53 pm
Location: Tri-Cities, Wa
Top

Re: Mitch's 7X16 (aka:Newbe with 7x16 conversion started)

Postby revorunner » Fri Sep 14, 2012 8:17 pm

Thanks for all the hard work keeping us updated on your progress. :thumbsup:
User avatar
revorunner
Teardrop Advisor
 
Posts: 55
Joined: Tue May 22, 2012 9:03 pm
Location: BC Canada
Top

Previous

Return to Cargo Trailer Conversions

Who is online

Users browsing this forum: No registered users and 1 guest