The Aero-Ham

...ask your questions in the appropriate forums BUT document your build here...preferably in a single thread...dates for updates, are appreciated....

Postby gww25 » Thu Oct 20, 2011 10:00 pm

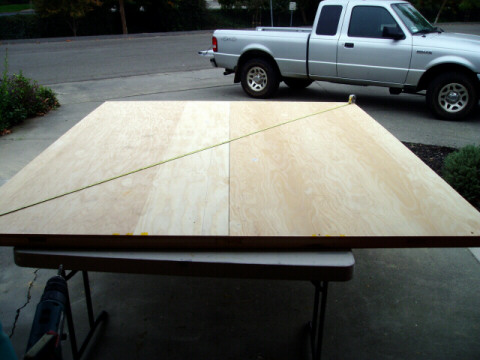
Here's a shot of the final installation. The deck is perfectly flat and square. The distortion is from the camera lens. I check for square and dimensional accuracy constantly throughout the construction process. I've been bitten more than a few times when I've tried to take shortcuts.
Image
[/img]
User avatar
gww25
Teardrop Advisor
 
Posts: 63
Images: 32
Joined: Sun Jul 17, 2011 2:14 pm
Location: Napa, California

Postby gww25 » Thu Oct 20, 2011 10:03 pm

Now that I've got a good work table it's time to start working on the sidewalls and get this project closed in for the winter.
User avatar
gww25
Teardrop Advisor
 
Posts: 63
Images: 32
Joined: Sun Jul 17, 2011 2:14 pm
Location: Napa, California

Postby gww25 » Sat Oct 22, 2011 4:29 pm

I haven't decided yet on whether or not to insulate the floor assembly but for now I've decided to just seal everthing with several coats of poly. Before I do that however I still need to do some additional work on the chassis.
Image[/img]
User avatar
gww25
Teardrop Advisor
 
Posts: 63
Images: 32
Joined: Sun Jul 17, 2011 2:14 pm
Location: Napa, California
Top

Postby gww25 » Sat Oct 22, 2011 4:43 pm

This is the first big 'enclosed' trailer that I've ever built so like most folks I'm probably going overboard but it gives me peace of mind at the cost of having to haul around extra weight. Here's the chassis sitting on the subfloor and as-is it will no doubt carry the loads but I still have a nagging urge to add some outriggers to carry some of the roof and wall loads.
Image[/img]
User avatar
gww25
Teardrop Advisor
 
Posts: 63
Images: 32
Joined: Sun Jul 17, 2011 2:14 pm
Location: Napa, California
Top

Postby gww25 » Sat Oct 22, 2011 4:49 pm

Outriggers in progress. The long piece of 2x2 steel tube seen on top in the snapshot is just being used as a straightedge to make sure all of the riggers are laying flat relative to the frame rails. I figure I've added close to 35 more pounds by doing this but the devil made me do it.
Image
[/img]
User avatar
gww25
Teardrop Advisor
 
Posts: 63
Images: 32
Joined: Sun Jul 17, 2011 2:14 pm
Location: Napa, California
Top

Postby gww25 » Wed Nov 16, 2011 10:26 am

I should have drilled the individual frame pieces with a drill press for the body mounting holes before I welded the thing together. Drilling with a hand drill was a real chore.
Image[/img]
User avatar
gww25
Teardrop Advisor
 
Posts: 63
Images: 32
Joined: Sun Jul 17, 2011 2:14 pm
Location: Napa, California
Top

Postby gww25 » Wed Nov 16, 2011 10:29 am

Here's a closeup up of a fixture I bought at a garage sale to make the job easier. It has a self-centering function amd the guides keep the bit nice and straight so the bolt holes were concentric.
Image
[/img]
User avatar
gww25
Teardrop Advisor
 
Posts: 63
Images: 32
Joined: Sun Jul 17, 2011 2:14 pm
Location: Napa, California
Top

Postby gww25 » Wed Nov 16, 2011 10:32 am

Went ahead and decided to add insulation to the floor. Just used the HD foam board and glued it in place.
Image[/img]
User avatar
gww25
Teardrop Advisor
 
Posts: 63
Images: 32
Joined: Sun Jul 17, 2011 2:14 pm
Location: Napa, California
Top

Postby gww25 » Wed Nov 16, 2011 10:34 am

Sheathed the underside with 1/4-inch birch ply sealed on both sides with three coats of poly.
Image
[/img]
User avatar
gww25
Teardrop Advisor
 
Posts: 63
Images: 32
Joined: Sun Jul 17, 2011 2:14 pm
Location: Napa, California
Top

Postby gww25 » Wed Nov 16, 2011 10:36 am

And then added three coats of acrylic deck paint. I'll undercoat the thing just before it's time to attached it to the chassis.
Image
[/img]
User avatar
gww25
Teardrop Advisor
 
Posts: 63
Images: 32
Joined: Sun Jul 17, 2011 2:14 pm
Location: Napa, California
Top

Postby aggie79 » Wed Nov 16, 2011 4:42 pm

Gary,

Your build is coming along nicely. Very professional work! Now that the platform is done, it's almost time to go vertical!

Take care,
Tom
Tom (& Linda)
For build info on our former Silver Beatle teardrop:
Build Thread

93503
User avatar
aggie79
Super Duper Lifetime Member
 
Posts: 5405
Images: 686
Joined: Tue Aug 07, 2007 5:42 pm
Location: Watauga, Texas
Top

Postby gww25 » Thu Nov 17, 2011 11:19 am

Still have a lot of detail work to do on the chassis so it'll be awhile before I start on the walls. Since I'm working outdoors the weather is starting to impact the schedule more than a lack of funds. One problem with going slow is that it gives you to much time to think of new things you want to do.
User avatar
gww25
Teardrop Advisor
 
Posts: 63
Images: 32
Joined: Sun Jul 17, 2011 2:14 pm
Location: Napa, California
Top

Postby ohbugger » Sat Nov 19, 2011 2:28 pm

This is gonna be a nice one! The plywood wasn't square enough?!? I always assumed the factory cuts on a 4x8 sheet of plywood were perfectly square and better than anything I could hope to achieve at home. Looks like you are quite the craftsman and are doing every step right! Nice work! Keep it up! All that attention to detail will create a great end result.
- Erik -
User avatar
ohbugger
Teardrop Master
 
Posts: 132
Joined: Wed Aug 17, 2011 3:51 pm
Location: Burien, WA
Top

Previous

Return to Build Journals

Who is online

Users browsing this forum: No registered users and 15 guests