And this is the Northstar globe that I did to get the lettering off of for the 1948 152A.

Scott
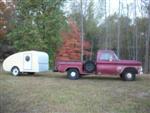
Teardrops n Tiny Travel Trailersor t n ttt for short (tnttt.com) |
![]() by kzhorse » Fri Nov 18, 2011 2:44 pm
by kzhorse » Fri Nov 18, 2011 2:44 pm
![]() by kzhorse » Fri Nov 18, 2011 3:15 pm
by kzhorse » Fri Nov 18, 2011 3:15 pm
Phooey wrote:Wow, that really looks terrific. I have wanted to try to do something like that. How did you do it?

![]() by campmaster-k » Fri Nov 18, 2011 5:12 pm
by campmaster-k » Fri Nov 18, 2011 5:12 pm


![]() by kzhorse » Fri Nov 18, 2011 8:14 pm
by kzhorse » Fri Nov 18, 2011 8:14 pm
slowcowboy wrote:Scot any trouble getting that coleman lamp to light?
what did you do to light it? they are diffrent lighting than a coleman lantern aren' t they?
slow. I am wanting to fire up my coleman lamp too.
![]() by Steve_Cox » Sat Nov 19, 2011 10:46 am
by Steve_Cox » Sat Nov 19, 2011 10:46 am


![]() by pete42 » Sat Nov 19, 2011 12:30 pm
by pete42 » Sat Nov 19, 2011 12:30 pm

![]() by kzhorse » Sat Nov 19, 2011 1:25 pm
by kzhorse » Sat Nov 19, 2011 1:25 pm
 Before (275 replacement globe)


![]() by kzhorse » Sat Nov 19, 2011 1:30 pm
by kzhorse » Sat Nov 19, 2011 1:30 pm

![]() by StPatron » Sat Nov 19, 2011 5:47 pm
by StPatron » Sat Nov 19, 2011 5:47 pm
Steve_Cox wrote:I've been wanting a blast cabinet for a few years, and now have one more reason I "need" one.

![]() by Mark72 » Sun Nov 20, 2011 2:18 pm
by Mark72 » Sun Nov 20, 2011 2:18 pm
![]() by kzhorse » Sun Nov 20, 2011 3:41 pm
by kzhorse » Sun Nov 20, 2011 3:41 pm
Users browsing this forum: No registered users and 1 guest