Completing what someone else started. 5'X8' benroy??

...ask your questions in the appropriate forums BUT document your build here...preferably in a single thread...dates for updates, are appreciated....

Postby aggie79 » Mon Nov 14, 2011 11:55 am

Hey Daymond,

You're making great progress! :applause: :thumbsup: :applause:

That's a nice teardrop you have under construction. And with the pace of your build, you've blown away the concept of "teardrop time." You'll be camping in no time.

If you haven't already, swing by the South Central section. Be sure and sign up for the Beavers Bend gathering in the Spring. It's not too far from you.

BTW - I used to live in Hot Springs and miss the beautiful state of Arkansas.

Take care,
Tom
Tom (& Linda)
For build info on our former Silver Beatle teardrop:
Build Thread

93503
User avatar
aggie79
Super Duper Lifetime Member
 
Posts: 5405
Images: 686
Joined: Tue Aug 07, 2007 5:42 pm
Location: Watauga, Texas

Postby D Cat » Mon Nov 14, 2011 7:51 pm

aggie79 wrote:Hey Daymond,

You're making great progress! :applause: :thumbsup: :applause:

That's a nice teardrop you have under construction. And with the pace of your build, you've blown away the concept of "teardrop time." You'll be camping in no time.

If you haven't already, swing by the South Central section. Be sure and sign up for the Beavers Bend gathering in the Spring. It's not too far from you.

BTW - I used to live in Hot Springs and miss the beautiful state of Arkansas.

Take care,
Tom


Thanks Tom! I really liked going over your build thread. I was very impressed! :applause:

I plan on building another one in a few years. Maybe this one will end up a loaner for the kids or friends when they need it. Camping in this one should help give me a good handle on things I would like to keep as well as things I would like to change. My goal is to get this one done before spring. We do a lot of canoeing and love camping on gravel bars when floating the Buffalo on multi day trips but there is a lot of time both there and other places we canoe that we will just bring the tear and sit up base camp. The other reason to build it was I have a 1966 corvair that I would like to do some long trips to other stare parks (both in and out of Arkansas) and it would be great that I can pull this little rig behind it and just camp in a park instead of a hotel.

I am looking forward to getting to some of the gatherings. I've read so much on this site the last year that I almost feel like I know you guys. :)

I love the hot springs area. Been there many times. Have you ever made it up to the Buffalo river area in Arkansas?
User avatar
D Cat
Teardrop Inspector
 
Posts: 22
Images: 45
Joined: Wed Apr 06, 2011 11:12 am
Location: Magazine Arkansas

Postby S. Heisley » Mon Nov 14, 2011 10:49 pm

You're doing really good, Daymond. It can be hard to take someone else's work and finish it to make it your own but you're being really successful at it! Thanks for sharing. :thumbsup: :applause:
User avatar
S. Heisley
Super Lifetime Member
 
Posts: 8865
Images: 495
Joined: Mon Sep 17, 2007 10:02 am
Location: No. California
Top

Postby D Cat » Sun Nov 27, 2011 5:04 pm

Ok, so I've been a little laxed at getting back on the teardrop for the last week or two. Been busy with life on my days off it seems. I have the who week off starting tomorrow minus my daughter being induced into labor on Wen. I hope to get a lot done!

I have done a few things during this time, some I have a couple of pictures of and some I don't. The canvas that was already applied on the project top when I got it wasn't really done the way I thought it should have been. For one, the roof wasn't filled and smoothed the way it should have been leaving some noticiable screw heads that can been seen through the canvas and a couple that can be felt. Also, there are a few places that the canvas bubbled up a little where it didn't adhear to the ply. It was put on with spar varnish. both glued and covered with it. I would welcome any and all advise as to how I should proceed from here. There were staples all along the top edge where he held the canvas in place while covering it with varnish. there was also a open seem in places along the top edge where the roof ply met the side. I filled the seam with F21 construction adhesive. In my experence its about the strongest out there. Much better than liquid nails and it is completely waterproof. I then pulled all the staples and used a router to trim and then round over the top ply even with the side. It is now a smooth transition from the top to the side. I was planning on just putting the canvas on the sides and then adding another layer of canvas over the top that would overlap the side a little and then be covered with trim. What I could use some advise on is wether I should just sand the canvas already on just to smooth it out before putting the top layer over it even if that means sanding through the existing layer in the places where it is bubbled or should I try to remove the top canvas and fill and then start new? I'm not 100% sure the existing canvas will come off easily or not. I suspect in places it will and in places it will not. Any susgestions?

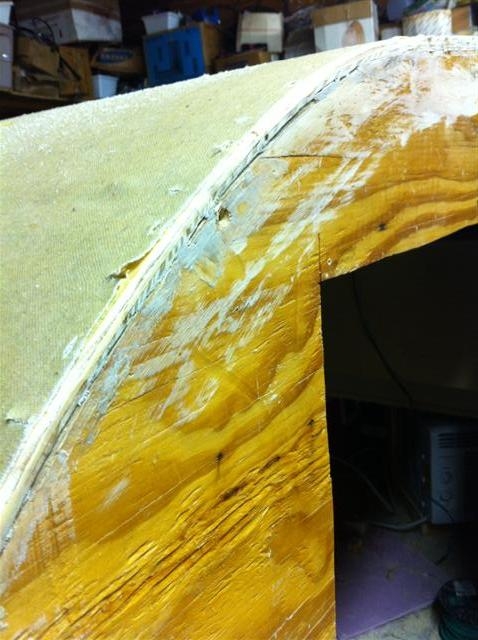
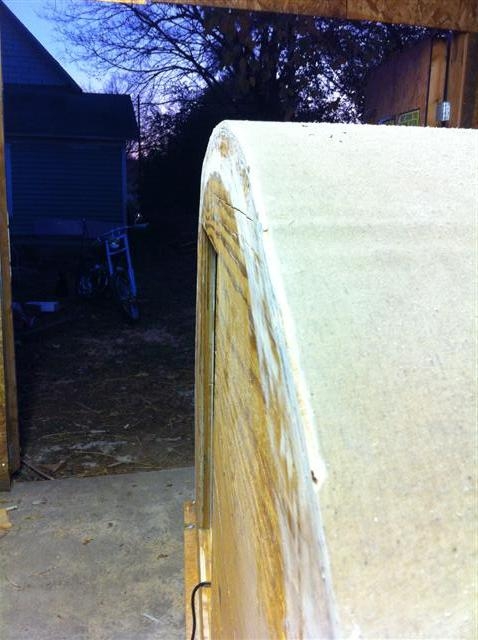
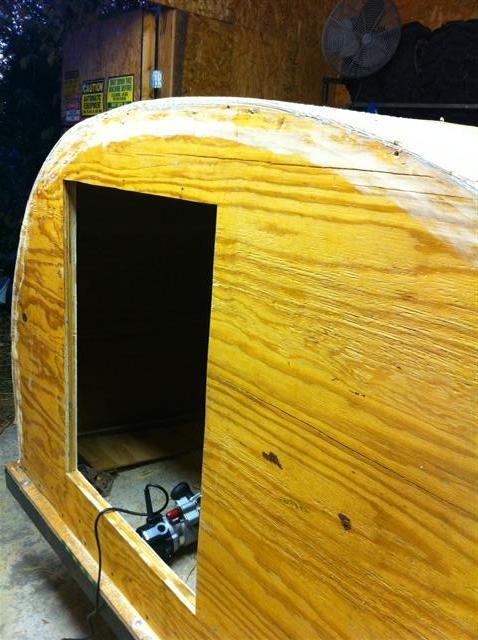
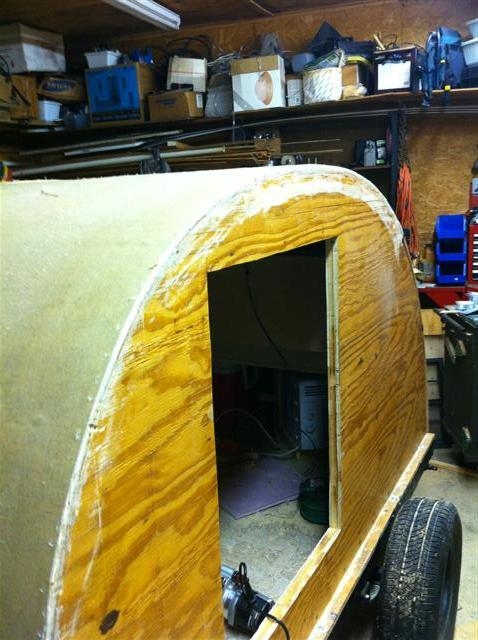
Here are what the sides look like after I cleaned them up with the router and a little sanding.

You can see that the canvas can be pulled loose at least on the edge anyway.
Image

Image

Image

Image

I am going to try and get the other door built, sides and hatch covered in canvas and if I'm really lucky maybe the final canvas or redone canvas which ever it endes up being done this next week.
User avatar
D Cat
Teardrop Inspector
 
Posts: 22
Images: 45
Joined: Wed Apr 06, 2011 11:12 am
Location: Magazine Arkansas
Top

Postby Oldragbaggers » Sun Nov 27, 2011 5:12 pm

You are really moving along on your build. I think you are going to have a nice teardrop there and it was enough of a blank canvas that I'm sure you will get to have some of what you wanted at least. I hope so. And welcome to the forum.
Life is sooooo good.........
Sail...camp....bike...repeat
Becky

Build Journal http://www.tnttt.com/viewtopic.php?f=50&t=45917
Visit our blog at http://www.oldragbaggers.com
Image Image
User avatar
Oldragbaggers
Gold Donating Member
 
Posts: 1842
Images: 331
Joined: Mon Aug 01, 2011 9:22 pm
Location: Essex, MD
Top

Postby rebapuck » Sun Nov 27, 2011 7:52 pm

If it was me, I'd just cover the roof with aluminum.
Judy
1966 VW camper
1967 VW singlecab
Image
User avatar
rebapuck
.
 
Posts: 2243
Images: 1
Joined: Thu May 14, 2009 1:55 pm
Location: Chapel Hill NC
Top

Postby dakotamouse » Sun Nov 27, 2011 8:05 pm

D Cat wrote:Crumbruiser,

They are actually brown. They do look black in the picture. I would have perfered black and was planning on painting them. The vents for the ac are black and I wanted the window frames to match. Not sure if I am going to still paint them black or not. :roll: The only other color option was white.

I got them from ebay. Shed windows, 14 X 21 with safety glass. Cost was about 70 bucks for both shipped I believe.


Sometimes the clue to using Ebay is knowing the exact words to find what you are looking for!!! Thanks for putting the right words on the tip of my tounge! This is just what I wanted for the gypsy wagon.
Image

Where did you get it? We didn't get it, we built it!
Myron and Mary
User avatar
dakotamouse
Titanium Donating Member
 
Posts: 1121
Images: 128
Joined: Sat Oct 22, 2005 10:23 am
Location: Bismarck, ND
Top

Postby StPatron » Sun Nov 27, 2011 11:07 pm

I'm enjoying reading your build thread and look forward to meeting you at one of the South Central gatherings. As Tom (Aggie79) wrote, check out the Beavers Bend gathering this coming Spring. It would be an excellent opportunity to talk trailers, meet some wonderful people, enjoy a campfire and some good cooking. Hope you can make it.

You're really moving along on your build and doing an excellent job! I like the modifications you did on the doors to fit the windows.

I don't have any experience with canvas coverings, so I'm sorry that I can't offer any tried/true advice on whether to add another layer or remove it. Prepping the existing canvas sounds like one heckuva job eliminating all those bubbles and taking care of the screw head "bumps". Just off hand, I think I'd probably take it down to bare wood, prep good and start over. Like you, I did a routered round-over on the roof/sidewall joint. Then I applied fiberglass tape to buy a little strength and weatherproof insurance. Sealing that seam is critical, in my opinion.
User avatar
StPatron
Donating Member
 
Posts: 748
Images: 297
Joined: Tue Dec 15, 2009 8:38 pm
Location: OK
Top

Postby D Cat » Mon Nov 28, 2011 11:02 am

StPatrón wrote:I'm enjoying reading your build thread and look forward to meeting you at one of the South Central gatherings. As Tom (Aggie79) wrote, check out the Beavers Bend gathering this coming Spring. It would be an excellent opportunity to talk trailers, meet some wonderful people, enjoy a campfire and some good cooking. Hope you can make it.

You're really moving along on your build and doing an excellent job! I like the modifications you did on the doors to fit the windows.

I don't have any experience with canvas coverings, so I'm sorry that I can't offer any tried/true advice on whether to add another layer or remove it. Prepping the existing canvas sounds like one heckuva job eliminating all those bubbles and taking care of the screw head "bumps". Just off hand, I think I'd probably take it down to bare wood, prep good and start over. Like you, I did a routered round-over on the roof/sidewall joint. Then I applied fiberglass tape to buy a little strength and weatherproof insurance. Sealing that seam is critical, in my opinion.


Thanks for the compliments. Everyone.

I hit the canvas on the top edge a little with my belt sander and it cut through it pretty easy. I think it would cut through the bubbled canvas petty easy but like you said, I think it would need to be taken back down to the ply and smoothed correctly to really look the way it should. I'm leaning toward that. Anyone have any susgestions on what is the best thing to use to smooth the ply before reapplying the canvas? I like the retro look of the canvas and was planning on adding some fabric accents down over the top of the canvas in places. I was planning on glassing a strip over the top edge but I have had a couple of people that have used canvas and said that going over the top and down the side a couple inches will do the same thing. The existing canvas does seem to be very water proof. It is getting trim on the top edge going over the side as well. I guess if it worked for canoes it should work here. It will be living under the carport while not camping.
User avatar
D Cat
Teardrop Inspector
 
Posts: 22
Images: 45
Joined: Wed Apr 06, 2011 11:12 am
Location: Magazine Arkansas
Top

Postby Robbie » Tue Nov 29, 2011 11:04 am

Hey daymond do you have any more pics of those windows? I found a seller that has those on eBay and was looking for a side view pic. I'm using 3/4" thick doors and just want to know how far they'll be protruding into the cabin space and what kind of trim I can use on the inside. Thanks.

And your build is comin along great! I'm shooting for my first camp trip with my benroy on Easter next year.

Robbie
My aluminum benroy build:
viewtopic.php?t=45640
User avatar
Robbie
Teardrop Master
 
Posts: 250
Images: 86
Joined: Tue May 10, 2011 11:28 am
Location: West Jordan, UT
Top

Postby desertmoose » Tue Nov 29, 2011 11:28 am

Daymond
I'm using canvas on my build. I really like how it's working for me.

Take a look at my build journal at "Horny Tow'd " to get the link to my albums for a description of how I did my canvas.

(here and on photobucket)

(maybe this will work)
http://tnttt.com/viewtopic.php?t=45718

I'd try a coarse belt in the belt sander and remove as much of the old canvas as possible. Would be worth the peace of mind in the long run knowing that you glued the new canvas down to something solid.

I used cheap ply on my build. Took a lot of Durham's rock hard water putty to fill the screw heads, knots, etc, but it turned out good.

Sam
User avatar
desertmoose
The 300 Club
 
Posts: 421
Images: 98
Joined: Fri Aug 27, 2010 12:20 pm
Top

whoops, double post

Postby desertmoose » Tue Nov 29, 2011 11:35 am

Not sure what happened....
Last edited by desertmoose on Wed Nov 30, 2011 2:33 pm, edited 1 time in total.
User avatar
desertmoose
The 300 Club
 
Posts: 421
Images: 98
Joined: Fri Aug 27, 2010 12:20 pm
Top

Postby D Cat » Wed Nov 30, 2011 2:26 pm

Hey Robbie. My doors are 1 3/8 thick. When the windows are dropped in the doors they are perfectly flush with the inside. Guess that makes them 1 3/8 from the flange that is on them. Hope this helps.
User avatar
D Cat
Teardrop Inspector
 
Posts: 22
Images: 45
Joined: Wed Apr 06, 2011 11:12 am
Location: Magazine Arkansas
Top

Postby D Cat » Wed Nov 30, 2011 2:27 pm

I'll check your build desertmoose. Thanks.
User avatar
D Cat
Teardrop Inspector
 
Posts: 22
Images: 45
Joined: Wed Apr 06, 2011 11:12 am
Location: Magazine Arkansas
Top

Previous

Return to Build Journals

Who is online

Users browsing this forum: No registered users and 10 guests