idea for routing the first profile in a build

Anything to do with mechanical, construction etc

idea for routing the first profile in a build

Postby eddie6775 » Sun Dec 04, 2011 2:30 pm

Hi everyone,
I'm planning on building a canned ham in the spring time and so today I was perfecting my profile and had this crazy idea. I used an 11"x17" piece of graph paper and a bezier curve to draw it and still meet my height requirements at any given point in the trailer. The thing that had me wondering about my profile was...How in the heck do I transfer this to my full size trailer!? I plan on plotting on a giant graph on the plywood just like I did on the paper, so what I need is a really big bezier curve! It occured to me then: If I make a big curve out of nice stiff plywood, then I can not only draw the template with it but use it as a guide for my router! It would eliminate any free hand cutting....Any one try this yet?

I'll try to figure out how to put an image here to show any one not familiar with a bezier curve what one looks like.
I think the other term for this tool is a French curve.

I found a link. this is what I'm asking about, only made with wood. It could be a good addition to any tool kit!
http://seamslikealot.blogspot.com/2010/ ... rsize.html
Last edited by eddie6775 on Sun Dec 04, 2011 3:49 pm, edited 1 time in total.
User avatar
eddie6775
Teardrop Advisor
 
Posts: 62
Images: 2
Joined: Fri Jul 16, 2010 9:20 am
Location: Montrose, PA

Postby Woodbutcher » Sun Dec 04, 2011 3:33 pm

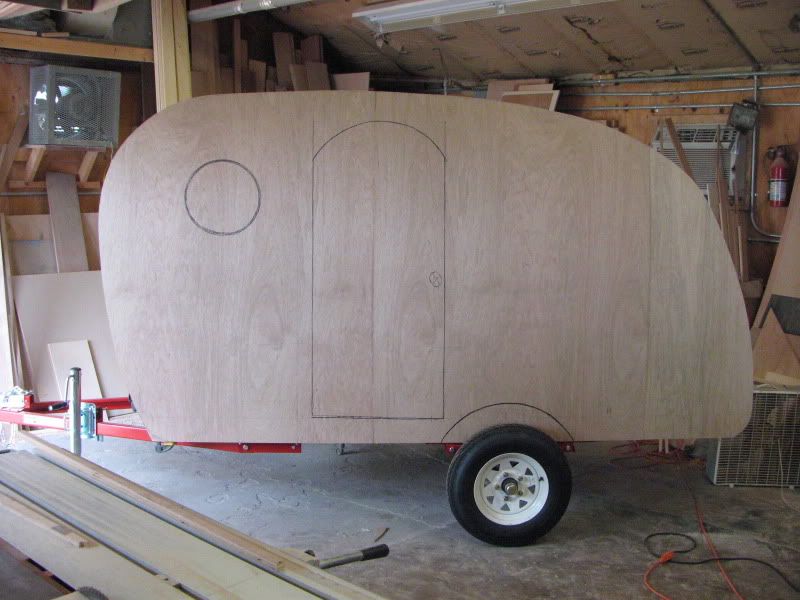
My last build is sort of a Standrop. Not really a standy and not really a teardrop. But I first drew out a profile on paper. Then transferred to cheap 1/4" plywood. I drew it out by measuring as close as possible to my drawing. Then my eye took over. I found what looked good on a small piece on paper did not work completely. The best look was a full size mock up. After getting the pattern made on the 1/4" I traced the profile on my 3/4" sides. I over cut the lines of the pattern by about 1/4". Then I screwed the 1/4" pattern to the outside of my sides. This way the aluminum sheeting would cover the screw holes. Then I ran the router using a flush bit with a bearing on it around the pattern. That produced a great cut and and pattern for side 2 as well. The 1/4" pattern was also helpful in figuring where all the shelving, cabinets, door and windows would go before cutting things. Just draw everything on the pattern and stand back and look. Don't like it sand it off and reposition.

This is my 1/4" pattern sitting on the trailer for some perspective.
Image


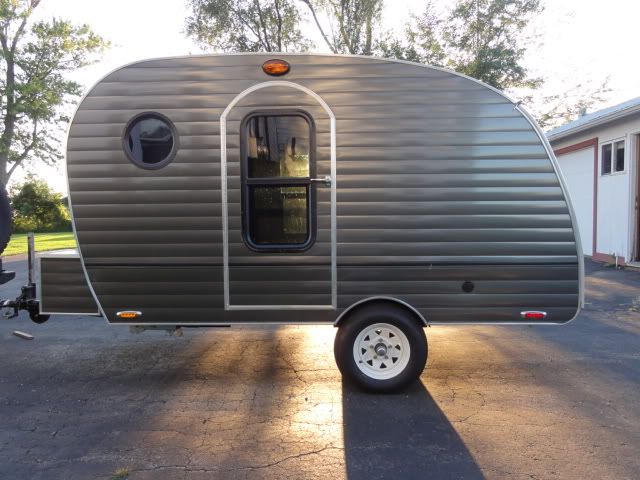
Here is finished product.

Image
User avatar
Woodbutcher
Platinum Donating Member
 
Posts: 4191
Images: 45
Joined: Fri Mar 10, 2006 10:01 pm
Location: Chicago Suburbs

Postby eddie6775 » Sun Dec 04, 2011 3:54 pm

Did you free hand cut the pattern as you tweaked it? That's nice work by the way... :thumbsup:
User avatar
eddie6775
Teardrop Advisor
 
Posts: 62
Images: 2
Joined: Fri Jul 16, 2010 9:20 am
Location: Montrose, PA
Top

Postby OCD » Sun Dec 04, 2011 4:07 pm

That's how I'm doing mine. I've just router cut the birch sides, it's worth taking the time to perfect a pattern as you'll save a lot of time in the long run.
http://mikenchell.com/forums/viewtopic.php?t=47117

Here's my pattern for mock-up
Image[/url]
OCD
Teardrop Advisor
 
Posts: 55
Joined: Mon Oct 31, 2011 9:22 pm
Top

Postby Blotto Bros » Sun Dec 04, 2011 5:23 pm

This may or may not help....

Years ago I was being cheap and decided to paint a sign on the side of one of my stores rather than paying a professional. My plan was to print the graphic onto graph paper then make a much larger graph on the building with chalk and transfer the design by hand.

While I was working one of my employees took my drawing and copied it onto a clear sheet using the copier, then rolled an old overhead projector out to the parking lot and turned it on. Much to my amazement it was a perfect and simple solution!! I could shrink or expand the image simply by moving the projector.

My suggestion for transferring a profile to "life size" is to do just as he did. Added benefits of it being very easy to re-size or change a design before you cut a single bit of wood.
Even those souls that are found must occasionally become lost to appreciate what they have.
User avatar
Blotto Bros
Silver Donating Member
 
Posts: 174
Images: 51
Joined: Sat Mar 19, 2011 4:11 pm
Location: Jacksonville, FL
Top

Postby 48Rob » Sun Dec 04, 2011 6:54 pm

one of my employees took my drawing and copied it onto a clear sheet using the copier, then rolled an old overhead projector out to the parking lot and turned it on.


You gave that employee a nice raise, right?

Great idea! :thumbsup:

Rob
Waiting for "someday" will leave you on your deathbed wondering why you didn't just rearrange your priorities and enjoy the time you had, instead of waiting for a "better" time to come along...
User avatar
48Rob
Super Lifetime Member
 
Posts: 3882
Images: 4
Joined: Thu Nov 17, 2005 6:47 pm
Location: Central Illinois
Top

Postby Koko65 » Sun Dec 04, 2011 8:33 pm

I printed out a sketch of the tear with a grid on it and then copied that grid onto the 1/4" pattern material. My wife numbered the grid and then roughed out the main points on the curves. I then used a long strip of wood and bent it to match the points. This provided smooth curves while staying close to the original design. After rough cutting the pattern with a jigsaw I smoothed it out with a combination of hand plane and a sanding block.

As mentioned above it is a good idea to screw the pattern down onto the actual wall. I didn't and just clamped it. In a couple of spots the bering on the router bit slipped in between the pattern and the wall causing a gouge. Now I have some repairs to make on the walls. Later, for other parts, I screwed the pattern and the parts to be routed straight to the workbench. That way nothing moved while I was routing.

There are some pics of us laying out the pattern in my album and also in our build thread.

Good luck

Onno
Onno
Okanagan Valley, BC.

"Four wheels move the body, two wheels move the soul"

Build Journal viewtopic.php?f=50&t=46312
User avatar
Koko65
Teardrop Master
 
Posts: 119
Images: 21
Joined: Sat Jan 15, 2011 11:58 pm
Location: Okanagan
Top

Postby aggie79 » Sun Dec 04, 2011 9:02 pm

Like Woodbutcher, I made a template. Instead of 1/4" plywood, I used 1/4" mdf. First, I drew a 3" grid using a drywall square. I used a home-made compass to layout the radial curves. For the non-radial curves, I used a wood batten. (The fixed points are temporarily held in place with double-sided tape.)

Image

Since I was using plywood as "framing" I drew in the shelf, face frame, bulkhead, and floor locations, as well as hardpoint locations for the electrical inlet, fenders, and wall-mounted interior lights. Then I cut the template. Here is a picture of it ready to trace onto the sidewall framing.

Image

After I traced the template, I rough cut the plywood with a jigsaw. Then I afixed the template to the plywood with double-sided tape and used a router and pattern bit to clean up the edges.

Image

Image

In case you are wondering, the red marks are areas that I did not cut or route all the way through. I skinned the interior of the sidewalls and then came back later and routed the doors to separate them from the sidewalls.
Tom (& Linda)
For build info on our former Silver Beatle teardrop:
Build Thread

93503
User avatar
aggie79
Super Duper Lifetime Member
 
Posts: 5405
Images: 686
Joined: Tue Aug 07, 2007 5:42 pm
Location: Watauga, Texas
Top

Postby grant whipp » Mon Dec 05, 2011 1:00 am

Blotto Bros wrote:... one of my employees took my drawing and copied it onto a clear sheet using the copier, then rolled an old overhead projector out to the parking lot and turned it on ...


Something I've been suggesting/advocating for years ... :thumbsup: ... works like a charm!
Celebrating Retirement after over 32 Years of Building, Promoting, Supporting, Supplying, Living the Lifestyle, and Loving Teardrop Trailers!
"Life Moves a Little Slower When You're On Teardrop Time"
The nature of Life, itself, is change ... "Those who matter, don't mind, and those who mind, don't matter."
Image
User avatar
grant whipp
Teardrop Manufacturer
 
Posts: 1815
Images: 117
Joined: Sun Jan 16, 2005 2:00 pm
Location: Jefferson State ('tween CA & OR!)
Top

Postby Blotto Bros » Mon Dec 05, 2011 4:40 pm

Looks like great minds think alike!! Of course that leaves me out since it wasn't my idea... :(
Even those souls that are found must occasionally become lost to appreciate what they have.
User avatar
Blotto Bros
Silver Donating Member
 
Posts: 174
Images: 51
Joined: Sat Mar 19, 2011 4:11 pm
Location: Jacksonville, FL
Top

Postby jstrubberg » Mon Dec 05, 2011 5:09 pm

Never done it with a teardrop, but I built custom archery equipment off and on for a number of years. The best method I found to create a new bow form was to lay the whole thing out on thin stock, jigsaw it to near dimension, then block sand it to exact and smooth lines. One your lines were correct, use a router and a straight bit along the edge of your thin stock and into the 1 1/2 beam material we used for forms.

It works, and it saves a TON of sanding! Makes a lot of sawdust in a hurry, though.
The more stuff I take along, the more time I spend taking care of my stuff!
jstrubberg
500 Club
 
Posts: 691
Joined: Tue Nov 08, 2011 8:26 pm
Location: mid-Missouri
Top


Return to Teardrop Construction Tips & Techniques

Who is online

Users browsing this forum: No registered users and 4 guests