Robbie's Benroy build- Now For Sale...

...ask your questions in the appropriate forums BUT document your build here...preferably in a single thread...dates for updates, are appreciated....

Postby aggie79 » Mon Jan 09, 2012 11:18 am

Robbie,

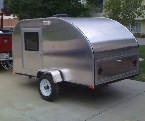
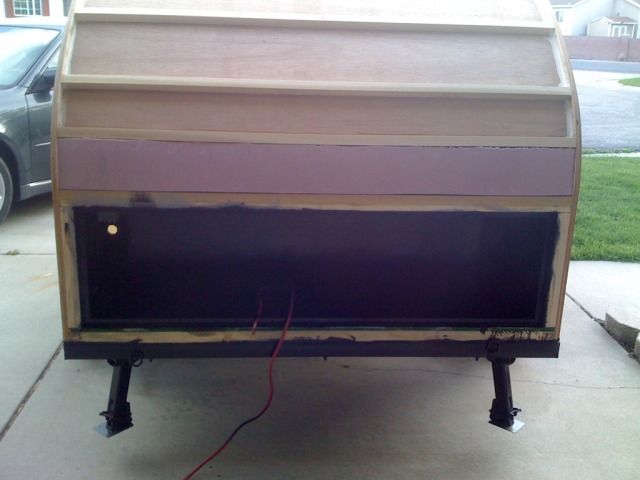
Even though you need to pull it back off, I bet it was a great feeling to see your teardrop shell and frame come together. Heck - I've seen people camping in teardrops less complete than yours.

Robbie wrote:2 steps foward, 1 step backward. :lol: :cry:


For me it was more like 1 step forward and 2 steps backwards. With the experience of #1, I'm pretty sure I could knock out #2 in about half of the time.

Take care,
Tom
Tom (& Linda)
For build info on our former Silver Beatle teardrop:
Build Thread

93503
User avatar
aggie79
Super Duper Lifetime Member
 
Posts: 5405
Images: 686
Joined: Tue Aug 07, 2007 5:42 pm
Location: Watauga, Texas

Postby Robbie » Mon Jan 09, 2012 11:29 am

Ya it definitely feels good to see it all together. And getting the bottom of those side walls all sealed up should be a fairly easy process. I have a couple friends coming over tonight to help me lift it up and just slide blocks between the cab and the frame so I have a few inches access to the bottom edge of the walls. Then I'm going to run a thick bead of poly roofing sealant along that edge and rub it into the end grain so it gets up in there a little and then add a really fat bead along the perimeter of the frame and around the bolt holes before I drop it back down. A good thick gooping of the roofing sealant should keep water out of there.

Honestly we don't do much planned foul weather camping anyways but just for those occasional rains that sneak up on ya I want it to be protected. I'm going to run a bead on the inner and outer seams once its set down also.
My aluminum benroy build:
viewtopic.php?t=45640
User avatar
Robbie
Teardrop Master
 
Posts: 250
Images: 86
Joined: Tue May 10, 2011 11:28 am
Location: West Jordan, UT

Postby absolutsnwbrdr » Mon Jan 09, 2012 11:39 am

Better to catch it now than find out something didn't get sealed after its too late!
Zach
Coming Soon...
Image Image
User avatar
absolutsnwbrdr
Donating Member
 
Posts: 2657
Images: 412
Joined: Mon Jan 25, 2010 6:10 pm
Location: Hanover, PA
Top

Re: Robbie's Benroy build- Tear's of Joy! 12-31 Update

Postby Robbie » Tue Mar 20, 2012 10:18 am

Wow its been a while since I've updated this! Well I got the cab lifted off the frame and sealed the edges with poly construction adhesive first and then the black roofing poly sealant between the cab and the frame. It sealed it up really nice and I can feel that it will keep a good seal and last a long time! Especially when the aluminum skins are on to cover over it. The weather is getting nicer here so forward progress will continue soon. I'm hoping to get the rear section of exterior skin on and the insulation in for the rear part of the trailer this weekend. Then start priming the whole thing and get a final few coats of enamel paint in the storage area. Slowly but surely! I bought a new 4 wheeler and a new Dodge Ram truck recently so the completion date will probably be sometime in June now. We'll be borrowing my father in law's redneck camper special until the Teardrop is done. Yeehaw! :lol: :cry:

I'll get some new pics up this weekend!!!!

Robbie
My aluminum benroy build:
viewtopic.php?t=45640
User avatar
Robbie
Teardrop Master
 
Posts: 250
Images: 86
Joined: Tue May 10, 2011 11:28 am
Location: West Jordan, UT
Top

Re: Robbie's Benroy build- Winter break ending!

Postby aggie79 » Tue Mar 20, 2012 10:53 am

Hey Robbie,

I was wondering where you've been. I guess things of thawed out in SLC. Good to see you're back on the build.

Take care,
Tom
Tom (& Linda)
For build info on our former Silver Beatle teardrop:
Build Thread

93503
User avatar
aggie79
Super Duper Lifetime Member
 
Posts: 5405
Images: 686
Joined: Tue Aug 07, 2007 5:42 pm
Location: Watauga, Texas
Top

Re: Robbie's Benroy build- Winter break ending!

Postby Robbie » Tue Mar 20, 2012 11:01 am

Ha ha thanks Tom! Ya I'm definitely not one for cold weather! I tried to get some propane heaters setup to work through the winter but without having a ceiling in my garage it was pretty pointless. But progress will be moving along again shortly. Hopefully get some small stuff done through this week and get the bigger stuff (exterior skins, interior door jambs, etc.) done this weekend. Then paint it all on Saturday or Sunday.
My aluminum benroy build:
viewtopic.php?t=45640
User avatar
Robbie
Teardrop Master
 
Posts: 250
Images: 86
Joined: Tue May 10, 2011 11:28 am
Location: West Jordan, UT
Top

Re: Robbie's Benroy build- Winter break ending!

Postby Forrest747 » Tue Mar 20, 2012 11:32 am

I was thinking that the other day that we have seen the Layton couple come out and wondered where you were at on your build Keep up the good work.
"All the success on the trail can not compensate for having square headlights"

"I've got a fever and the only prescription is more cowbell!"
http://www.tnttt.com/viewtopic.php?f=50&t=37701 Build Journal
User avatar
Forrest747
Cowbell Donating Member
 
Posts: 1327
Images: 447
Joined: Mon Apr 06, 2009 3:40 am
Location: West Valley Utah, Utah
Top

Re: Robbie's Benroy build- Update w/ pics!

Postby Robbie » Mon May 07, 2012 8:50 am

Well its about time for another update! I've been adding to my list of summer projects and realized I REALLY need to finish my trailer. Since the last update I've added the front power box with the porch light switch and a 12v outlet, sealed and painted the rear storage area with the same enamel paint as the frame, insulated and skinned the rear half of the trailer, and got the cab fully sealed to the frame! Now for some updated build pics!

Image

Image

Image

Image

Image

Image

Image

Image
My aluminum benroy build:
viewtopic.php?t=45640
User avatar
Robbie
Teardrop Master
 
Posts: 250
Images: 86
Joined: Tue May 10, 2011 11:28 am
Location: West Jordan, UT
Top

Re: Robbie's Benroy build- Winter break ending!

Postby Robbie » Mon May 07, 2012 8:52 am

Image

Image

Cheers to the first skin!!!

Image

Image

Image
My aluminum benroy build:
viewtopic.php?t=45640
User avatar
Robbie
Teardrop Master
 
Posts: 250
Images: 86
Joined: Tue May 10, 2011 11:28 am
Location: West Jordan, UT
Top

Re: Robbie's Benroy build- Winter break ending!

Postby Robbie » Mon May 07, 2012 8:55 am

Hopefully I'll have the remaining 2 front skins done within the next week or so. Then I'll be able to use the router to flush it all up around the edges and the openings at the roof vent hole and storage area. A good few coats of primer/sealer around the entire thing to keep the wood sealed and some of the oil based enamel at the edges and openings. Then I'll be ready to start skinning with the aluminum!!!

My new hopeful finish date is to have it all sealed up and campable by Memorial weekend. We'll see what happens though....
My aluminum benroy build:
viewtopic.php?t=45640
User avatar
Robbie
Teardrop Master
 
Posts: 250
Images: 86
Joined: Tue May 10, 2011 11:28 am
Location: West Jordan, UT
Top

Re: Robbie's Benroy build- Update w/ pics! 5-10

Postby absolutsnwbrdr » Mon May 07, 2012 10:12 am

Nice to see you back at it... Its really coming together :beer:
Zach
Coming Soon...
Image Image
User avatar
absolutsnwbrdr
Donating Member
 
Posts: 2657
Images: 412
Joined: Mon Jan 25, 2010 6:10 pm
Location: Hanover, PA
Top

Re: Robbie's Benroy build- Update w/ pics! 5-10

Postby S. Heisley » Mon May 07, 2012 6:55 pm

Lookin' Good! :thumbsup:
User avatar
S. Heisley
Super Lifetime Member
 
Posts: 8866
Images: 495
Joined: Mon Sep 17, 2007 10:02 am
Location: No. California
Top

Re: Robbie's Benroy build- Update w/ pics! 5-10

Postby CliffinGA » Mon May 07, 2012 7:54 pm

Looking good Robbie, just glad to see you back at it bud. Keep at til you have it to the point you can enjoy it.

Cliff :thumbsup:
In God we trust, shoot the rest and he will sort out!

My Build:

viewtopic.php?f=50&t=42628
User avatar
CliffinGA
1000 Club
1000 Club
 
Posts: 1499
Images: 207
Joined: Sat Nov 14, 2009 1:29 pm
Location: Jefferson, GA
Top

Re: Robbie's Benroy build- Update w/ pics! 5-10

Postby Oldragbaggers » Mon May 07, 2012 8:17 pm

Very nice looking teardrop. Congrats on your progress.
Life is sooooo good.........
Sail...camp....bike...repeat
Becky

Build Journal http://www.tnttt.com/viewtopic.php?f=50&t=45917
Visit our blog at http://www.oldragbaggers.com
Image Image
User avatar
Oldragbaggers
Gold Donating Member
 
Posts: 1842
Images: 331
Joined: Mon Aug 01, 2011 9:22 pm
Location: Essex, MD
Top

Re:

Postby Oldragbaggers » Mon May 07, 2012 8:40 pm

Robbie wrote:Thanks Mike that's not a bad idea! I'm definitely going to look into that! Maybe I can find some that are strong enough to glue on the inside of the roof so the door just sticks there with nothing visible at all!


Check some marine catalogs for portlight dogs. They are little bars on chains that hold up the ports in boat when they are open. You might be able to make up something on your own based on that idea.
Life is sooooo good.........
Sail...camp....bike...repeat
Becky

Build Journal http://www.tnttt.com/viewtopic.php?f=50&t=45917
Visit our blog at http://www.oldragbaggers.com
Image Image
User avatar
Oldragbaggers
Gold Donating Member
 
Posts: 1842
Images: 331
Joined: Mon Aug 01, 2011 9:22 pm
Location: Essex, MD
Top

PreviousNext

Return to Build Journals

Who is online

Users browsing this forum: No registered users and 11 guests