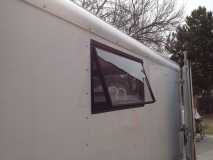
Today I installed one of the two 30”x15” crank out windows I bought from Grant at Li’l Bear Tagalongs. They arrived well packed and in perfect condition. They arrived without any fasteners, sealer or instructions. I emailed Grant asking some advice about how to mount them, and he responded within minutes on a Saturday. Excellent Service.
The windows arrived drilled for mounting on the sides only. Top and bottom mounting rails were not drilled. The sides are set up for plastic covers for the screws, and the covers were included. I asked Grant his advice on whether to drill the top/bottom rails, or use some sort of an adhesive. He did recommend that I drill them, and recommended either siliconized latex caulk or RV putty. Home depot carries the former, but not the latter, so I bough the caulk.
Then it was back to the trailer to begin the process of measuring, remeasuring, re-remeasuring, sitting, pondering, worrying, remeasuring again until I ran out of remeasures... Then, cutting.
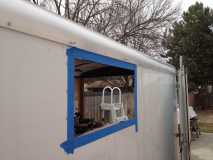
I elected to cut the aluminum exterior panels with a jig saw swathed in blue painters tape to protect the surface. I put more tape on the exterior panels to protect them Since I was bisecting one of the frame uprights, I used a 4.5” right angle grinder and a cutting wheel. Having never used one before, I discovered that one has to be VERY careful not to lose control of it... Also, wear googles or a face shield as the grinder throws a lot of material.
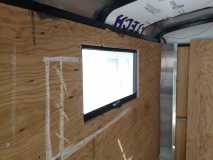
Once the exterior panel hole was cut I reinforced the opening with 2” X 1.25” fir strips. I initially stapled them from the outside, very close to the edge of the hole to keep them positions while I reinstalled the 3/8” plywood paneling. I screwed the plywood to the fir strips, and then installed the window for a test fit.. It fit! (Phew)
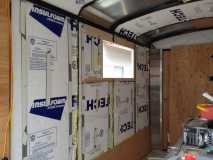
Next, I dry fit the window, predrilling the holes on sides, and through the top and bottom window rails. Once installed securely with screws, I removed the window and returned to the inside of the trailer where I used a router with a roller bearing tip to follow the outlines of the fir strips, opening the wall. That worked great.
Then, I returned to the outside of the trailer, and applied blue painter’s tape all around the outside edges of the window frame. This was done in order to prevent the latex grout from making a mess on the side of the trailer. I then removed the window and applied the latex sealer, and reinstalled the window. Then I used paper towels to wipe away any excess caulk from the frame surface. Once the frame was nice and clean, I pulled away the painters tape... And got a nice clean edge.
Last, I installed the plastic screw covers on the vertical edges of the frame. They were hard to install until I figured out that if you warm them in water and then squeeze them a bit they fit in the locking grooves.
All of the above took only about 7 hours! I have one more to do, and since I did all my trial and error (and error, and error) on this first one the second should go much better.
I was concerned that I might destabilize the side wall of the trailer by cutting the vertical support and just framing the opening without replacing more of the structure. However, when it was all buttoned up, with insulation in the core, the wall was very solid. The sandwich of exterior aluminum, fir framing and plywood worked well. The top of the window is actually very securely attached to the top frame of the trailer structure.
The windows seems of high quality and operates smoothly. I like the idea of being able to leave the windows open part way even when it rains.
Living in the high-desert.


 A grommet would have been nice! How long will it take to wear through the insulation and short out? Any bets?? I am seriously thinking of moving all that wiring to surface wiring tracks (like this stuff