Stretch Benroy 10/20/13 Update - Campable at last!

...ask your questions in the appropriate forums BUT document your build here...preferably in a single thread...dates for updates, are appreciated....

Postby DudKC » Mon Jul 04, 2011 10:55 pm

Image

We got the outer wall glued together and the interior framed with 1 inch boards. Going back up tomorrow to hopefully get the framing installed completely, insulate, and put the inner skin on the passenger side. Then we'll move on to the driver's side. Looks like I'll be ordering windows tonight.
Dustin

View my build thread here:
http://www.tnttt.com/viewtopic.php?f=50&t=42426
DudKC
Teardrop Master
 
Posts: 125
Images: 100
Joined: Wed Jan 26, 2011 10:46 pm
Location: Kansas City

Postby DudKC » Sun Feb 05, 2012 8:05 pm

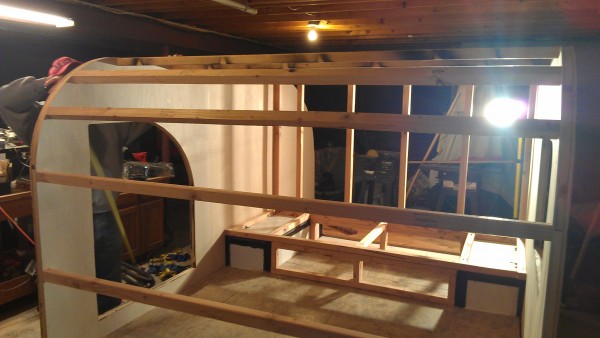
Well, I did get the windows ordered, and most everything else I need ordered, but that was about it for the past few months. After a lengthy teardrop vacation we got started back up a few weeks ago. Since then we've gotten the walls up, roof spars and back wall framed in.

Walls up
Image

Inside "bunk bed" framed in
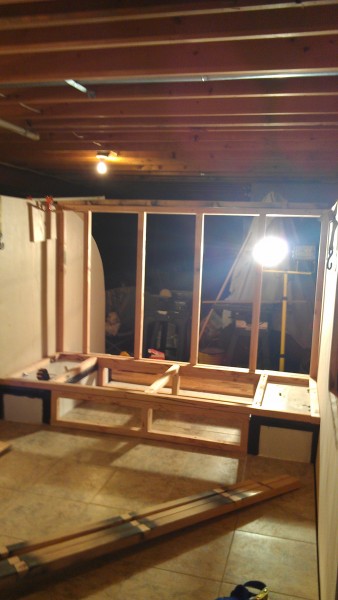
Image

Roof spars
Image

Counter top ledger
Image

It definitely feels solid after we got everything screwed together nice and tight. That makes me feel pretty good about the recent progress. Probably run some wiring next then start building the hatch.
Dustin

View my build thread here:
http://www.tnttt.com/viewtopic.php?f=50&t=42426
DudKC
Teardrop Master
 
Posts: 125
Images: 100
Joined: Wed Jan 26, 2011 10:46 pm
Location: Kansas City

Re: Stretch Benroy 2/5/12 Update

Postby DudKC » Sun Feb 12, 2012 1:41 pm

Got our electrical wiring ran through the roof spars and down through the back wall.

Wire run
Image

Interior 120V outlet
Image

Galley 120V outlet
Image

Distribution panel will be under the galley counter, inside a cabinet
Image

Still need to install the inlet and get everything connected and mounted.
Dustin

View my build thread here:
http://www.tnttt.com/viewtopic.php?f=50&t=42426
DudKC
Teardrop Master
 
Posts: 125
Images: 100
Joined: Wed Jan 26, 2011 10:46 pm
Location: Kansas City
Top

Re: Stretch Benroy 2/5/12 Update

Postby MizzouChE2006 » Fri Feb 17, 2012 3:43 pm

Looks pretty neat! Great work thus far!
MizzouChE2006
Teardrop Inspector
 
Posts: 1
Joined: Fri Feb 17, 2012 3:22 pm
Top

Re: Stretch Benroy 2/5/12 Update

Postby DudKC » Sun May 27, 2012 9:01 pm

Took advantage of the 3 day weekend and got a lot done over the Holiday.

Got the back walls finished and installed. The bench doubles as storage and a bed.

Image

A little closer look at the storage compartment. We put the drawer latch on and it seems to hold it in place so we'll see how it holds up as time goes on.

Image

This is the first piece of plywood we bent. It went OK (1/4 inch luan). We did finish skinning the hatch but I didn't get a good picture at the time.

Image

Then we got the interior skinned. The 1/4 inch luan bends fairly well, the bend piece did break on one side, but it broke on the "back" side and the interior looked unblemished so we just went with it.

Image

The we got everything insulated.

Image

And put the first piece of exterior skin on.

Image

Hopefully tomorrow everything goes well and we will have the last 2 pieces of exterior skinned.
Dustin

View my build thread here:
http://www.tnttt.com/viewtopic.php?f=50&t=42426
DudKC
Teardrop Master
 
Posts: 125
Images: 100
Joined: Wed Jan 26, 2011 10:46 pm
Location: Kansas City
Top

Re: Stretch Benroy 5/27/12 Update

Postby LDK » Sun May 27, 2012 9:16 pm

I like what you've done so far. :thumbsup: It's going to be a good size benroy. How long and wide is it going to be?
LDK
Gold Donating Member
 
Posts: 1419
Images: 1
Joined: Fri Jan 22, 2010 8:29 pm
Top

Re: Stretch Benroy 5/27/12 Update

Postby DudKC » Sun May 27, 2012 9:28 pm

LDK wrote:I like what you've done so far. :thumbsup: It's going to be a good size benroy. How long and wide is it going to be?


Thank you! The frame is about 6' x 9' 10" and about 4 1/2 feet tall.
Dustin

View my build thread here:
http://www.tnttt.com/viewtopic.php?f=50&t=42426
DudKC
Teardrop Master
 
Posts: 125
Images: 100
Joined: Wed Jan 26, 2011 10:46 pm
Location: Kansas City
Top

Re: Stretch Benroy 5/27/12 Update

Postby DudKC » Sat Jun 02, 2012 9:05 pm

So we got a little closer to the finish line today. It seems like the closer I think we get, I realize the farther we are than I thought.

Got the outer skin stained the other night. Golden Oak aniline dye from Constantines Wood.
Image

Today we got the first 2 coats of the West Systems epoxy (105/207) on the outer skin.
Image

And the epoxy on the hatch. It looks very wet in these photos because it was, it dries nice and clear when you use the 105/207 mixture.
Image

We also got the back wall skinned and put the counter top up there to get a feel for what it's going to look like.
Image

Still a ways to go but we're chipping away at it. My dad may just get his basement back sometime this year.
Dustin

View my build thread here:
http://www.tnttt.com/viewtopic.php?f=50&t=42426
DudKC
Teardrop Master
 
Posts: 125
Images: 100
Joined: Wed Jan 26, 2011 10:46 pm
Location: Kansas City
Top

Re: Stretch Benroy 6/2/12 Update

Postby DudKC » Sun Jun 17, 2012 10:10 pm

Got some work done in the galley this weekend.

Cut the hole for the power inlet, tested the fit.
Image

Cutting the hole in the counter top for the stove top.
Image

Tested the fit.
Image

Made the cabinet face out of 1/2 inch MDF.
Image

Made the cabinet doors out of the same 1/2 inch MDF and routed the edges.
Image
Dustin

View my build thread here:
http://www.tnttt.com/viewtopic.php?f=50&t=42426
DudKC
Teardrop Master
 
Posts: 125
Images: 100
Joined: Wed Jan 26, 2011 10:46 pm
Location: Kansas City
Top

Re: Stretch Benroy 6/17/12 Update

Postby Oldragbaggers » Mon Jun 18, 2012 7:02 am

Very, very nice Dustin. I really like it and you obviously know what you are doing.
Life is sooooo good.........
Sail...camp....bike...repeat
Becky

Build Journal http://www.tnttt.com/viewtopic.php?f=50&t=45917
Visit our blog at http://www.oldragbaggers.com
Image Image
User avatar
Oldragbaggers
Gold Donating Member
 
Posts: 1842
Images: 331
Joined: Mon Aug 01, 2011 9:22 pm
Location: Essex, MD
Top

Re: Stretch Benroy 6/17/12 Update

Postby DudKC » Mon Jun 18, 2012 9:15 pm

Oldragbaggers wrote:Very, very nice Dustin. I really like it and you obviously know what you are doing.


Thanks, Becky! I clicked your blog and it looks like your build is coming along very nicely! The West Systems epoxy is great and has a lot of uses. Good luck with everything!
Dustin

View my build thread here:
http://www.tnttt.com/viewtopic.php?f=50&t=42426
DudKC
Teardrop Master
 
Posts: 125
Images: 100
Joined: Wed Jan 26, 2011 10:46 pm
Location: Kansas City
Top

Re: Stretch Benroy 6/17/12 Update

Postby DudKC » Thu Jul 05, 2012 5:23 pm

More progress today:

Polyurethane on the galley cabinets. We epoxied them last week with more of the 105/207 West Systems epoxy.

Image

Image

Entry door trimmed out.
Image

Close up of the T-Molding around the curve in the door.
Image

Installed hinge and mounted door.
Image

It shuts!
Image

Thanks goes out to Grant for all the advice and helpful products!
Dustin

View my build thread here:
http://www.tnttt.com/viewtopic.php?f=50&t=42426
DudKC
Teardrop Master
 
Posts: 125
Images: 100
Joined: Wed Jan 26, 2011 10:46 pm
Location: Kansas City
Top

Re: Stretch Benroy 7/5/12 Update

Postby pappaw » Fri Jul 06, 2012 12:31 pm

I like! :thumbsup:

Cheers :beer:
Image Cheers from Granny, Pappaw, and Cocoa (the Dachshund) Image
pappaw
Teardrop Master
 
Posts: 240
Images: 14
Joined: Mon Nov 22, 2010 12:15 pm
Location: S.W.Ohio
Top

Re: Stretch Benroy 7/5/12 Update

Postby DudKC » Sun Jul 08, 2012 4:29 pm

Today we installed the weather stripping on the entry door and installed the door handle.

Close up of the door seal.
Image

After drilling the hole with the hole saw we had to figure out what to do with the T-molding where it was in the way of the outside door handle.
Image

We marked the outline of the door handle.
Image

The dremel made quick work of that task.
Image

Close up of the inside door handle after we cut off the metal rod that goes through the handle. We used a hacksaw to cut it off and grinder to round off the edges.
Image

Side view of the inside handle, you can see the spacer we put in to make the latch flush with the inside wall.
Image

Finished product.
Image
Dustin

View my build thread here:
http://www.tnttt.com/viewtopic.php?f=50&t=42426
DudKC
Teardrop Master
 
Posts: 125
Images: 100
Joined: Wed Jan 26, 2011 10:46 pm
Location: Kansas City
Top

Re: Stretch Benroy 7/8/12 Update

Postby Oldragbaggers » Sun Jul 08, 2012 7:44 pm

Gotta love the Dremel. I don't know which I love best, my Dremel, my router or my Kreg jig. :thinking:
Life is sooooo good.........
Sail...camp....bike...repeat
Becky

Build Journal http://www.tnttt.com/viewtopic.php?f=50&t=45917
Visit our blog at http://www.oldragbaggers.com
Image Image
User avatar
Oldragbaggers
Gold Donating Member
 
Posts: 1842
Images: 331
Joined: Mon Aug 01, 2011 9:22 pm
Location: Essex, MD
Top

PreviousNext

Return to Build Journals

Who is online

Users browsing this forum: No registered users and 9 guests