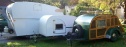
I'm smitten by the woodies, but haven't been able to discern after looking at several pics: Is the external framework of a woody functional or merely aesthetic? How is the framework attached? How is moisture sealed out from between frame and panel? Is there a woody build journal that I've missed? Thanks.
tk
questions for woody builders
10 posts
• Page 1 of 1
Re: questions for woody builders
![]() by mikeschn » Sat Mar 25, 2006 7:40 am
by mikeschn » Sat Mar 25, 2006 7:40 am
tk wrote:I'm smitten by the woodies, but haven't been able to discern after looking at several pics: Is the external framework of a woody functional or merely aesthetic? How is the framework attached? How is moisture sealed out from between frame and panel? Is there a woody build journal that I've missed? Thanks.
tk
Check out Steve F's webpage... also check out the Lil Diner build journal, in the Hall of Fame.
Mike...
P.S. To answer your question, Steve glues in the foam using epoxy. So the wood sides are sealed, inside and out...!
The quality is remembered long after the price is forgotten, so build your teardrop with the best materials...
-

mikeschn - Site Admin
- Posts: 19202
- Images: 475
- Joined: Tue Apr 13, 2004 11:01 am
- Location: MI