Building The Atma Travelear Teardrop

...ask your questions in the appropriate forums BUT document your build here...preferably in a single thread...dates for updates, are appreciated....

Re: Building The Atma Travelear Teardrop - Update 8/17 pg 27

Postby Junkboy999 » Sun Aug 19, 2012 2:29 am

Looking good Dave.

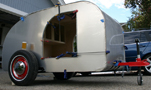
I got another question for you. What is the cross section look like for the aluminum Door trim you used for the entry doors. Do you have a Link on the net for it. I really need to redo the doors on my used TD.

Thanks Terry
Junkboy999
User avatar
Junkboy999
1000 Club
1000 Club
 
Posts: 1259
Images: 52
Joined: Fri Jul 06, 2012 9:18 pm
Location: Wichita, KS

Re: Building The Atma Travelear Teardrop - Update 8/17 pg 27

Postby DMcCam » Sun Aug 19, 2012 8:40 pm

Thank you Terry! I got my door trim from Grant at Lil' Bear here's the link: http://www.lilbear.teardrops.net/parts.html#molding He has several sizes to choose from. My walls are 1" thick so I bought the 1 1/4" then ripped it down on the table saw.

Cheers,

Dave
User avatar
DMcCam
Gold Donating Member
 
Posts: 883
Joined: Wed Jan 06, 2010 8:30 pm
Location: Reno, Nevada

Re: Building The Atma Travelear Teardrop - Update 8/17 pg 27

Postby TRP » Mon Aug 20, 2012 10:23 am

Looking great Dave!

What battery did you go with for your build? I'm rebuilding an original 55 Benroy and I'm about at the stage where I should start to think about where to mount a battery and fuse block. I'm not quite ready for final fit and finish yet, but it would be easier to test to make sure I didn't blast a nail through any wires at this stage. :)

I only plan to run a dome light in the interior cabin, the galley dome light, the Fantastic Fan, and two small reading lights. I may also install a 12v charger receptacle for phones, tablets, and similar devices.

Any advice you can offer would be much appreciated.

Thanks
Ted
User avatar
TRP
Silver Donating Member
 
Posts: 316
Images: 341
Joined: Wed Jun 27, 2012 2:50 pm
Location: Morgan Hill, CA
Top

Re: Building The Atma Travelear Teardrop - Update 8/17 pg 27

Postby DMcCam » Mon Aug 20, 2012 10:48 pm

Hi Ted, I just got a standard marine 12 volt deep cycle for about $100. It specs out about the same output as the high end sealed batteries at half the price. I'm going to have a few small vents in the top of the tongue box and one or two in the bottom of the battery compartment. I isolated my 12 volt plugs and Fantastic fan on separate circuits and used 14 gauge wire throughout (I know, a bit overkill but there it is). I'll be doing my final electrical installation soon I hope.

All the best,

Dave
User avatar
DMcCam
Gold Donating Member
 
Posts: 883
Joined: Wed Jan 06, 2010 8:30 pm
Location: Reno, Nevada
Top

Re: Building The Atma Travelear Teardrop - Update 8/17 pg 27

Postby DMcCam » Tue Aug 21, 2012 6:52 pm

Hi Everyone, I had only a little teardrop time this weekend.

Image
After installing the second roof edge trim I wanted to see how the vinyl insert molding would look. This shot shows the lower front edge molding installed too.

Image
Here's a high view of the way the molding and hinge worked out.

Image
A high close up of the joint between them.

Image
This is how they mate together.

Image
Passenger side view. I left the tails long on the roof edge molding so I can trim it to length after the bottom edge molding's installed.

Image
Today I bent the door edge molding and temporarily installed it with small screws. The 'T' molding is next then final assembly with sealer.

All the best,

Dave
User avatar
DMcCam
Gold Donating Member
 
Posts: 883
Joined: Wed Jan 06, 2010 8:30 pm
Location: Reno, Nevada
Top

Re: Building The Atma Travelear Teardrop - Update 8/21 pg 28

Postby danlott » Tue Aug 21, 2012 11:16 pm

Looks very good Dave. Really looking forward to seeing the finished teardrop in person.

Dan
Hoplite Traveler Build thread
Image Image
Life is what happens to you while you're busy making other plans.
User avatar
danlott
Donating Member
 
Posts: 874
Images: 264
Joined: Fri Mar 06, 2009 2:18 pm
Location: Winnemucca, Nevada
Top

Re: Building The Atma Travelear Teardrop - Update 8/17 pg 27

Postby Captain Monkeyshines » Fri Aug 24, 2012 8:33 pm

DMcCam wrote:Image
Here's a high view of the way the molding and hinge worked out.

Image
A high close up of the joint between them.


Dave, I've got a couple of things to say things:
A) that's an awesome looking teardrop, you've definitely got it going on

and 2) the trim looks very well fitted, and I was wondering (not to throw a monkey in your wrench, but) that area near the hinge looks to me like it will hold water when it rains. This might potentially seep down into your cabinets or your galley. Shouldn't there be a small open area for any water to drain off the roof? Not that I've ever built a teardrop or anything, though, just askin'

C) Love the whole design!
“When You're Alone”
When you're in the kitchen, you've got to behave
You don't put metal in the microwave
The knobs on the stove are “hands off” no doubt
And when you make toast, don't use a knife to fish it out!
When you're alone, when you're alone
You got to stay safe when you're home all alone.
When you're alone, when you're home all alone
You got to make sure not to die, or choke or burn the house down.
User avatar
Captain Monkeyshines
Teardrop Advisor
 
Posts: 84
Images: 1
Joined: Wed Jan 25, 2012 9:23 pm
Location: A galaxy not too far away
Top

Re: Building The Atma Travelear Teardrop - Update 8/21 pg 28

Postby kinto » Fri Aug 24, 2012 9:43 pm

Nice!

Looking forward to seeing it in the wilds! My girl & I were into camping before, but we go probably 2x as much now since it's only a matter of hitching up the tear/ no set-up unless you feel like it/ no more hauling camp crap (see: necessities) up & down from the basement...

*Almost* everything 'in there' is an amazing feeling... just grab clothes & beer!


Cheers!

kent
:D
Is a hippopotamus just a really cool opotamus?

imay ildbay urnaljay

Image
User avatar
kinto
Gold Donating Member
 
Posts: 228
Images: 465
Joined: Tue Jul 19, 2011 10:20 am
Location: STL
Top

Re: Building The Atma Travelear Teardrop - Update 8/17 pg 27

Postby DMcCam » Mon Aug 27, 2012 9:53 am

Captain Monkeyshines wrote:Dave, I've got a couple of things to say things:
A) that's an awesome looking teardrop, you've definitely got it going on and 2) the trim looks very well fitted, and I was wondering (not to throw a monkey in your wrench, but) that area near the hinge looks to me like it will hold water when it rains. This might potentially seep down into your cabinets or your galley. Shouldn't there be a small open area for any water to drain off the roof? Not that I've ever built a teardrop or anything, though, just askin'
C) Love the whole design!


Hi Captain, Thank you for your kind compliments on my little trailer build. Your question came up as we were installing the trim and we decided to go ahead with it even though it will have a pool of catch water when it rains. With the amount of sealer we used the area is very water tight. If it becomes an issue I'll make a pathway for the water through the mitered joint to the hinge edge. Come to think of it, it's probably a good idea to do anyway. We camp mostly in the high sierra range in good weather. Rainstorms are very infrequent.

Hey Kent, I can't wait to be out camping...too good to miss.

All the best,

Dave
User avatar
DMcCam
Gold Donating Member
 
Posts: 883
Joined: Wed Jan 06, 2010 8:30 pm
Location: Reno, Nevada
Top

Re: Building The Atma Travelear Teardrop - Update 8/21 pg 28

Postby DMcCam » Fri Aug 31, 2012 12:53 pm

Hi Everyone, Got a few things accomplished this week. Mostly I was fitting and bending the .063 aluminum. Man is that stuff stiff!

Image
We had to figured out a way to bend the aluminum around the tongue box hatch, the lower bottom pan and the hatch. You can see how extreme the bend needed to be looking at the TB hatch.

Image
Using a 6" steal pipe as a crude form, we placed spacers under both ends and added a side guide to keep the bends square.

Image
This image shows equal distance marks on the back side of the TB hatch aluminum.

Image
Taking our time, we bent the TB hatch little by little.

Image
Here you can see that it worked pretty well. The contact cement and trim will easily hold it to the curve now.

Image
Here's how the little bottom pan shaped up. We cut a kerf in the back side of the sheet aluminum then bent it to fit the deck end. It's held in place with small screws that will be replaced with the screw nails once the contact cement is applied.

Image
You can see how tight the fit is with the galley walls.

Image
I think it will flatten out and fit nicely with the contact cement and trim.

Now on to fitting the aluminum for the hatch!

All the best,

Dave
User avatar
DMcCam
Gold Donating Member
 
Posts: 883
Joined: Wed Jan 06, 2010 8:30 pm
Location: Reno, Nevada
Top

Re: Building The Atma Travelear Teardrop - Update 8/21 pg 28

Postby Richard Miller » Fri Aug 31, 2012 6:04 pm

Looking great Dave, I really look forward to the updates, getting close :)
I used to be pretty indecisive, but now I'm not too sure
User avatar
Richard Miller
Teardrop Advisor
 
Posts: 54
Images: 0
Joined: Thu Nov 24, 2011 12:35 pm
Location: Lubbock, TX
Top

Re: Building The Atma Travelear Teardrop - Update 8/21 pg 28

Postby KCStudly » Fri Aug 31, 2012 6:16 pm

Dave, I haven't commented too much, but I have to tell you just how much I know we all appreciate your eye for design and the continuity of your theme. The Atma "is" the "Ultimate".

:thumbsup:
KC
My Build: The Poet Creek Express Hybrid Foamie

Poet Creek Or Bust
Engineering the TLAR way - "That Looks About Right"
TnTTT ORIGINAL 200A LANTERN CLUB = "The 200A Gang"
Green Lantern Corpsmen
User avatar
KCStudly
Donating Member
 
Posts: 9640
Images: 8169
Joined: Mon Feb 06, 2012 10:18 pm
Location: Southeastern CT, USA
Top

Re: Building The Atma Travelear Teardrop - Update 8/31 pg 28

Postby nevadatear » Fri Aug 31, 2012 6:58 pm

Keep on plugging Dave! Three weeks an counting. We don't care if it is finished, just street legal. You could always license it in lovelock. Just got to get it this far! See you soon. You will be camping at twain and tears! I think u can, I think u can.
Debbie (with Randy looking over my shoulder)
Our build thread: http://www.tnttt.com/viewtopic.php?t=41295&highlight=monstero
2009 Homebuilt woody, Kenskill inspired 5 wide
ImageImage
User avatar
nevadatear
Silver Donating Member
 
Posts: 2381
Images: 171
Joined: Mon Nov 10, 2008 2:37 pm
Location: No. Nevada
Top

Re: Building The Atma Travelear Teardrop - Update 8/21 pg 28

Postby DMcCam » Tue Sep 04, 2012 10:07 am

Richard Miller wrote:Looking great Dave, I really look forward to the updates, getting close :)


Thank you Richard!

KCStudly wrote:Dave, I haven't commented too much, but I have to tell you just how much I know we all appreciate your eye for design and the continuity of your theme. The Atma "is" the "Ultimate". :thumbsup:


You are very kind KC. I hope she measures up when she's all done. The pictures don't show many of the oopses.

nevadatear wrote:Keep on plugging Dave! Three weeks an counting. We don't care if it is finished, just street legal. You could always license it in lovelock. Just got to get it this far! See you soon. You will be camping at twain and tears! I think u can, I think u can.


Hi Debbie, I'm a working on it girl! Unionville here we come...

Cheers,

Dave
User avatar
DMcCam
Gold Donating Member
 
Posts: 883
Joined: Wed Jan 06, 2010 8:30 pm
Location: Reno, Nevada
Top

Re: Building The Atma Travelear Teardrop - Update 8/31 pg 28

Postby DMcCam » Tue Sep 04, 2012 10:08 am

Hi Everyone, We finally got around to the 'T' molding on the doors this long weekend. I followed Grants method of relieving the inside edge.

Image
This is the underside of the 'T' molding relieved to about 3/16". We pre-drilled the mounting holes after laying out the corners.

Image
I've got the first screw in holding the molding in place.

Image
Each stick is 12' long because my doors are a bit over 11' in circumference. Here you can see two of the relieved edges on the inside of the molding.

Image
This shot shows the 'T' molding attached with a screw to the outside door edge. You can see that I hadn't cleaned up the silicon yet from the edge molding install.

Image
Working very slowly and carefully, I bent the molding around the corners securing it in place with screws.

Image

Image
I'm pleased the way they turned out although I do have a few wrinkles in the curves. I hope I can figure out a way to smooth them out. The seam will be hidden behind my hinges.

Image
The inside looks like this all ready for final installation and seals.

All the best,

Dave
User avatar
DMcCam
Gold Donating Member
 
Posts: 883
Joined: Wed Jan 06, 2010 8:30 pm
Location: Reno, Nevada
Top

PreviousNext

Return to Build Journals

Who is online

Users browsing this forum: No registered users and 15 guests