Colorado_Carter Teardrop Build

...ask your questions in the appropriate forums BUT document your build here...preferably in a single thread...dates for updates, are appreciated....

Re: Colorado_Carter Teardrop Build

Postby bdosborn » Mon Oct 29, 2012 7:24 pm

Nice build! Another Coloradoan subscribed and watching... :thumbsup:

Bruce
2009 6.5'X11' TTT - Boxcar
All it takes is a speck of faith and a few kilowatts of sweat and grace.
Image
Boxcar Build
aVANger Build
User avatar
bdosborn
Donating Member
 
Posts: 5595
Images: 806
Joined: Wed May 05, 2004 11:10 pm
Location: CO, Littleton

Re: Colorado_Carter Teardrop Build

Postby Colorado_Carter » Mon Nov 05, 2012 11:32 am

Had another good weekend of building.

The first order of business was wiring the interior up for electrical.

I am going pretty basic, I plan on mainly using at camps without electrical service (not really my thing) so mostly a 12V system with some 120V capabilities that can be added in later. I wired for drivers and passenger side interior and exterior lights(swithced), front and back marker lights, reading lights, fan, TV, solar, 12V interior recepticle, 120V interior recepticle, water pump etc. Even though I dont plan on immediatly utilizing some of these items, at least they are there.

Check out the first pic, can you spot any issues? It was more economical to buy a 500' spool of wire, unfortunatly it is only one color. Fortunaly my Type A personaltiy made some awesome labels. Unfortunalty the labels are not sticking all that well. (thats 2-unfortunates to 1-fortunate, im likely in trouble) I need to make some more out of a different sticker type before they fall off.

The only problem I had is the interior roof wiring. I intended it to go into the roof from the back wall, but instead it goes from the back wall to the roof inside. A few wires will be visible, but hidden by the cabinets. No harm.
Attachments
IMG_20121103_111649.jpg
IMG_20121103_111649.jpg (86.75 KiB) Viewed 2038 times
IMG_20121103_111728.jpg
IMG_20121103_111728.jpg (143.35 KiB) Viewed 2038 times
IMG_20121103_111719.jpg
IMG_20121103_111719.jpg (153.62 KiB) Viewed 2038 times
User avatar
Colorado_Carter
Teardrop Advisor
 
Posts: 72
Images: 102
Joined: Mon Jun 04, 2012 12:17 pm

Re: Colorado_Carter Teardrop Build

Postby Colorado_Carter » Mon Nov 05, 2012 11:42 am

Next I installed the interior back wall and side walls. The two side walls are oak, and the back wall is pineish. I plan on staining and finishing the side walls and cabinet fronts, but the roof and walls I am planning on carpeting.

I also started the roof spars, I am putting them about a foot apart in this first section. The radiuses will of course need more. I plan on installing the first four feet of the roof, then complete the interior cabinets (except doors which I will do all at one time). I can then stain and urethane the interior. I will then move forward with the roof.
Attachments
IMG_20121105_072553.jpg
IMG_20121105_072553.jpg (94.11 KiB) Viewed 2037 times
IMG_20121105_072542.jpg
IMG_20121105_072542.jpg (97.35 KiB) Viewed 2037 times
IMG_20121105_072538.jpg
IMG_20121105_072538.jpg (99.95 KiB) Viewed 2037 times
User avatar
Colorado_Carter
Teardrop Advisor
 
Posts: 72
Images: 102
Joined: Mon Jun 04, 2012 12:17 pm
Top

Re: Colorado_Carter Teardrop Build

Postby Colorado_Carter » Mon Nov 12, 2012 12:08 pm

I wanted to get farther along this weekend but mother nature and Murphy and his laws teamed up against me. I tried hard though.

I did manage to get the first interior roof panel up. I also managed to assemble the cabinet frame, which because I was lazy cost alot of extra time to complete. I thought I could hand route a groove for the cabinet floor-Wrong. I knew better, but I did it anyway instead of setting up a router table or table saw. It took a bit of time to come up with a repair plan and alternate floor system. I also have a sneaky suspicion that installing a shelf at a later date is a poor idea, but I can't justify buying more ply just for that when Im sure more will be left over later.

Doing some serious thinking of an alternate less hard wood for the galley-maybe maple. Think anyone will notice if I don't tell them??

Last night, I finally got all the visible oaken pieces stained a nice cherry.

Time for some polyeurathane to make it-Shiny
Attachments
IMG_20121111_174253.jpg
IMG_20121111_174253.jpg (103.54 KiB) Viewed 1986 times
IMG_20121111_174246.jpg
IMG_20121111_174246.jpg (113 KiB) Viewed 1986 times
IMG_20121109_170619.jpg
IMG_20121109_170619.jpg (93.48 KiB) Viewed 1986 times
User avatar
Colorado_Carter
Teardrop Advisor
 
Posts: 72
Images: 102
Joined: Mon Jun 04, 2012 12:17 pm
Top

Re: Colorado_Carter Teardrop Build

Postby Colorado_Carter » Mon Nov 12, 2012 3:14 pm

Thanks

I generally go with a cherry, but thought something a little deaper would be better. The grain really popped after I applied it. All my projects around the house get a redish-either mahagony or cherry finish.

I should have included a picture of me last night, I liked it so much I spilled a bunch down my leg. Now one leg red-the other white.
User avatar
Colorado_Carter
Teardrop Advisor
 
Posts: 72
Images: 102
Joined: Mon Jun 04, 2012 12:17 pm
Top

Re: Colorado_Carter Teardrop Build

Postby Colorado_Carter » Mon Nov 19, 2012 11:36 am

I was hoping for a more productive weekend, but I only had one solid day to work on it.

I managed to get three coats of polyurathane on the wood. It is all shiny and smooth, just right.

I installed the interior lights and switches.I decided they would be handy when it's finally covered. I temporarily am powering them with a 12V transformer. I'm pretty happy with the amount of light they cast.

In the first photo, I had just stretched the next piece of plywood. I was starting to cleanup and noticed that somewhere in the day I thought it would be a good idea to put a worklight on the garage door rail. (when I could still stand up in the trailer). Now I was laughing at myself because there wasn't a real good way to get it back down.
Attachments
IMG_20121117_162456.jpg
IMG_20121117_162456.jpg (116.42 KiB) Viewed 1934 times
IMG_20121117_172230.jpg
IMG_20121117_172230.jpg (84.46 KiB) Viewed 1934 times
IMG_20121117_172241.jpg
IMG_20121117_172241.jpg (98.96 KiB) Viewed 1934 times
User avatar
Colorado_Carter
Teardrop Advisor
 
Posts: 72
Images: 102
Joined: Mon Jun 04, 2012 12:17 pm
Top

Re: Colorado_Carter Teardrop Build

Postby Colorado_Carter » Mon Nov 19, 2012 11:51 am

I added the second piece of ceiling plywood which started just behind the fan and went about 1/3 the way down the front. It covers the majority of the front radius. As it turns out-the 5mm underlayment is tougher than I thought it would be. I got it up there and was surprised at how far I still had to bend it. It wasn't going to make it-I started to panick.

So after some research I either needed to make kurfs or could try some hot water. So I sprayed it down with some hot water on both sides, and after about three hours of pushing, shoving, reapplying water, using some straps, a spare 2x4, several support boards, cursing, blood, sweat and beer I finally managed to get it into place. It was late when I finished, and I should have glued it in-but I didn't. I kept dreaming it had popped out all night, everytime the house creaked. I glued it in the following morning, much to my relief that went pretty easy.
Attachments
IMG_20121117_152615.jpg
IMG_20121117_152615.jpg (80.83 KiB) Viewed 1934 times
IMG_20121117_172221.jpg
IMG_20121117_172221.jpg (99.88 KiB) Viewed 1934 times
IMG_20121117_162456.jpg
IMG_20121117_162456.jpg (116.42 KiB) Viewed 1934 times
User avatar
Colorado_Carter
Teardrop Advisor
 
Posts: 72
Images: 102
Joined: Mon Jun 04, 2012 12:17 pm
Top

Re: Colorado_Carter Teardrop Build

Postby bdosborn » Mon Nov 19, 2012 1:22 pm

Austin Hardwoods in Denver has 4X8 sheets of 1/8" plywood. It's real easy to bend...

Bruce
2009 6.5'X11' TTT - Boxcar
All it takes is a speck of faith and a few kilowatts of sweat and grace.
Image
Boxcar Build
aVANger Build
User avatar
bdosborn
Donating Member
 
Posts: 5595
Images: 806
Joined: Wed May 05, 2004 11:10 pm
Location: CO, Littleton
Top

Re: Colorado_Carter Teardrop Build

Postby Colorado_Carter » Mon Nov 19, 2012 1:45 pm

Thanks Bruce, fortunatly it's installed.

Nice build by the way, it really came out nice. I also really liked the shop vac -vacuum pump.

Where did you source the filon from??
User avatar
Colorado_Carter
Teardrop Advisor
 
Posts: 72
Images: 102
Joined: Mon Jun 04, 2012 12:17 pm
Top

Re: Colorado_Carter Teardrop Build

Postby bdosborn » Mon Nov 19, 2012 8:29 pm

I got it the Filon from the Metal Company in Arvada. It had gotten pretty expense the last time I checked, I doubt I could afford to use it now.

Bruce
2009 6.5'X11' TTT - Boxcar
All it takes is a speck of faith and a few kilowatts of sweat and grace.
Image
Boxcar Build
aVANger Build
User avatar
bdosborn
Donating Member
 
Posts: 5595
Images: 806
Joined: Wed May 05, 2004 11:10 pm
Location: CO, Littleton
Top

Re: Colorado_Carter Teardrop Build

Postby Colorado_Carter » Tue Nov 20, 2012 10:53 am

Thanks for letting me know.I won't be ready for another month or two but I wanted to start thinking about it. Still haven't decided aluminum, filon, or some other material.
User avatar
Colorado_Carter
Teardrop Advisor
 
Posts: 72
Images: 102
Joined: Mon Jun 04, 2012 12:17 pm
Top

Re: Colorado_Carter Teardrop Build

Postby Colorado_Carter » Mon Nov 26, 2012 12:28 pm

Well, I tried but progress was pretty limited.
I sealed the seams and screw holes with some silicone just for good measure
Image

I managed to get all the carpet in. I should have done some more research, because I am pretty sure I installed it the hard way. I did get it in, and it came out pretty good. I installed some reading lights, some 12V and 120V recepticles inside. That will pretty much wrap up the inside for now. I have the bottom of the inside cabinets and some shelves ready to be installed in the next day or two. All that will be left is the cabinet doors which I am saving for later.
Image

Image

I also took it down off the stands. I was excited to get it down and install the last couple feet of the profile, but.... the whole trailer shrank. It was amazing. it seems alot smaller now that is a whole four inches shorter-its weird. But with the tires on, and the profile done it is kinda sexy.
Image

I have a ton of small things to complete this week, and some big decisions to make in order to get started on the galley.
Image
User avatar
Colorado_Carter
Teardrop Advisor
 
Posts: 72
Images: 102
Joined: Mon Jun 04, 2012 12:17 pm
Top

Re: Colorado_Carter Teardrop Build

Postby Colorado_Carter » Mon Nov 26, 2012 2:40 pm

Is there any general consensus as to where to place the galley hinge? I can stick it right next to the wall on the backside of the cabinet or move it to the front of the cabinets (roughly 1ft from the back wall). Is there plus or minuses to either? Will my 5'11" noggin not get hit when I walk under it. I am leaning toward moving it to the front edge of the cabinet at this point?


Image
User avatar
Colorado_Carter
Teardrop Advisor
 
Posts: 72
Images: 102
Joined: Mon Jun 04, 2012 12:17 pm
Top

Re: Colorado_Carter Teardrop Build

Postby Colorado_Carter » Mon Dec 03, 2012 11:25 am

I seem to think I can get alot more done than I do on the weekends. I thinks its partially all the small things that I forget need to get done and my own mistakes and genius ideas that seem to cut into production.

I finally started the galley. I found enough scratch and dent flooring for $10 buckes at a box store. Not the most ideal matrerial, but pricewise. Itll work. On a sidebar while cheap, I ruined a saw blade cutting that concrete wood-ugh I knew better. I also, being semi unbrillient decided to laminate up some oak for a counter. materials+time=I should have bought formica. It came out good but was a pain. I did like the design idea of a sliding countertop so it does slide 20", but I doubt it will need to go that far out too often. Another bit of advice is measure twice, make additions and subtractions twice, and then recheck. I made the counter 1/4" too small-it was fixable but a preventable error. I also got started on the galley cabinets, just trying to size it all up and make sure it is functional.
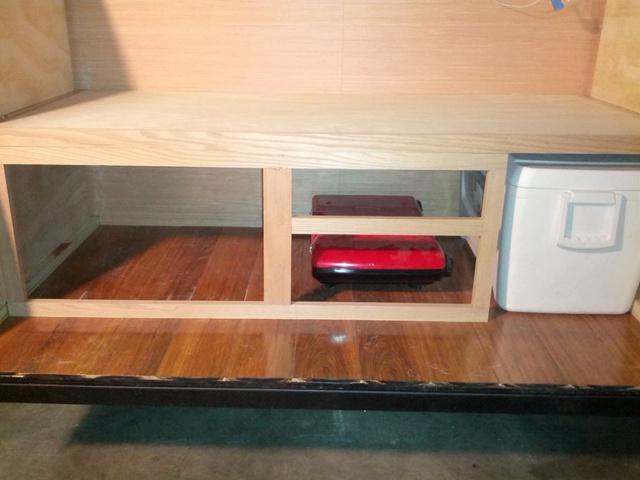
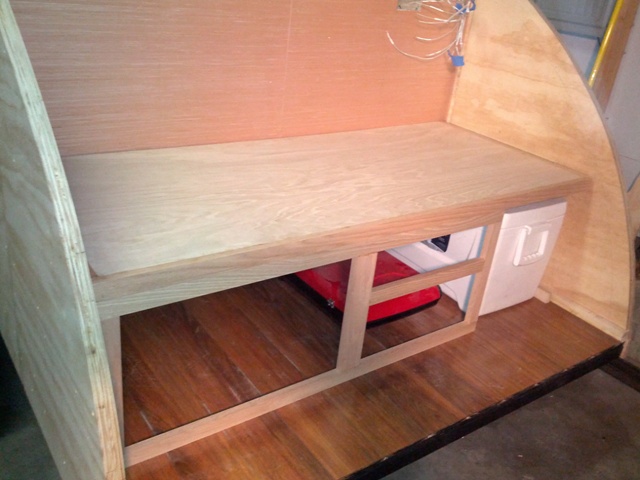
Image
Image

This week I put in roofing insulation, pain in the butt. I kerfed the outside with a razor blade. It doesn't look pretty but I think it will allow it to make the bends. Seemed to work. I decided to install an electrical box to house just the trailer wiring. Since it isn't fused, I figured it could be hidden and out of the way.
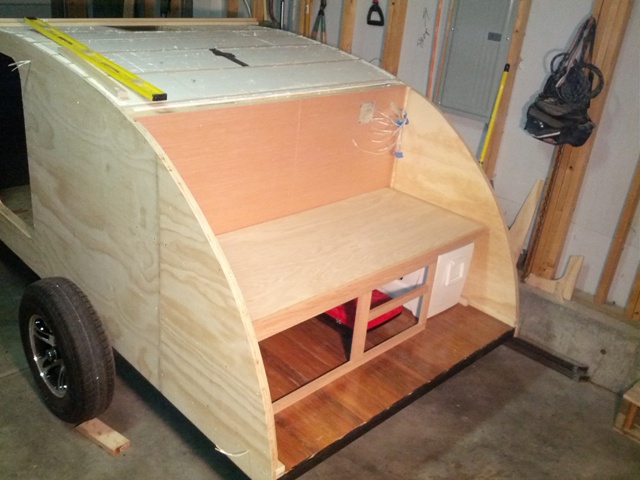
Image

Alright last image of the interior for a while, I put shelves in and the bottom of the interior cabinet along with carpet on the bottom.
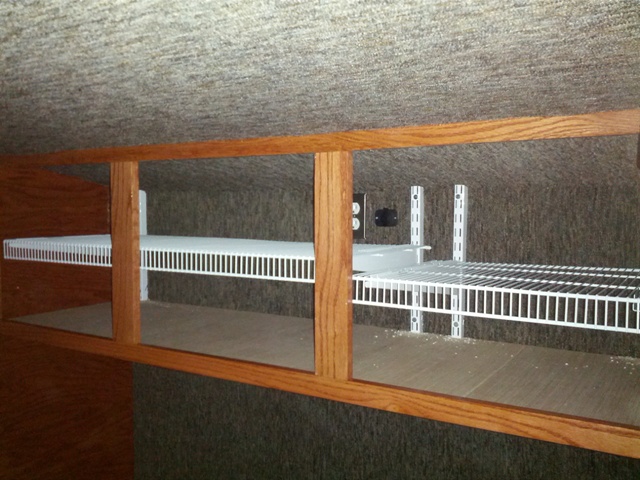
Image
User avatar
Colorado_Carter
Teardrop Advisor
 
Posts: 72
Images: 102
Joined: Mon Jun 04, 2012 12:17 pm
Top

Re: Colorado_Carter Teardrop Build

Postby KCStudly » Mon Dec 03, 2012 3:49 pm

Adjustable shelves are a great idea; very flexible in design. I like. :thumbsup:
KC
My Build: The Poet Creek Express Hybrid Foamie

Poet Creek Or Bust
Engineering the TLAR way - "That Looks About Right"
TnTTT ORIGINAL 200A LANTERN CLUB = "The 200A Gang"
Green Lantern Corpsmen
User avatar
KCStudly
Donating Member
 
Posts: 9640
Images: 8169
Joined: Mon Feb 06, 2012 10:18 pm
Location: Southeastern CT, USA
Top

PreviousNext

Return to Build Journals

Who is online

Users browsing this forum: No registered users and 1 guest

cron