Colorado_Carter Teardrop Build

...ask your questions in the appropriate forums BUT document your build here...preferably in a single thread...dates for updates, are appreciated....

Re: Colorado_Carter Teardrop Build

Postby Junkboy999 » Sun Dec 09, 2012 11:15 pm

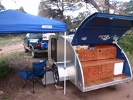
Nice. I’m wondering of the shelfs can be flipped over so the front has the lip facing up. That way stuff
will not just slide against the doors, and fall out when the doors are open.

Love the carpet ideal.
User avatar
Junkboy999
1000 Club
1000 Club
 
Posts: 1259
Images: 52
Joined: Fri Jul 06, 2012 9:18 pm
Location: Wichita, KS

Re: Colorado_Carter Teardrop Build

Postby Martiangod » Sun Dec 09, 2012 11:35 pm

Some great progress, really syarting to take shape, wheels look great....build on eh! !!
If it ain't broke, fix it till it is

Chris

Deep in the Heart of Nowhere
The topper viewtopic.php?f=50&t=58140, gone to a new home to be converted
into an ice fishing shack...FREEBIE !!! for a nice young family
The trailer viewtopic.php?f=50&t=48156
User avatar
Martiangod
500 Club
 
Posts: 856
Images: 432
Joined: Mon Jan 09, 2012 10:39 pm
Location: Peace River, Alberta

Re: Colorado_Carter Teardrop Build

Postby Colorado_Carter » Mon Dec 10, 2012 12:15 pm

Thanks for the support.

I would just like to start off todays update with a safety moment. As is common sense, and noted numerous times in the directions, and often heard in work safety briefings when using a brad nailer (or any nailer) never (ever) put an extremety (namely my thumb) next to or near where you are nailing. The nails often have a tendency to not go straight and exit the wood in an unpredictable fashion. I managed to nail my thumb to the project-it has officially drawn blood. It went through the plywood, curved and buried itself about an inch in. The worst was having to pull my thumb off of it and now the dull throb. So from me to everyone-please be safe when handling tools. I also learned-the oxyclean type of sanitizer I use for home brewing does a good job removing blood stains.

I put in a lot of time this weekend, I again feel like I should be farther along. For the most part there was a lot of sanding the bottom portion of the cabinets and the countertop. Most of the actual progress was the upper cabinet build, it took a while to sort through where to put the hinge, how it was going to look, sizes, etc. I used a couple sticks of poplar for the hinge, inserted a wedge in between and screwed them together then hand crafted some supports for in the middle. What a pain, it does seem nice and sturdy though. I also plan on the electrical going on the right side, so with all the wires and what not that will need to go there I curved a sheet of oak to cover that area. The other half will be a shelf. I did a lot of considering what will actually be visible when its all skinned, it looks a little weird now, but I think it will be fine. It is all sanded and ready for stain, unfortunatly it is a bit chilly this week. I may bring them in and stain/polyurothane them in the basement. Then do the final install.

Image
Image
Image
User avatar
Colorado_Carter
Teardrop Advisor
 
Posts: 72
Images: 102
Joined: Mon Jun 04, 2012 12:17 pm
Top

Re: Colorado_Carter Teardrop Build

Postby 225 » Mon Dec 10, 2012 1:41 pm

Sorry about your thumb.

Looking good though!
User avatar
225
Teardrop Master
 
Posts: 198
Joined: Sun Apr 15, 2012 6:07 am
Location: Asheville, NC.
Top

Re: Colorado_Carter Teardrop Build

Postby KCStudly » Mon Dec 10, 2012 3:37 pm

225 wrote:Sorry about your thumb.

Looking good though!


+1
KC
My Build: The Poet Creek Express Hybrid Foamie

Poet Creek Or Bust
Engineering the TLAR way - "That Looks About Right"
TnTTT ORIGINAL 200A LANTERN CLUB = "The 200A Gang"
Green Lantern Corpsmen
User avatar
KCStudly
Donating Member
 
Posts: 9640
Images: 8169
Joined: Mon Feb 06, 2012 10:18 pm
Location: Southeastern CT, USA
Top

Re: Colorado_Carter Teardrop Build

Postby Colorado_Carter » Mon Dec 10, 2012 6:59 pm

Thanks for the sympathy-I deserved it though. Hopefully learned my lesson for awhile.
User avatar
Colorado_Carter
Teardrop Advisor
 
Posts: 72
Images: 102
Joined: Mon Jun 04, 2012 12:17 pm
Top

Re: Colorado_Carter Teardrop Build

Postby Colorado_Carter » Mon Dec 17, 2012 11:16 am

So with the cold this week I drug the galley frame and coutertop to the basement and put some stain and polyurothane on them. It really made them come alive. I also painted most of the galley interior that wouldn't be oak. It took quite a while to reinstall the cabinet frame. I thought I had all the bits and pieces ready to go, but I was wrong. I also made the drawer frame, but it didn't make the pics.

Cabinet doors were on the next list.... I spent several hours preparing a couple practice doors. I was not planning on doing anything fancy, a simple 1/2" tongue and corresponding groove. I don't know quite what I am doing wrong but the tongue and groove just isn't good enough. The shoulders are fine, the grooves seem to go together but either the tonge or the groove is not a perfect 90 and I have too big a gap to fill. I was working with just a table saw, I checked and rechecked the angles, but it didn't seem to improve. I plan on trying one more time with a router table and groove bit, hopefully it will do better. Otherwise I think I will just butt the ends together and pocket screw them togeher.

I also layed out one sheet of the exterior skin, I am hoping a little setting will prebend it. I also got one spar of the galley hatch cut out, that is going to be a thinker. It fits great, but i still need to consider the hinge, the latch, how the exterior skin will fit and how far it will go. I suspect this will be the hardest part.

Image
Image
User avatar
Colorado_Carter
Teardrop Advisor
 
Posts: 72
Images: 102
Joined: Mon Jun 04, 2012 12:17 pm
Top

Re: Colorado_Carter Teardrop Build

Postby KCStudly » Mon Dec 17, 2012 4:14 pm

Galley looks FABULOUS! Nice job on the finish.

I did some quick test staining and poly on some pieces for TPCE and the poly is full of specks.
KC
My Build: The Poet Creek Express Hybrid Foamie

Poet Creek Or Bust
Engineering the TLAR way - "That Looks About Right"
TnTTT ORIGINAL 200A LANTERN CLUB = "The 200A Gang"
Green Lantern Corpsmen
User avatar
KCStudly
Donating Member
 
Posts: 9640
Images: 8169
Joined: Mon Feb 06, 2012 10:18 pm
Location: Southeastern CT, USA
Top

Re: Colorado_Carter Teardrop Build

Postby nevadatear » Tue Dec 18, 2012 7:28 pm

Looking VERY good!☺
Debbie (with Randy looking over my shoulder)
Our build thread: http://www.tnttt.com/viewtopic.php?t=41295&highlight=monstero
2009 Homebuilt woody, Kenskill inspired 5 wide
ImageImage
User avatar
nevadatear
Silver Donating Member
 
Posts: 2381
Images: 171
Joined: Mon Nov 10, 2008 2:37 pm
Location: No. Nevada
Top

Re: Colorado_Carter Teardrop Build

Postby Junkboy999 » Wed Dec 19, 2012 3:49 am

looks great. :thumbsup:

Now might be a good time to start thinking about the Hatch struts or supports. It seems a few builders get
the whole galley and hatch skinned and finished. Next come the after thought about where the support will
go. My used TD had a rake handle in it for a support. I had place a tilt and pan night vision camera in the
galley to see where I had space for supports.
User avatar
Junkboy999
1000 Club
1000 Club
 
Posts: 1259
Images: 52
Joined: Fri Jul 06, 2012 9:18 pm
Location: Wichita, KS
Top

Re: Colorado_Carter Teardrop Build

Postby Colorado_Carter » Wed Dec 19, 2012 10:38 am

Thanks for the kudos.

Your absolutely right about the hatch. It's driving me a hair batty thinking about it. Between how to butt it against the bottom, all the electrical that needs to go in it, how to make the side seal, struts, deformation, and, and, and..... Hopefully once I get to building it will come together.

Doug
User avatar
Colorado_Carter
Teardrop Advisor
 
Posts: 72
Images: 102
Joined: Mon Jun 04, 2012 12:17 pm
Top

Re: Colorado_Carter Teardrop Build

Postby Colorado_Carter » Wed Dec 26, 2012 11:13 am

This weekend I only had one good day to focus and work on the project. I finished the drawer and set it in place, along with the cooler slideout. The cooler slide out went in surprisingly easy. I am not sure about the 100lb slides I purchased. I put some weight on the front end and it seemed to sag pretty easy. I think as long as I put ice towards the back it will be fine, or it will get replaced-later. I also attached a couple sheets of the plywod skin, two sheets went to the front of the door. I am working on letting that stuff do a little pre-bending, by just letting it set on top it seemed to be conform (at least some). I still have the hard pieces to go, so I think I will put it in place without glue or nails and use some straps to bend it into shape over a couple days. I fitted the hurricane hinge in place and cut out all the ribs (2-from pine, 3 from 3/4" ply and 2 from 5/8" ply) for the galley hatch. That was a pain, I used a jigsaw to rough out the shape and then used a router to trim them all to one standard. The router part went fine but the jigsaw just didn't like cutting throught he plywood. All I had was a 6 tpi bit, but by the end I was feeling sorry for that jigsaw. At any rate-its done. The rest should go reasonably quickly next week-famous last words.

Happy Holidays Everyone, and in the words of Red Green-"Keep your stick on the ice"

Image
Image
Image
Image
User avatar
Colorado_Carter
Teardrop Advisor
 
Posts: 72
Images: 102
Joined: Mon Jun 04, 2012 12:17 pm
Top

Re: Colorado_Carter Teardrop Build

Postby KCStudly » Wed Dec 26, 2012 3:58 pm

Progress is progress.

It's looking good! Nice work. :thumbsup:
KC
My Build: The Poet Creek Express Hybrid Foamie

Poet Creek Or Bust
Engineering the TLAR way - "That Looks About Right"
TnTTT ORIGINAL 200A LANTERN CLUB = "The 200A Gang"
Green Lantern Corpsmen
User avatar
KCStudly
Donating Member
 
Posts: 9640
Images: 8169
Joined: Mon Feb 06, 2012 10:18 pm
Location: Southeastern CT, USA
Top

Re: Colorado_Carter Teardrop Build

Postby Ben » Thu Dec 27, 2012 7:38 am

Red green is cool one of my heros!! Great build too looks really nice
Going broke quick fixing a bad start!
Ben
Teardrop Master
 
Posts: 200
Images: 221
Joined: Sun Aug 05, 2012 8:39 pm
Location: Hocking hills Ohio
Top

Re: Colorado_Carter Teardrop Build

Postby Colorado_Carter » Wed Jan 02, 2013 10:34 am

Hope everyone had a Happy New Year.

I managed to make some progress this weekend. I managed to get all the exterior ply on over the weekend. That front corner was a B#%##%. It took a couple tries to get get it satisfactory. I tried to get it in one peice but it would not have been pretty, so I glued most of it and then cut off about 7" which I kerfed a bit and managed to manhandle it into place. I made some excellent progess on the hatch. It is put together, wired and the interior and exterior ply added. (no pics of the interior ply done) It needs some TLC with the sander and some filler to make it look pretty. It does seem pretty functional though. The passenger side sets out about a 1/4" but I think it will be fine after I adjust the gap for some seals. I can't really explain why it did this though. I suspect it warped a little with the ply, but it more seems to be up near the hinge. Maybe a screw or some glue is making it difficult. I think once the latch is in place it might take a little push to lock, and everything will be fine.

Too late now, on to some finish work on it the hatch and the dreaded cabinet doors.

Image
Image
Image
Image
Image
Image
User avatar
Colorado_Carter
Teardrop Advisor
 
Posts: 72
Images: 102
Joined: Mon Jun 04, 2012 12:17 pm
Top

PreviousNext

Return to Build Journals

Who is online

Users browsing this forum: Google [Bot] and 2 guests