The Poet Creek Express - Foamie Hybrid

Canvas covered foamies (Thrifty Alternatives...)

Moderator: eaglesdare

Re: The Poet Creek Express - Foamie Hybrid

Postby KCStudly » Sun Feb 03, 2013 9:43 am

RandyG, the chunk has always been the weekend after Halloween, Fri, Sat, Sun. Bridgeville, DE. I have only attended as a participant with Firing Line access. General access is kept behind a snow fence about 50 yards back, the crowds are generally huge, especially when the weather is fair, so plan on arriving early. They start the kids up early and it goes all day long each day. Dress in layers, and be prepared for any weather condition, including mud. Google "World Champion Punkin Chunkin" and you will find the association's website with info about the event.

Thanks for the support, GPW. :thumbsup:

Eagle, yeah, I kind of figured you could drill through the canvas if you wanted to, but I don't want to. I'd rather have the screw holes sealed up well w/o having to apply a patch or other obvious cover up. (p.s. re: the last pics I saw of your dogs recently, they were looking good! :thumbsup: )

Okay, gotta go chunk.
Last edited by KCStudly on Mon Mar 14, 2022 12:37 pm, edited 1 time in total.
KC
My Build: The Poet Creek Express Hybrid Foamie

Poet Creek Or Bust
Engineering the TLAR way - "That Looks About Right"
TnTTT ORIGINAL 200A LANTERN CLUB = "The 200A Gang"
Green Lantern Corpsmen
User avatar
KCStudly
Donating Member
 
Posts: 9640
Images: 8169
Joined: Mon Feb 06, 2012 10:18 pm
Location: Southeastern CT, USA

Re: The Poet Creek Express - Foamie Hybrid

Postby eaglesdare » Sun Feb 03, 2013 10:36 am

oh i gotcha. i was thinking you were drilling in with something like a hinge or handle (which would cover the hole to begin with). that is what i did, so i wasn't worried about a patch.

thanks, the pups are cute, aren't they. :lol: no bias here. the male really does look good, but the female, well hubby keeps saying she looks like she belongs in the wild. she has some weird looking fur, real wavy. but gotta love her anyways. :wine:
Louella
May the foam be with you.
User avatar
eaglesdare
Donating Member
 
Posts: 3168
Images: 13
Joined: Tue Aug 26, 2008 7:06 pm

Re: The Poet Creek Express - Foamie Hybrid

Postby KCStudly » Sun Feb 03, 2013 7:26 pm

GPW wrote: KC, Great progress you’re making ... :thumbsup: Thanks for the pumpkin info !!! Has anybody tried a sabot on those cannons yet ?

Thanks GPW, sabots are not allowed. Nothing goes in the gun but the pumpkin. They do allow them to do a ceremonial dousing with beer, which many feel is an illegal lubricant, but it is in the spirit of the event, so they allow it.

GPW wrote: Strange your laminated ribs deformed ... :o Any reason why?

This is New England. Very humid in the summer and very dry in the winter. The wood moves with changes in humidity. There was a lot of glue on most surfaces, but they were still raw and not sealed 100/ct, so I am not altogether surprised.

As you will recall I was torn in the beginning on which method to use for this edging; segment joined and template trimmed, or jig laminated slats. I went with the laminations because it was a technique that I had not used before and I was intrigued by the method. I am sort of relieved now. It is almost a given now that I will be switching to the segmented version and thus the lack of even thickness issue will be solved. It is a shame that all of that effort that went into building the jig, cutting the slats, sorting, gluing, clamping, clean-up, etc. will have been wasted, but, hey, there is a learning curve with every technique. I have learned where I could have done better with that technique, and that it is not worth doing it that way again for the result that I achieved, nor for my application.

If I was doing something decorative where I wanted the ply's to show, or where ultimate structural strength was required, then I would start with wider stock, rip the slats from much more stable stock than the fir I used, rip it on Ben's much more accurate saw, plane the part to final thickness, and seal it right away.

Instead I will use the segmented method like I did for the hatch ribs and for the front roof arc ribs. I am considering two options: either using 2x or using two layers of 1x with staggered joints laminated together. Since structural strength is not the main factor, it's more about impact resistance and a hard edge for the hatch seal, I am leaning toward the 2x. Will need more cedar plank to stay true to the build, though maple or poplar is an option.

Stay tuned. I may have some chunker scale model parts to show in a little bit. :thumbsup:
Last edited by KCStudly on Mon Feb 04, 2013 12:01 am, edited 1 time in total.
KC
My Build: The Poet Creek Express Hybrid Foamie

Poet Creek Or Bust
Engineering the TLAR way - "That Looks About Right"
TnTTT ORIGINAL 200A LANTERN CLUB = "The 200A Gang"
Green Lantern Corpsmen
User avatar
KCStudly
Donating Member
 
Posts: 9640
Images: 8169
Joined: Mon Feb 06, 2012 10:18 pm
Location: Southeastern CT, USA
Top

Re: The Poet Creek Express - Foamie Hybrid

Postby KCStudly » Sun Feb 03, 2013 11:21 pm

More off topic chunker stuff; I hope you don’t mind.

Here is one of the four (4) modioli (Latin for washer) that will make up one end of our two (2) Ethos style (Ethos video) rope bundles on the Mad Hatra scale Model (MHM).
Image
It is 3 inches in diameter.

A std. ballista is like a crossbow or slingshot where the projectile is cradled in a pouch between two sling lines that are anchored on either side by two springs. In the case of the slingshot the sling itself is the spring. In the case of the cross bow the bow arms are the spring. In the case of the ballista the arms are rigid and the rope bundles at the pivot point of the arms are the springs.

A Hatra Ballista has the rope bundles at the outer ends of a stanchion frame (the opposite way around from a std. ballista) and the throwing arms swing from the inside out; going from pointing the tips of the arms at each other to the arms pointing straight forward. This is an ancient design that was very short lived (in a historical sense); a slight improvement over the std. ballista due to the “snap” that you get in the sling line at the end of the throw. Team Captain Eric has done a great deal of study, math, and small to medium scale building of hatra ballistas, as he felt that this snap was a key to better performance.

Well, in history the ballista and hatra ballista were quickly over taken by the onager style of catapult with its rope bundle oriented horizontally, a single throwing arm that travels in an overhand vertical plane and has a sling that “cracks the whip” overhand style like David used to slay Goliath, the guy at the end of a water skiing rope, or the skater at the end of the conga line. Much greater acceleration and a much higher elevation at mechanical release for greater throwing distance.

The advantages of the overhand throw and sling are pretty obvious, spawning the well-known French trebuchet (essentially a gravity powered onager with no rope bundle or spring) many hundreds of years later.

The Mad Hatra concept borrows the best concepts from all of our torsion competitors while still utilizing two rope bundles for (hopefully) more power potential than any others (we have long believed that Mr. B has been the most powerful torsion machine due to our two rope bundles, but that we have been limited by our low knuckle ball release). The Mad Hatra is a two stage machine with elevated onager style throwing arm and sling (like best in class Chucky3; push thru the second ad and the second vid gives a nice overview of the torsion class, with a shot of Mr. B about 40 sec’s in ), but with two Ethos style bundles that require much less structural weight to support themselves from crushing. There are some other oddities that will allow us to minimize our set up efforts and that are driven by over the road considerations, but we hope that this will not affect throwing performance much at all.

Here is the throwing arm (TA) that I built for the scale model.
Image
Sorry for the pour contrast with the work bench.

It is 20 inches from pivot point to arm tip. The spine is 3/8 OD x .040 wall steel. The rib is .100 thk x 3/4 deep SS, and the hub plate is .135 thk x 4 x 4 inch SS.

I’ll just let that soak in for now.

Dave (who has followed this thread) and team captain Eric got to see my build progress first hand today, and I think that they were suitably impressed. Dave commented that seeing the parts and build area in person was much more informative, giving a better sense of the scope of the thing in person, than through reading the progress and viewing the pic’s on line. (We also played with the mini ballista a bit, too!)
Last edited by KCStudly on Fri May 03, 2013 10:18 pm, edited 1 time in total.
KC
My Build: The Poet Creek Express Hybrid Foamie

Poet Creek Or Bust
Engineering the TLAR way - "That Looks About Right"
TnTTT ORIGINAL 200A LANTERN CLUB = "The 200A Gang"
Green Lantern Corpsmen
User avatar
KCStudly
Donating Member
 
Posts: 9640
Images: 8169
Joined: Mon Feb 06, 2012 10:18 pm
Location: Southeastern CT, USA
Top

Re: The Poet Creek Express - Foamie Hybrid

Postby KCStudly » Sun Feb 03, 2013 11:33 pm

Here's one for GPW; hurling a frozen turkey!!!
KC
My Build: The Poet Creek Express Hybrid Foamie

Poet Creek Or Bust
Engineering the TLAR way - "That Looks About Right"
TnTTT ORIGINAL 200A LANTERN CLUB = "The 200A Gang"
Green Lantern Corpsmen
User avatar
KCStudly
Donating Member
 
Posts: 9640
Images: 8169
Joined: Mon Feb 06, 2012 10:18 pm
Location: Southeastern CT, USA
Top

Re: The Poet Creek Express - Foamie Hybrid

Postby RandyG » Mon Feb 04, 2013 2:03 am

Frozen turkey? Might as well be a bowling ball.
Randy
Aircraft fabricator, novice carpenter, electrical apprentice, audio engineer dropout.
Build thread - http://www.tnttt.com/viewtopic.php?f=50&t=54126
User avatar
RandyG
500 Club
 
Posts: 695
Images: 115
Joined: Thu May 10, 2012 6:52 pm
Top

Re: The Poet Creek Express - Foamie Hybrid

Postby GPW » Mon Feb 04, 2013 6:11 am

KC , unfortunate the laminated ribs didn’t work out ! They are likely the strongest alternative ... :( More work to do !!!

Thanks for the turkey toss flick .... 8)
There’s no place like Foam !
User avatar
GPW
Gold Donating Member
 
Posts: 14920
Images: 546
Joined: Thu Feb 09, 2006 7:58 pm
Location: New Orleans
Top

Re: The Poet Creek Express - Foamie Hybrid

Postby KCStudly » Wed Feb 06, 2013 9:07 pm

Yeah, I thought you'd get a kick out of that.

Just a short update. Have mostly been planning. Trying various configurations of gas struts as a back-up plan to the actuators. Had been looking at the McMaster-Carr listings with ball ends, but found this evening that there is a bigger selection of them listed w/o the ends already on them (you can buy a variety of end types with different stack heights and off sets, clevis style, etc.), so am just trying to find the optimum fit of all the little bits and pieces while maximizing the stroke length in the available space. Once I get the 2D geometry worked out, I will have to figure out how to adapt the struts to the ribs and galley walls. Depending on how that works out, I may have to go back and rework the geometry again. The main thing is if the cylinder end will go up along the inside of the first rib and side mount to it, or if it will be under slung with a bracket tab (sorry, no pic's or sketches to show yet).

Either way, for the side wall I am picturing an imbedded block, like the others, then the interior ply skin, then a decorative hardwood block as a spacer screwed into the embedded block, then a mounting plate made out of stainless steel sheet stock. The ball stud would attach thru a center hole in the plate, and the plate would be screwed with four (4) decorative SS screws into the hardwood block hiding the screws holding the hardwood block to the wall. Hidden under the plate would be a countersunk hole in the hardwood block for the nut on the back of the ball stud to fit into. A more expensive option would be to spring for the stainless steel version of the ball studs, trim some of the thread length off of them and weld them into the mounting plates.

Why go to all of this trouble, you say? Well, I have read lots of cases where people have had their strut anchors pull out of their wood due to insufficient strength and/or spacing of the screws. By doing it as described above, I can spread the mount out over a bigger foot print and the strut should not be able to lever the mounting bracket out of the hardwood.

I also need to layout a plan for the new galley wall edges, and I need to spend more time planning my electrical wiring schematic and routing.

Big snow storm heading our way for the end of the week.
KC
My Build: The Poet Creek Express Hybrid Foamie

Poet Creek Or Bust
Engineering the TLAR way - "That Looks About Right"
TnTTT ORIGINAL 200A LANTERN CLUB = "The 200A Gang"
Green Lantern Corpsmen
User avatar
KCStudly
Donating Member
 
Posts: 9640
Images: 8169
Joined: Mon Feb 06, 2012 10:18 pm
Location: Southeastern CT, USA
Top

Re: The Poet Creek Express - Foamie Hybrid

Postby Bogo » Thu Feb 07, 2013 2:28 pm

For a captive nut that is embedded, look at "tee nuts". You can distort the barrel slightly out of round to make one into a lock nut.

KCStudly wrote:Why go to all of this trouble, you say? Well, I have read lots of cases where people have had their strut anchors pull out of their wood due to insufficient strength and/or spacing of the screws. By doing it as described above, I can spread the mount out over a bigger foot print and the strut should not be able to lever the mounting bracket out of the hardwood.

You may consider "ball joint rod ends". McMaster-Carr has them under "Power Transmission" --> "Rod Ends". With them you can support the bolt that holds the end in place on both sides of the strut. This will allow you to make a bracket out of hardwood, a bolt, and nut plus what you use to hold it to the wall. If you keep the gas spring only moving in one plane, you only really need plain eyes for the bolt to go through, but you would need a smooth surface for the eye to press and rotate against. Most bolts have threading which isn't smooth. You'd need a sleeve or a bolt with a short amount of threading, and a smooth shank. "Shoulder bolts" or "shoulder screws" are what the industry calls them. Either way, the ball joint rod end provides that smooth surface to rotate on. An issue is possible rotation of the bolt from friction between the bolt and rod end. I'd counter it by gently distorting the t-nut barrel out of round so the bolt threads in hard. If that doesn't work, then low or medium strength thread locking compound could be used. Don't use high strength as you will likely spin the t-nut if you have to remove it for repairs.

The hardwood brackets can be fashioned to whatever shape you want, but I'd have at least 2" of wood along the lines of force. 3" would be better. So if the force is coming in from the NW quadrant, I'd have the SE quadrant extend out at least 2" from the bolt hole. More would be better, and may be needed for strength and stability. If the grain of wood could be made perpendicular to the direction of force it would be best. This way the bolt isn't trying to split the wood like a splitting maul. Note, layers of wood could be used. Some orientated for fully open, and some orientated for fully closed. Cabinet grade plywood likely could be used. Your gas spring will be generating it's greatest force for the greatest length of time when closed. That would be the most critical for orientating the grain of the wood.

Parts I was thinking of as possibilities:
M6 tee nut for shoulder bolt below: http://www.mcmaster.com/#98965A320 $8.76 for 50
Rod end: http://www.mcmaster.com/#6465K63 $2.02 each
Pick an 8mm shoulder bolt to fit rod end of gas spring: http://www.mcmaster.com/#shoulder-bolts/=ldl1pg $1.50 to $3 each, Select 8mm for Shoulder Diameter to quickly narrow down to those that will fit the rod end above.
Pick an m8 threaded end gas spring to suit: http://www.mcmaster.com/#gas-springs/=ldkthb $17 to $102 each.

Grabbed data cos I may want it later for my build ;) .
User avatar
Bogo
500 Club
 
Posts: 658
Images: 39
Joined: Tue Oct 02, 2012 4:32 pm
Location: The land between two rivers.
Top

Re: The Poet Creek Express - Foamie Hybrid

Postby KCStudly » Thu Feb 07, 2013 10:51 pm

Thanks Bogo for the thorough description and links to those components. I am familiar with shoulder bolts and I used the threaded inserts in my floor assembly to be able to screw it to the trailer frame. I had looked at the clevis, eyelet and ball end (heim) rod joints, too. I am sure that info will be helpful to someone.

There are a couple of reasons that I think the ball stud and socket ends will work best. Here are a couple of the design criteria that I am trying to stick to and my reasoning: (1) I want to keep the hatch ribs as clean and clutter free as possible, avoiding visible holes, but I don’t mind the idea of custom made stainless steel or aluminum brackets and/or tabs. My thought is that the thread inserts would need to go in from the opposite side of the rib and would therefore show (or at least need a decorative plug; not so much a problem in the side wall). That would place the strut on the inside of the rib, further away from the wall, increasing the cantilever forces on the wall mount. The heim joints are longer than the ball sockets and would make the overall strut length a little longer. In order to maintain the recommended geometry while using the strut with the longest stroke available that will fit (and therefore keeping the mounting point on the hatch side as far away from the hinge...and therefore keeping the leverage down) I found that I needed that little bit of room to keep the lower anchor point out from under the hatch rib when it is closed (a side effect of my bustle like profile where the top of the hatch is relatively short and flat while the back turns back in sharply and down, plus the deep ribs). (2) I want to keep the outermost hatch ribs as close to the side walls as possible (about 3/16 clearance), so that the edge of the hatch panel inner skin that compresses the hatch seal stays as rigid as possible where it hangs over the side from the rib. My ribs are a nice deep 3 inches, so I think I will be able to get away with just one 3/4 thk rib per side (i.e. not doubling up the outer ribs). That means that there is very little room between the rib and wall for a double shear style tab (such as would be used with a rod end located under the rib), or even the head of a bolt or nut on a through bolt. I may have to think that through a little better because even if the mounting tab is only on the inside, the fasteners should really go thru, so maybe a recessed plate with flat head screws on the outer face of the rib, and self-locking or acorn nuts on the inside to hold the bracket.

As it turns out, if I use the socket and ball studs at both ends, I can mount the lower rod end to a simple 1/8 thick wall plate screwed directly to the inner wall skin and recessed block (w/o the hardwood spacer I mentioned above), and turn the upper cylinder end stud facing inward. This puts the strut closer to the wall for less cantilever, and aligns the mounting face of the upper ball stud very close to the inner face of the rib (with the strut lined up underneath and very near the centerline of the rib).

Here is a screen shot looking through the galley with the strut modeled and the curb side wall turned off. The superimposed sketch depicts the geometry.
Image

The red lines represent radii from the hinge centerline to the hatch CG in both the open and closed positions. The magenta arc represents the path of the upper anchor point. The blue lines are the centerlines of the strut in the up and down positions (superimposed on the upper). The yellow line connects the hinge centerline to the lower strut anchor point, showing that the closed strut axis is just over center so that the hatch will not attempt to open itself unintentionally (assuming that the gasket doesn’t push it open).

It has been said that making the strut go over center can pry at the hinge, but I think that may be because no allowance was made for the strut going past fully compressed and then giving back a little. If I was to attempt to do this and just used the collapsed dimension at the final closed point, it would not be able to compress slightly while starting to open (as it goes through the dwell point) and would surely bind the hinge. Said another way, the strut is shortest on the yellow line, just before closing, and extends a little as it sweeps past that on closing.

The linear actuators are also shown. They are my primary plan and I left them visible in this view for comparison. However, I need to figure out where to put the blocking for the gas struts as a backup plan in case the actuators don't work out as planned. I have been thinking that I might just leave the skins off of the galley side walls and bulkhead until the hatch is built and I have proven one or the other of these options. Or just put in bigger blocks for the gas struts to anchor to, giving a little leeway in case I am off somewhere. Better yet, incorporate this feature into the new wall edging pieces so that it is tied in really solid to the wall.

Well, I see that I am rambling and mixing up thoughts again. I hope this all makes sense.
Last edited by KCStudly on Fri Apr 05, 2013 3:36 pm, edited 1 time in total.
KC
My Build: The Poet Creek Express Hybrid Foamie

Poet Creek Or Bust
Engineering the TLAR way - "That Looks About Right"
TnTTT ORIGINAL 200A LANTERN CLUB = "The 200A Gang"
Green Lantern Corpsmen
User avatar
KCStudly
Donating Member
 
Posts: 9640
Images: 8169
Joined: Mon Feb 06, 2012 10:18 pm
Location: Southeastern CT, USA
Top

Re: The Poet Creek Express - Foamie Hybrid

Postby ghcoe » Fri Feb 08, 2013 12:46 pm

I think the gas strut looks like a better solution. Less leverage on all the lifting components.
George.

Gorrilla Glue, Great Stuff and Gripper. The three G's of foamie construction.

My build viewtopic.php?t=54099
Working with flashing for foamie construction viewtopic.php?f=55&t=60303
Making a hot wire http://tnttt.com/viewtopic.php?f=55&t=55323
User avatar
ghcoe
1000 Club
1000 Club
 
Posts: 1982
Joined: Fri Dec 11, 2009 11:20 pm
Location: SW Idaho
Top

Re: The Poet Creek Express - Foamie Hybrid

Postby GPW » Sat Feb 09, 2013 9:06 am

KC , looks like you’re getting a little SNOW !!! :frightened:
There’s no place like Foam !
User avatar
GPW
Gold Donating Member
 
Posts: 14920
Images: 546
Joined: Thu Feb 09, 2006 7:58 pm
Location: New Orleans
Top

Re: The Poet Creek Express - Foamie Hybrid

Postby KCStudly » Sun Feb 10, 2013 1:01 pm

GPW, Yup, and how.

ghcoe wrote:I think the gas strut looks like a better solution. Less leverage on all the lifting components.


Yup, you’re right, George. The fact that the rod end is further out closer to the CG means that the leverage is reduced, but only as the hatch approaches fully open. Although the CG moves toward the strut as the hatch closes, the angle of the force vector gets closer and closer to the hinge, actually passing it at the last moment. Since the gas pressure on the strut is constant, the leverage at this point may actually be higher than the actuator. The actuator acts on a shorter arm, but stays much closer to perpendicular to this arm throughout its travel.

Suffice to say that I plan on using a suitably robust hinge with a staggered screw hole pattern to really bed the hinge leafs solid to the double spars.

Okay, Bogo has me thinking of some options and I managed to spend a little bit of time on the model before bugging out from work due to the approaching blizzard (my department shut down at noon to allow us to get home before the worst started).

Here is a section cut through the center of both ball studs looking forward and down thru the plane of the strut in the open position. This is the same combination of parts (sockets and ball end studs) that I showed in the side geometry above, except the lower ball stud bolt face has been moved to 1/8 inch away from the side wall skin, allowing for a wall plate which is not shown (no hardwood block required between skin and anchor plate).
Image

You can see how well the strut lines up under the hatch rib. So I decided to look at some other combinations of end types and brackets. The combination of these two parts is looking good for the top with the bracket screwed into the underside of the rib.
Eyelet Bracket
Eyelet End Fitting

I think I will use hardwood for the imbedded blocks at these wall locations for the anchor plates to screw to, and I will weld a heavy SS 5/16UNC nut on the back of the plate for the ball studs to screw into.

This just in: Above was written Friday evening before the power went out at about 8:30pm. We had about 18-20 inches of snow on top of a heavy slushy layer and it has been below freezing throughout. The power (and furnace) just came back on about an hour ago, and it is now noonish. House got down to about 41 deg F last night. Lots of blankets on the bed and three cats huddled up.

Catching up from where I left off on Friday: After getting out of work I went to the bank, had the oil changed in the Ford (I’ll do it when the weather is good, but…), and stopped at Benny’s (a five and dime) to get another gallon of white gas. They didn’t have it, but they had a combination propane lantern and hard plastic case for $30 (should have grabbed it). Stopped at another small hardware store and got the white gas. Had a pastrami Rueben for lunch, then off to Mecca to collect up the lanterns and kerosene heater, just in case.

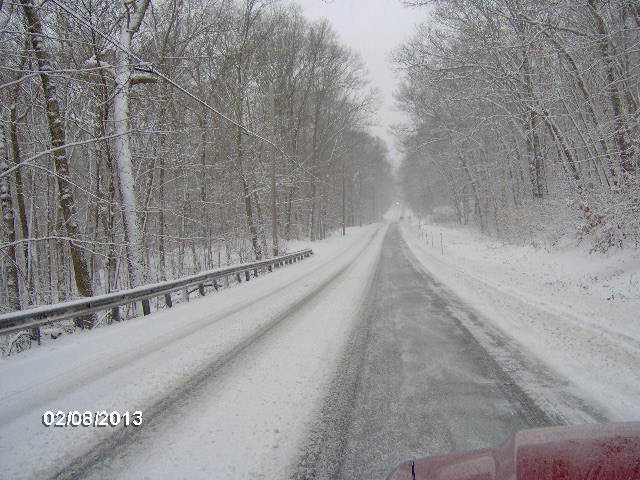
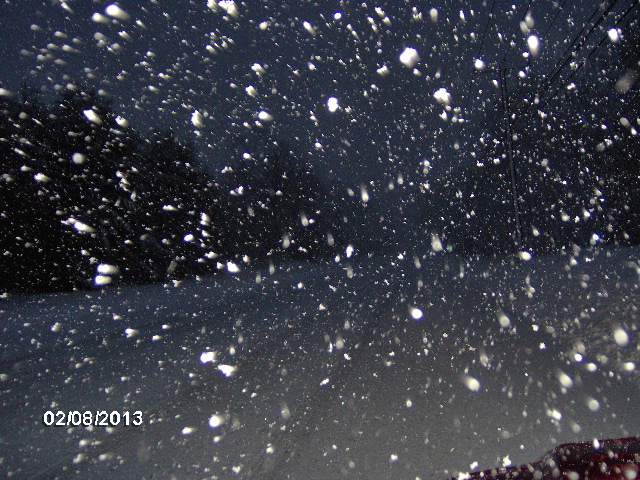
Road to Mecca before it got bad.
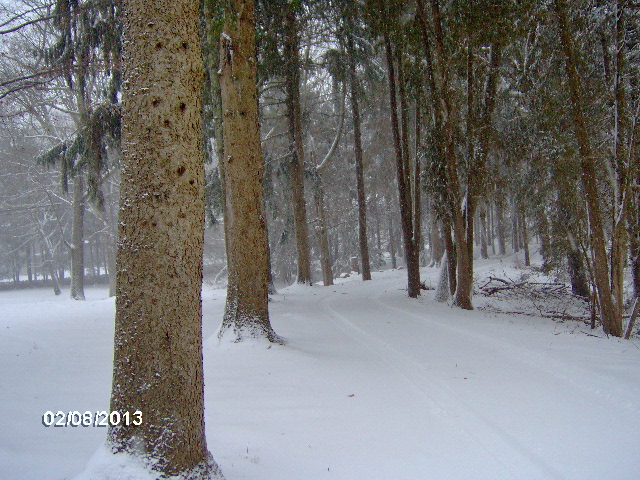
Image

Karl’s driveway.
Image

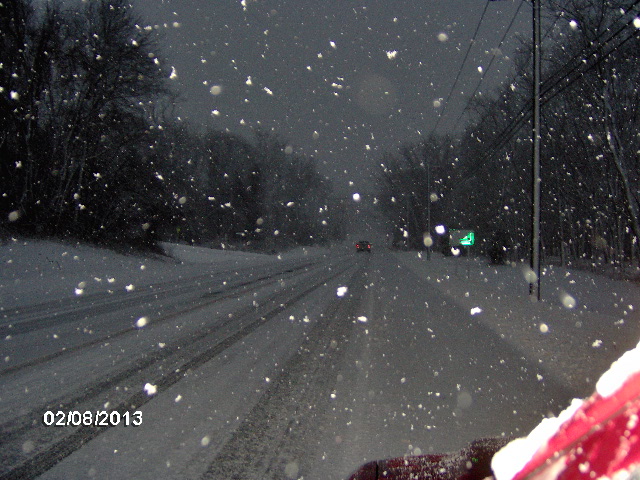
Starting to come down on the ride home.
Image

Had to back track a little to find an open packy; this is the same location 15 min’s later.
Image

Power went out, no cable, no internet, no land line phone.
Image

Put the turd to work. Good call making the trip to Mecca.
Image

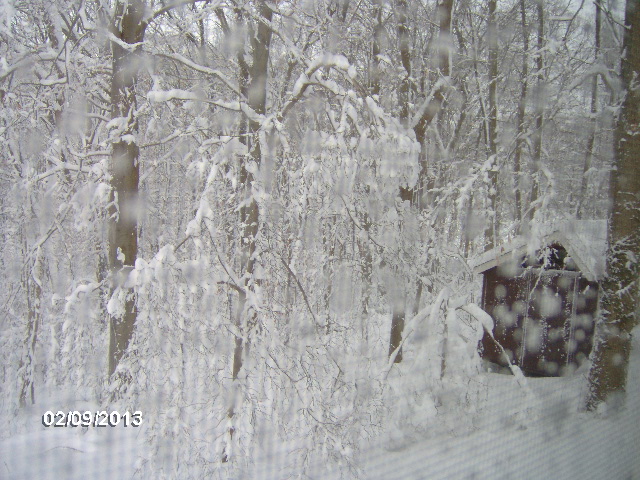
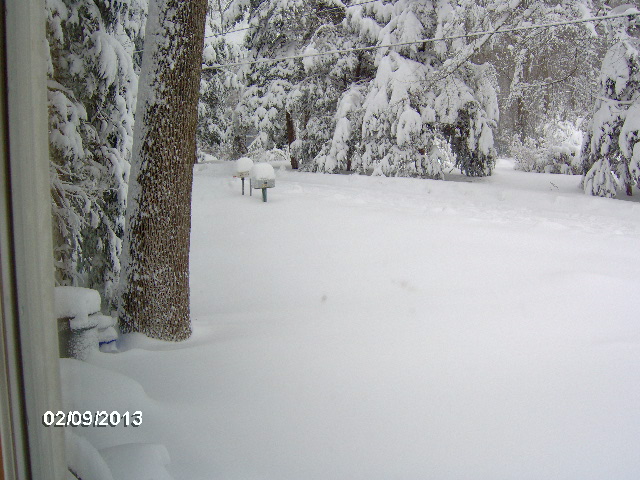
Out the back of the screen porch the morning after.
Image

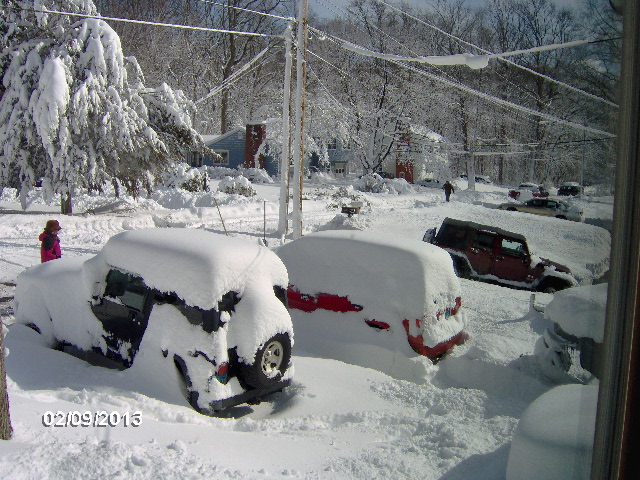
This one tells the story. When I parked the Ford it was several feet up further in the driveway. It had slid down in the night to less than a foot from the tongue on the boat trailer. If it had knocked the boat off of the jack stands (unlikely) the next thing to stop it would be the outboard poking through the garage door.
Image

Heavy snow load on the cedars, and the berm from the snow plow was about 3 ft out into the road and 2 ft high. Road still had 6 inches of snow in it, and the plow didn’t come around again until late Saturday afternoon.
Image

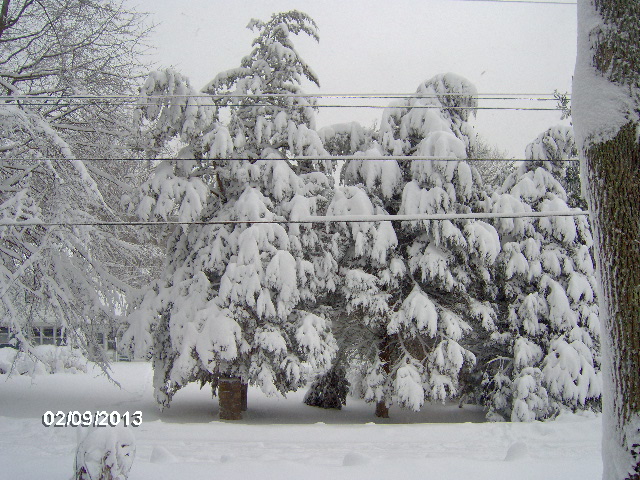
I know this seems like a trifle to many of you, but this is about as big as it gets around here.
Image

The front walk after running the snow blower for a couple of hours.
Image

After running the blower out of the garage and up in front of the vehicles, pushing the berm across the street and doing the walks (believe me, running the blower is not effortless… horsing it around and working it into the big berms, pushing down for traction, pulling up to get it to dig down, jigging it back and forth for forward progress) I went in for some hot oatmeal and a hot cup of tea while Yvette chipped up the packed layer and started to uncover the vehicles so that we could pull them out and get the rest.
Image

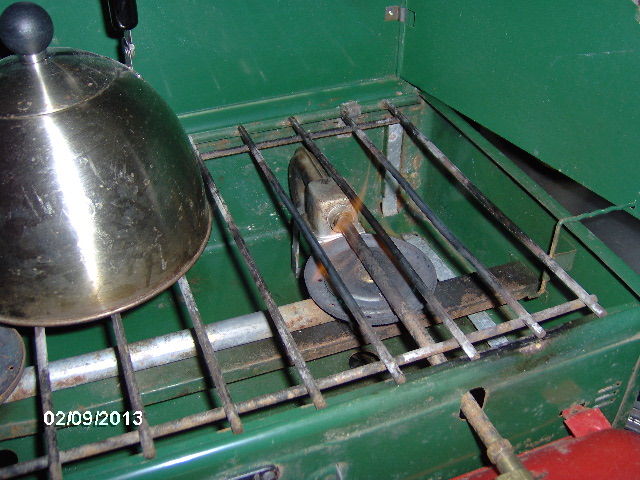
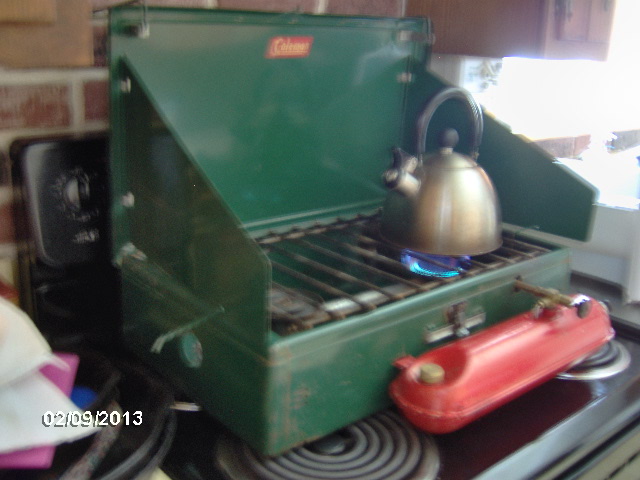
Did absolutely nothing to the 413E that I got from MaureenM, except put fuel in and pump. Great working stove.
Image
Image
Image

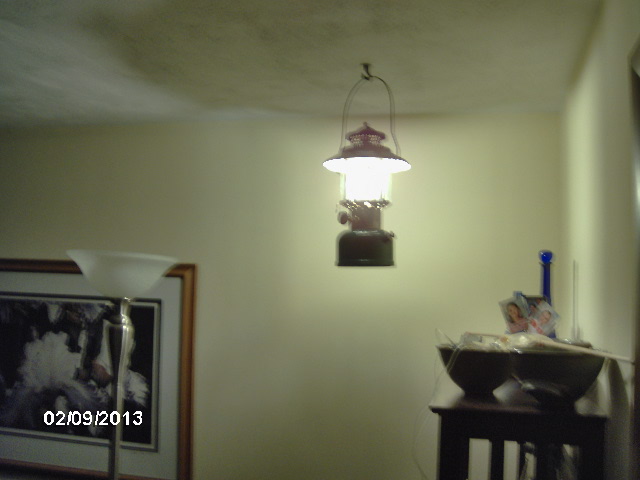
The 228E Big Hat takes a turn at lighting duties Saturday night.
Image

It is now Sunday mid day and the furnace is playing catch-up. I had to switch off the circuit for the hardwired radon blower because when it came back on it was droning something fierce. The exhaust chimney that exits up the side of the house near the rain gutter must be choked with snow.

All for now; I am staying under this blanket until the heat comes up.
KC
My Build: The Poet Creek Express Hybrid Foamie

Poet Creek Or Bust
Engineering the TLAR way - "That Looks About Right"
TnTTT ORIGINAL 200A LANTERN CLUB = "The 200A Gang"
Green Lantern Corpsmen
User avatar
KCStudly
Donating Member
 
Posts: 9640
Images: 8169
Joined: Mon Feb 06, 2012 10:18 pm
Location: Southeastern CT, USA
Top

Re: The Poet Creek Express - Foamie Hybrid

Postby Junkboy999 » Mon Feb 11, 2013 9:34 pm

In our house my dad always had the camp stove, lantern and Aladdin Kerosene Heater ready to go. We use
it during the blizzards around 1976 and 79 in Ohio. Best things to have.

Hope you weather through it ok.
User avatar
Junkboy999
1000 Club
1000 Club
 
Posts: 1259
Images: 52
Joined: Fri Jul 06, 2012 9:18 pm
Location: Wichita, KS
Top

Re: The Poet Creek Express - Foamie Hybrid

Postby S. Heisley » Mon Feb 11, 2013 9:35 pm

That just goes to show that campers know how to survive well, even in a blizzard!
Thanks for all the pictures. Glad you survived so well. :thumbsup: :applause:
User avatar
S. Heisley
Super Lifetime Member
 
Posts: 8867
Images: 495
Joined: Mon Sep 17, 2007 10:02 am
Location: No. California
Top

PreviousNext

Return to Foamies

Who is online

Users browsing this forum: No registered users and 7 guests