Wild Idahos Compact Build

...ask your questions in the appropriate forums BUT document your build here...preferably in a single thread...dates for updates, are appreciated....

Re: Wild Idahos Compact Build

Postby Wolffarmer » Wed Jan 16, 2013 5:05 pm

That is the campground. When I was there I put my camp chair on the bank of the river and finished a book I had been reading.
Tough trip

I highly recommend it. If you can find the edition with the photos even better. It was just fitting to finish it on the banks of the Salmon.

Randy
"these guys must be afraid of the dark"
User avatar
Wolffarmer
Donating Member
 
Posts: 4612
Images: 309
Joined: Wed May 02, 2007 1:32 pm
Location: Idaho Rupert

Re: Wild Idahos Compact Build

Postby Wild Idaho » Tue Jan 22, 2013 8:06 pm

Well I've made a little more progress on the frame adding 2x2x1/8th angle iron to the sides of the frame as well as a cross member in the middle of the frame to prevent any sag in the floor when I put it down. This process would have been easier if I didn't have to rewire a 220 20amp breaker to be a 110 20amp breaker so I could weld (only have a 100 amp stick welder) but once that was done things seemed to move right along. I've come to the conclusion that the person who invented the stick welder was great but the peson who invented the grinder is even better. Nothing like a grinder to help clean up some welds. Now I need to paint the frame and then move on to the floor.

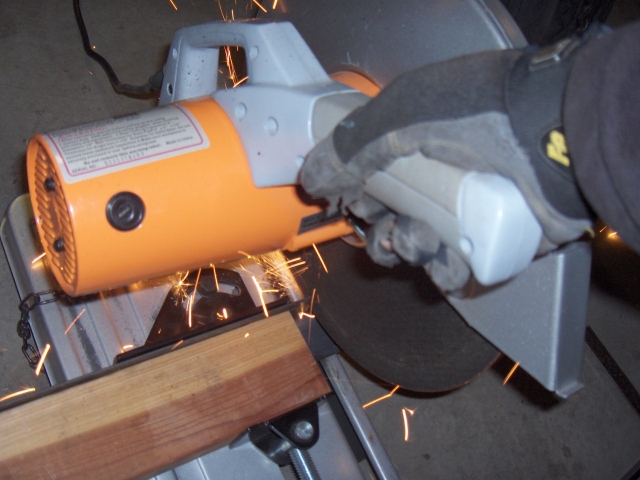
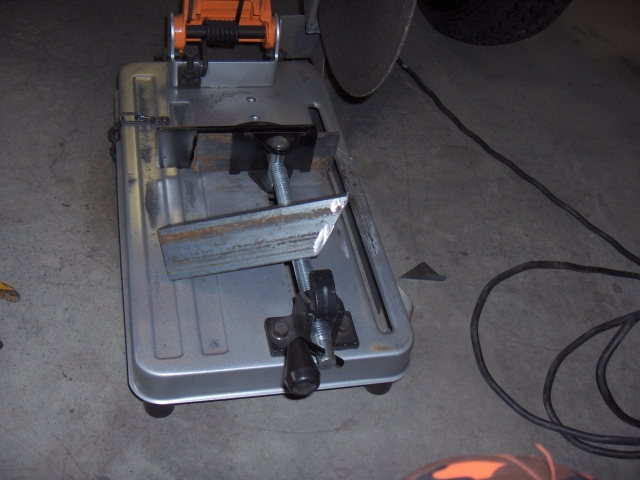
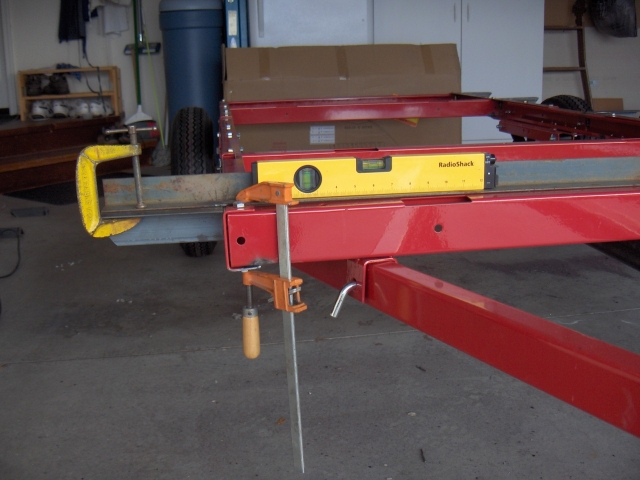
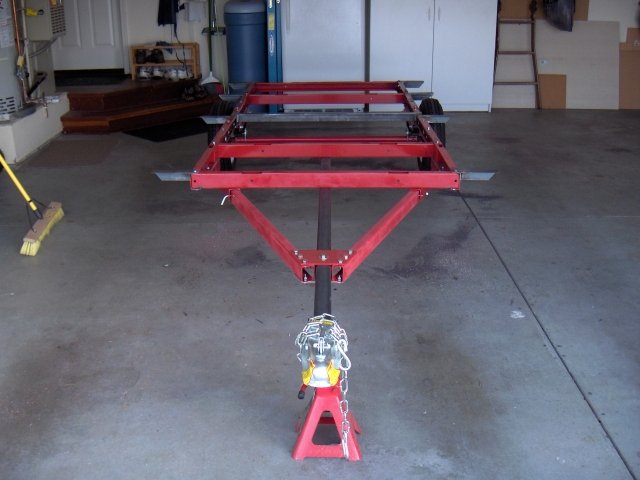
Here are some pictures of the progress.
Image
Image
Image
Image
User avatar
Wild Idaho
Teardrop Builder
 
Posts: 39
Images: 97
Joined: Sat Jan 05, 2013 7:25 am

Re: Wild Idahos Compact Build

Postby c139 » Sun Feb 03, 2013 3:04 pm

What did you use to extend the frame? I've got the same trailer, and want to build out to 10'.
c139
Teardrop Inspector
 
Posts: 3
Joined: Mon Mar 26, 2012 11:22 am
Location: Toledo, Ohio
Top

Re: Wild Idahos Compact Build

Postby myoung » Mon Feb 04, 2013 10:23 am

Enjoy the build. For similar reasons, I too chose the Compact design, but made quite a few modifications to design and layout and size. As a point of reference, my 6x11x5.5 trailer weighs 1,450 with a full propane tank, half water tank, and full port-potti.

Putting the larger floor plate on a smaller dimensioned frame isn't a big deal. A few pieces of angle iron extending to the outer edges is all you need. The plywood floor and the structure itself make for a sufficiently rigid structure.
Mike Young
build thread: viewtopic.php?t=40459
User avatar
myoung
500 Club
 
Posts: 644
Images: 250
Joined: Sat Aug 07, 2010 11:21 am
Location: Nipomo, CA
Top

Re: Wild Idahos Compact Build

Postby Wild Idaho » Mon Feb 04, 2013 11:07 pm

c139 wrote:What did you use to extend the frame? I've got the same trailer, and want to build out to 10'.

Hi C139, I used the center cross members that came with the frame. The cross members fit right inside the frame on both the drivers side and passanger side of the trailer. Since I used those crossmembers to extend the frame, that left a big empty space in the middle of the trailer. What I did was get a 4' piece of 2x2x1/8th inch angle and welded it into the center of the frame. Not sure if I needed to but it gives me piece of mind which is worth a lot. Take a look at my first few pictures. I tried to photograph the extension. Hope that helps.
User avatar
Wild Idaho
Teardrop Builder
 
Posts: 39
Images: 97
Joined: Sat Jan 05, 2013 7:25 am
Top

Re: Wild Idahos Compact Build

Postby Wild Idaho » Mon Feb 04, 2013 11:22 pm

myoung wrote:Enjoy the build. For similar reasons, I too chose the Compact design, but made quite a few modifications to design and layout and size. As a point of reference, my 6x11x5.5 trailer weighs 1,450 with a full propane tank, half water tank, and full port-potti.

Putting the larger floor plate on a smaller dimensioned frame isn't a big deal. A few pieces of angle iron extending to the outer edges is all you need. The plywood floor and the structure itself make for a sufficiently rigid structure.

Hi Myoung, thanks for the input and especially the weight. I think I've read through your thread 3 times now and will probably take many more looks at it. Everyone has great ideas that we can all pull from. I'm only planning on 5.5x10 trailer. I won't have a fridge, AC or hot water tank so that will hopefully bring the weight down from what yours weighs.
User avatar
Wild Idaho
Teardrop Builder
 
Posts: 39
Images: 97
Joined: Sat Jan 05, 2013 7:25 am
Top

Re: Wild Idahos Compact Build

Postby Wild Idaho » Mon Feb 11, 2013 12:29 am

Well after a few weeks of work, I’m ready to post some progress on my build get your feedback.

After a lot of work on the trailer frame, I was able to make my first cut on some actual wood. This really made it feel like the build was beginning. Actually, it just another step in the build process, the build began when I bought the frame, but this just seems to be small mile stone.
102070

Here’s a picture of the floor ready for the black goo.
102074

Here’s an after picture once I put on 2 coats of Henry’s Asphalt Emulsion.
102068

While all the cutting, gluing and emulsion painting was going on, I worked on the wiring for the trailer lights. Here’s a picture of the routing. I had a lot of ½ inch pvc left over from a pool installation that I used to run the wiring. I spent an addition $5 bucks on a 90 degree and a junction box. This seemed to be the least expensive way to go as well as the most durable way to go for me.
102075

Here’s a picture of the driver’s side tail light wiring. I used some clear silicone to keep things for moving around and keep the bugs out.
102072102069

Here’s a picture of the passenger side tail light with a hole in the end cap where the wires come out.
102073

I added this junction box just in case I ever needed to run extra wiring or who knows what may come in the future. My concern is that I have a lot of wire bundled up in there and I wonder what type of heat might build up while driving with the lights on. Any feedback would be greatly appreciated
102077

One question I have is regarding sealing the wood. So I have the bottom sealed but now I’m moving to the sides. I’ll be building the frames but once I build the frames, do I glue the luan to the frame and then apply a sealant? I think so but just not sure what to use. I’ve read a lot about people using CPES,… varnish, etc. but I’m just not sure. Any advice would be great.
User avatar
Wild Idaho
Teardrop Builder
 
Posts: 39
Images: 97
Joined: Sat Jan 05, 2013 7:25 am
Top

Re: Wild Idahos Compact Build

Postby Wolffarmer » Mon Feb 11, 2013 12:48 am

On my next build I plan to use Ace Hardware Spare Varnish mixed about 50/50 with mineral spirits for about 2 coats, then after that as soaked into the wood a coat or 2 with just a bit of mineral spirits. This is for the underside and hidden places. I do not plan on using the black goo again. I have my reasons.

:) :) :)

Randy


Oh, I like your wire runs.
"these guys must be afraid of the dark"
User avatar
Wolffarmer
Donating Member
 
Posts: 4612
Images: 309
Joined: Wed May 02, 2007 1:32 pm
Location: Idaho Rupert
Top

Re: Wild Idahos Compact Build

Postby Wild Idaho » Mon Feb 25, 2013 7:44 pm

Well time for another update. Over the weekend I was able to get the floor bolted down but not without a visit from Murphy. I wish he never would have written his law :x

Things were going pretty well with all my holes lining up to insert the bolts and attach them but that's when he struck.
102559
My guess is that the metal that was used in the nut was rather soft. When it met a little resistance I think the threads stripped which really buggered up the bolt. I had to drill 4 holes in the bolt and screw it to the floor just so I could work the nut back off. What a pain. After it happened twice, I figured out what was going on and made a run down to Ace to get some new nuts. BTW, drilling a hole in the bolt and screwing it to the floor allowed me to go under the trailer and tighten the nuts without it spinning on me as it tightened. That seemed to work pretty good.
102560
I was also able to build my fenders. Now I just need to coat them with some black goo and install them.
102561
I've also ordered my windows and lights. I visited an RV salvage yard this past week but didnt' really find anything that I tought would work. A lot of the windows didn't have trim rings and/or the weather striping was pulling away from the window. That combined with removing all the caulk just seemed like I was buying myself a lot of work.

This weekend I hope to begin my wall construction.
User avatar
Wild Idaho
Teardrop Builder
 
Posts: 39
Images: 97
Joined: Sat Jan 05, 2013 7:25 am
Top

Re: Wild Idahos Compact Build

Postby Wolffarmer » Mon Feb 25, 2013 8:02 pm

Good progress there. What is the name and where is that RV salvage? I may need to pay a visit

Randy
"these guys must be afraid of the dark"
User avatar
Wolffarmer
Donating Member
 
Posts: 4612
Images: 309
Joined: Wed May 02, 2007 1:32 pm
Location: Idaho Rupert
Top

Re: Wild Idahos Compact Build

Postby Wild Idaho » Mon Feb 25, 2013 8:30 pm

Here's the link to the salvage yard. http://www.allseasonsfuninc.com/
The website looks nice but the storefront is really small town. Still, it was kinda cool to wander around and see what they have.
User avatar
Wild Idaho
Teardrop Builder
 
Posts: 39
Images: 97
Joined: Sat Jan 05, 2013 7:25 am
Top

Re: Wild Idahos Compact Build

Postby Wolffarmer » Mon Feb 25, 2013 9:05 pm

Thanks. I like a wreaking yard I can wander round in.

Randy
"these guys must be afraid of the dark"
User avatar
Wolffarmer
Donating Member
 
Posts: 4612
Images: 309
Joined: Wed May 02, 2007 1:32 pm
Location: Idaho Rupert
Top

Re: Wild Idahos Compact Build

Postby Wild Idaho » Wed Mar 27, 2013 9:46 pm

Time for another update. It sure seems like I've done a lot since my last post but the pictures don't seem to show it. I've finished the framing on all the walls.103751 and skinned all the inside walls 103752. I've even put on 2 coats of poly urethane 103753 It all looks pretty good. I actually used just the inexpensive underlament from HD as opposed to the Oak or Birch. Why? I really like the knots in the wood. Kind of looks like knotty pine. I've read a lot of horror stories on using the HD 1/4 ply and I've experienced some warping of the wood but nothing I can't live with. One thing I will say is that the surfaces are VERY thin. You can't sand very much with 220 grit sand paper before going through the surface. So far, I'm really pleased with the progress though. Saturday, the walls go up! :) Wish me luck.
User avatar
Wild Idaho
Teardrop Builder
 
Posts: 39
Images: 97
Joined: Sat Jan 05, 2013 7:25 am
Top

Re: Wild Idahos Compact Build

Postby S. Heisley » Wed Mar 27, 2013 10:11 pm

You're making good progress. Here's my share of the luck sent to ya fer da walls. :D
User avatar
S. Heisley
Super Lifetime Member
 
Posts: 8865
Images: 495
Joined: Mon Sep 17, 2007 10:02 am
Location: No. California
Top

Re: Wild Idahos Compact Build

Postby Wild Idaho » Sat Mar 30, 2013 10:20 pm

Great day of progress today! Not only was I able to work with my dad but we were able to get all 4 walls up. Each wall went up pretty easy but there definitely was a moment of nervousness. Did I cut right? Did I measure right? Would all my work be wrong? Where would Murphy's Law strike. Well truth be known, I did make one measurement wrong but in a good way. I made the back wall a little to tall but nothing a skill saw couldn't take care of.
103900
Here's a picture of me with the side walls and back wall up.
103899
Here's a picture looking from the back door towards the front with 2/3rd of the front on.
103897
This is a picture of the front walls installed. Cutting the angles correctly was a little nerve racking but we got it right.
103896
Here's a picture of my dad doing a little glue clean up.
103895
and finally a picture of me infront of the trailer with all the walls up. What a great feeling.
103898
User avatar
Wild Idaho
Teardrop Builder
 
Posts: 39
Images: 97
Joined: Sat Jan 05, 2013 7:25 am
Top

PreviousNext

Return to Build Journals

Who is online

Users browsing this forum: No registered users and 18 guests