Regal Eagle Done! Video Tour 6/29/15

...ask your questions in the appropriate forums BUT document your build here...preferably in a single thread...dates for updates, are appreciated....

Re: Regal Eagle TJ Gathering Tomoka SP 2/9/15

Postby Vedette » Mon Feb 16, 2015 9:20 am

Job Well Done! :applause:
Good Roads
Brian & Sandi
Good Roads
Brian & Sandi
Here is a link to my Build Journal
viewtopic.php?f=50&t=50912
Image109106109111109110138766
User avatar
Vedette
Silver Donating Member
 
Posts: 5141
Images: 443
Joined: Thu Dec 01, 2011 4:28 am
Location: Westbank B.C.

Re: Regal Eagle TJ Gathering Tomoka SP 2/9/15

Postby Java Jack » Mon Feb 16, 2015 8:37 pm

Wow, looks great. Lots of hardwork really paid off.

Great job on the build. It would be fun to see this sitting next to mine...it's like a big brother to the 560.
There are 10 types of people in this world, those that understand binary and those that don't.
Regards,
Java
Proud Owner of a CampInn 560 Ultra
Blog: http://cre8tiveapps.blogspot.com/
Video: https://youtu.be/TLLFt3vzFoA
Sill Images: http://imgur.com/a/EE0zC#0
User avatar
Java Jack
Teardrop Master
 
Posts: 186
Joined: Wed Aug 06, 2014 3:39 pm

Re: Regal Eagle TJ Gathering Tomoka SP 2/9/15

Postby Gunguy05 » Thu Feb 19, 2015 11:01 pm

Vedette wrote:Job Well Done! :applause:
Good Roads
Brian & Sandi


Thank you. I was glad to get it out on the road and camp!

Java Jack wrote:Wow, looks great. Lots of hardwork really paid off.

Great job on the build. It would be fun to see this sitting next to mine...it's like a big brother to the 560.


Thank you! Funny you say that. As we were packing up to leave the camp site on Sunday, a guy and his wife rolled by. He said "hey, how do you like the raindrop"? Lol.. I said "it's not a raindrop, but I'm glad that you recognized the resemblance".

Turns out, he has a regular size camp inn. He lived just up the road from the gathering, and wasn't able to make it, but came down Sunday to checkout who was still there. I was bummed, I thought I was about to get to see a real live camp inn in person!

Still have quite few things to get done to have it completely functional. Going to try and work on things a bit this weekend. The list is getting shorter.. but..

1. Get the fiberglass AC roof vent finished (this is dad's project)
2. Wire up the 12V and 110 (non navigational) stuff. We just need the battery, going to sams tomorrow to pick it up.
3. Build the lower cabinets (need these to put the electrical in)
4. Build the bunk - fairly simple.. famous last words...
5. Cut the front bunk foam pieces ( I bought some 3" high density foam on sale this week)
6. Couple of piece of trim on the roll pan
7. Cover the inside curve with foam and oak panels. We are abandoning the idea of the curved window. Although I would like to conquer this, I think it looks fine without it. I shudder at the idea of cutting holes and not being able to get the widows to fit. The flat one in the middle was a $^&%!!!.
8. I'm sure I missed a few.. but this is a start to a punch list.
Brian


Checkout my buildThe Regal Eagle Bow front for 4
Image
Also my teardrop updates from blog on Dad Rambles
User avatar
Gunguy05
The 300 Club
 
Posts: 385
Images: 6
Joined: Mon Dec 02, 2013 4:45 pm
Location: South GA
Top

Re: Regal Eagle TJ Gathering Tomoka SP 2/9/15

Postby Tommy2tone_1999 » Fri Feb 27, 2015 9:39 am

Great looking camper. Glad you finally got to camp in her! I have just a little more work to do with mine before she's done. Love the bow shape in the front
Make time for fitness and it'll make time for you.
http://TommyDoran.com
http://tommydoran.com/favor
Interview: http://goo.gl/Non1oR
Build Journal - http://www.tnttt.com/viewtopic.php?f=50&t=58395
Come find me on Facebook - http://www.facebook.com/tommy.doran
Image
Image
Tommy2tone_1999
Teardrop Master
 
Posts: 236
Images: 148
Joined: Tue Oct 21, 2008 10:54 am
Location: St. George, Louisiana
Top

Re: Regal Eagle TJ Gathering Tomoka SP 2/9/15

Postby Gunguy05 » Tue Mar 03, 2015 2:05 pm

Tommy2tone_1999 wrote:Great looking camper. Glad you finally got to camp in her! I have just a little more work to do with mine before she's done. Love the bow shape in the front


Thanks for the kind words Tommy. Your's is alllmost there too :worship: :worship: :thumbsup: 8)

Just a few odds and ends that I have started working on in the galley.

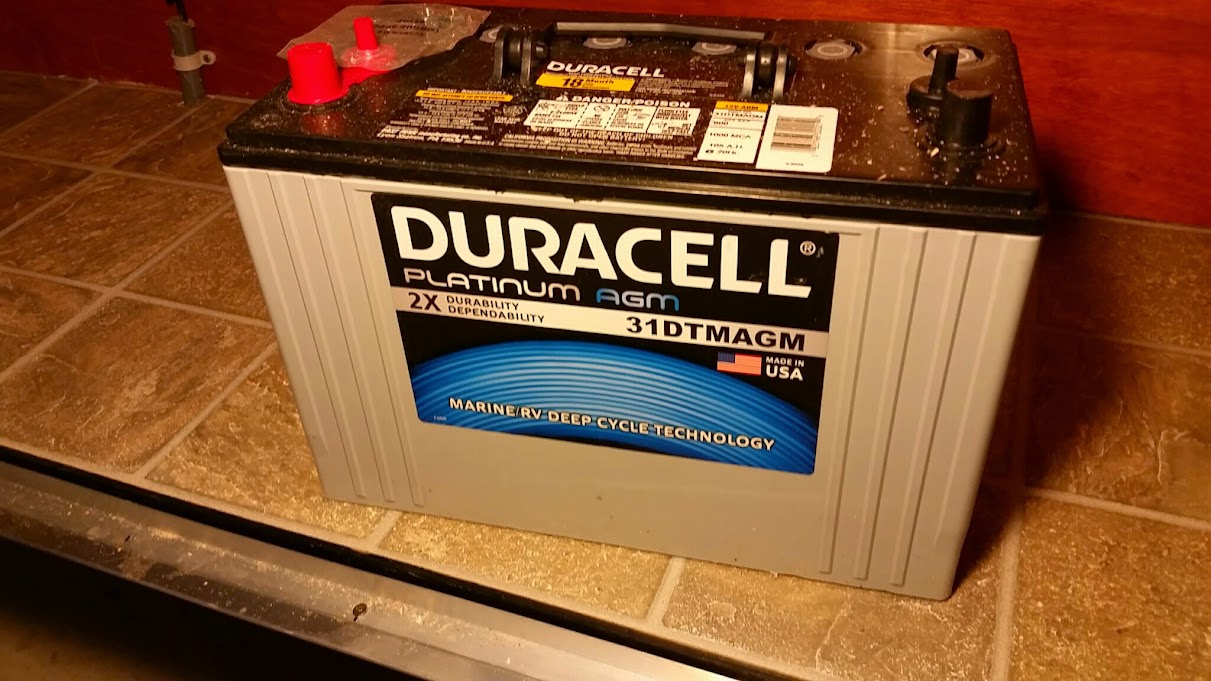
We went back and forth on venting, not venting, capacity, and overally durability, on a battery choice.. We ended up going "all out" and getting the AGM. I researched this one and it seems to have great reviews in the BIG RV forums and other places. Picked it up at Sams for right at $200 with core charge.

Image

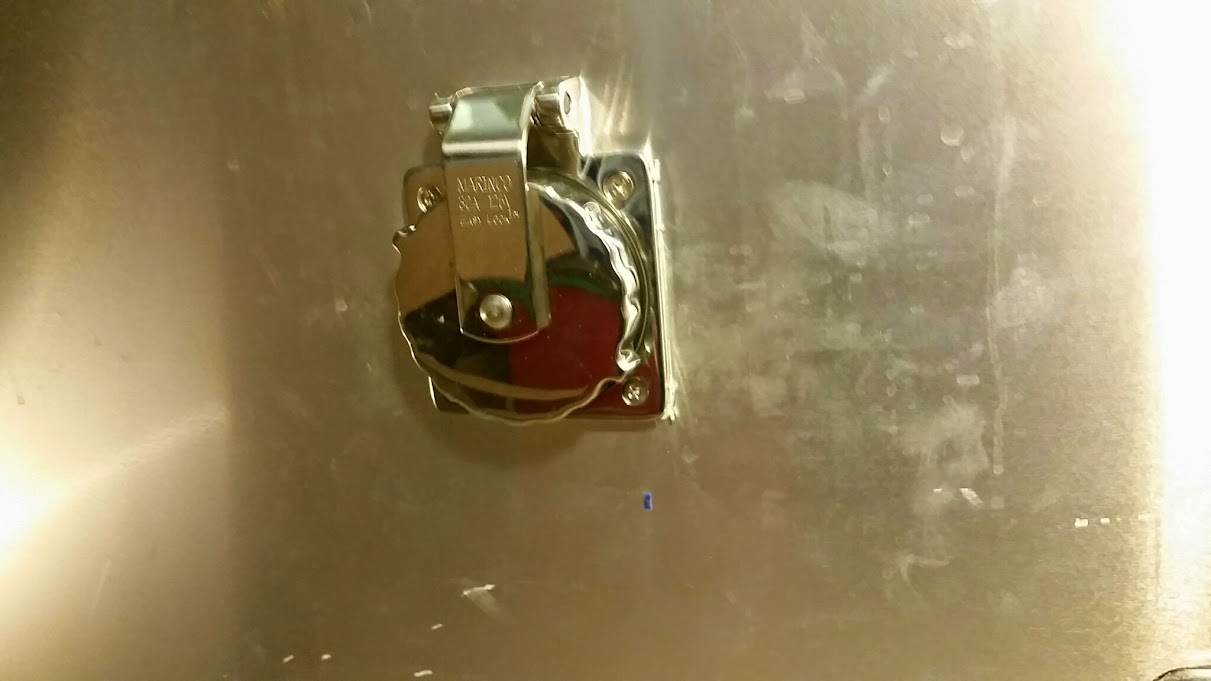
Also, we got the shore inlet installed. I found a furrion on ebay for around... I think it was 54.00 including shipping, but this showed up instead. I guess they were out of the other and had to substitue.. not biggie. Just a well if not better than the furrion stainless. Sorry for the fuzzy photo :(

Image

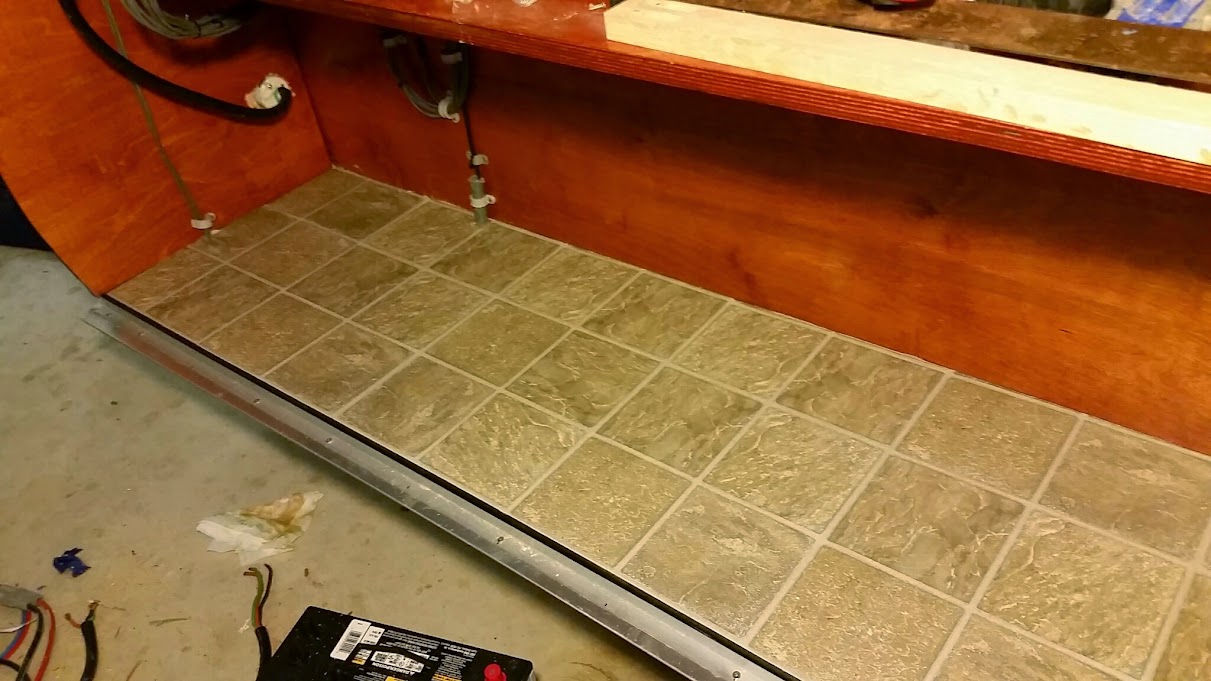
Also, decided to put down come stick on tiles to the floor of the galley. Truth is you won't see much of them, but I think they will give it a nice finished look when it's done and add a little contrast to all of the wood.

Image

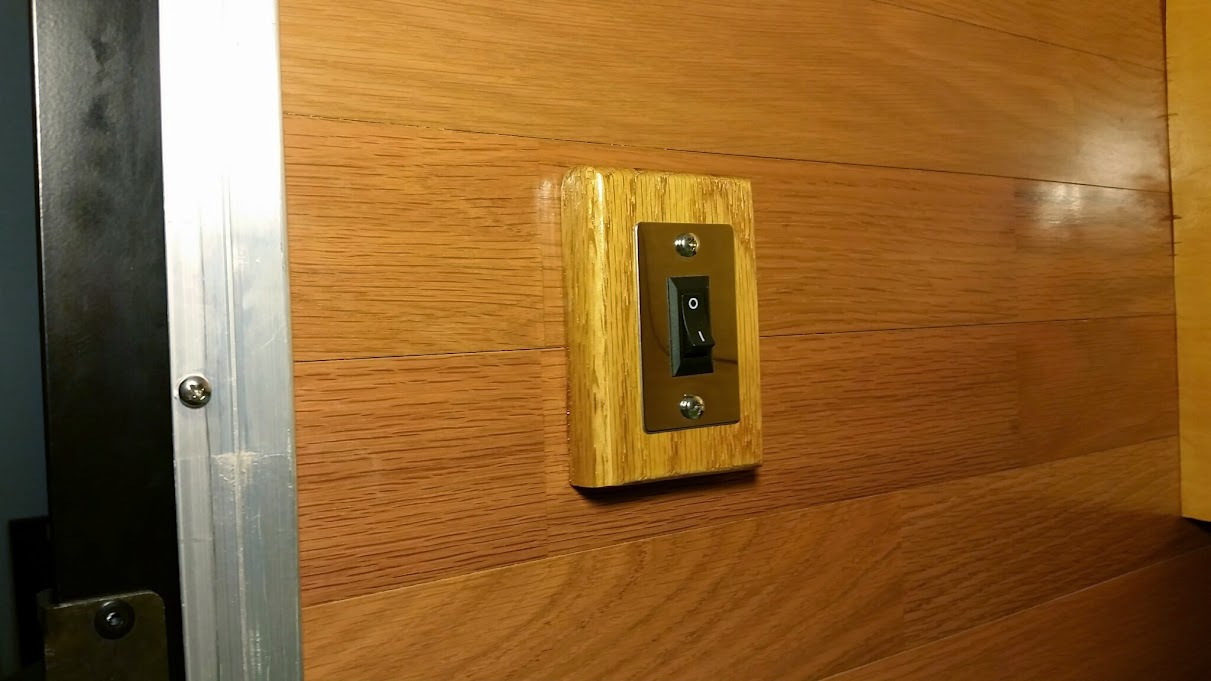
One last thing was I cut, edge routed, and installed the switches in the cabin for the porch lights. Just scrap pieces of oak with a couple coats of spar varnish on them.

Image

Whittling away at the list....
Brian


Checkout my buildThe Regal Eagle Bow front for 4
Image
Also my teardrop updates from blog on Dad Rambles
User avatar
Gunguy05
The 300 Club
 
Posts: 385
Images: 6
Joined: Mon Dec 02, 2013 4:45 pm
Location: South GA
Top

Re: Regal Eagle TJ Gathering Tomoka SP 2/9/15

Postby Gunguy05 » Tue Mar 24, 2015 10:13 pm

Just an update to show our allllmost finished trailer..

First we had to finish the back cabinets so that we could mount the PD4045 unit. We had planned on mounting it in the door of the lower left cabinet, but that changed.

Once I got the back (only ) cabinet door finished, I couldn't bring myself to cut a hole in it.

Image

So we decided to make another false wall behind it and mount the converter and cutoff switch in it.

Some of the back wiring. This all of the wires for the nav lights tied down.
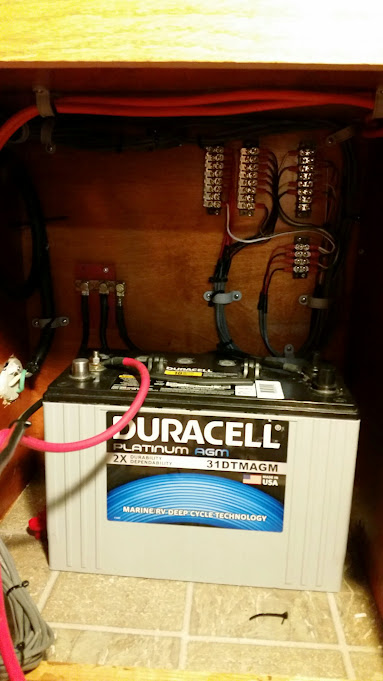
Image

Here is the board with the PD unit mounted to it. We wired all of the 12V wires down to strips, then the wires from the PD on the other side with a common ground buss for all the grounds. This is then wired in with the other grounds, then goes to the frame.
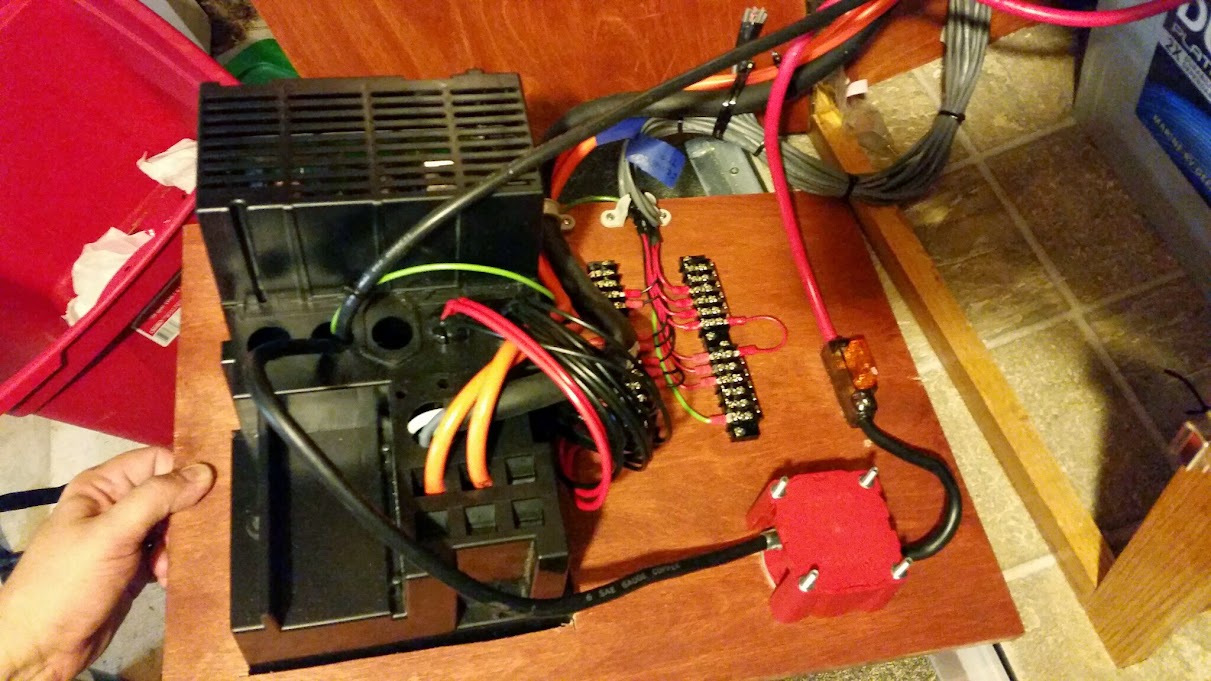
Image

This is a photo showing it setting in place. We attached a bracket to it in the back so that it could be removed for access to the battery. If needed we can cut a vent hole in the bottom foot wall to allow air circulation to this cabinet from the cabin.
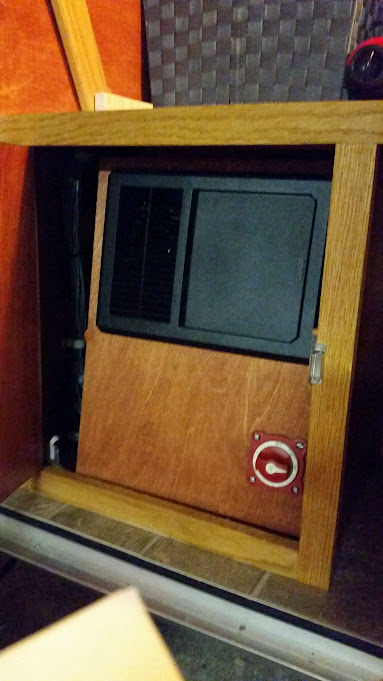
Image

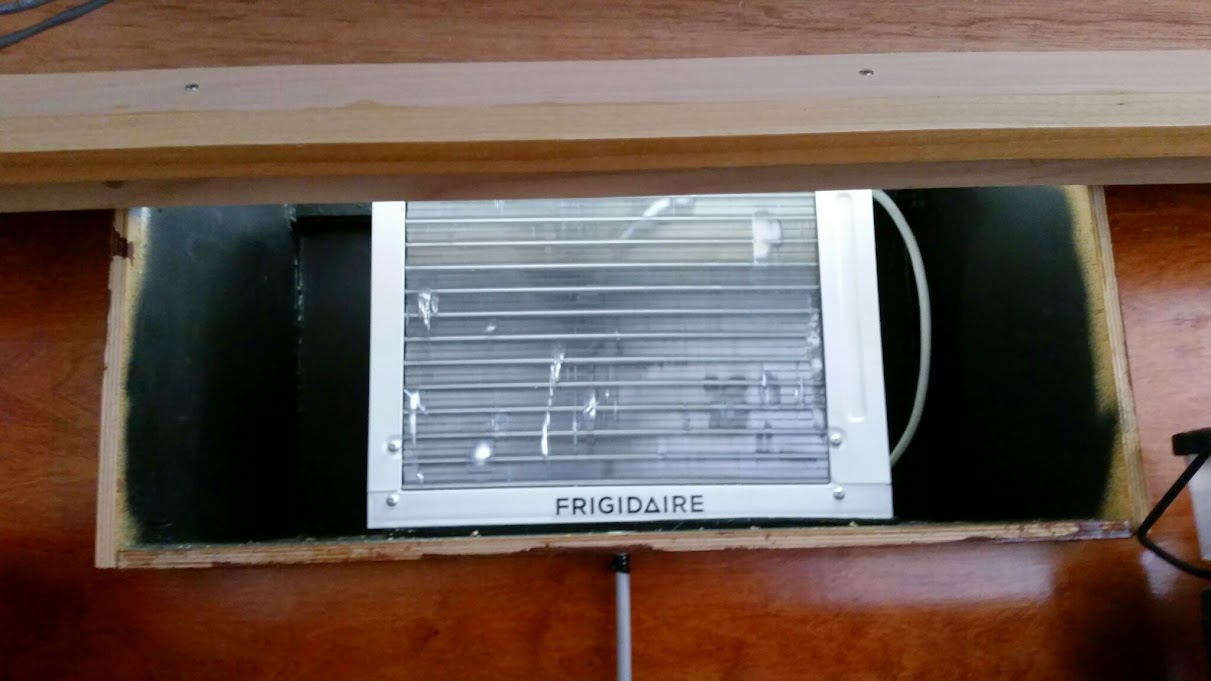
Once the electircal was tied up and ready for the road the next thing was to tackle the AC unit. We had previously planned a box for it, and have sealed with CPES and bed liner paint on top to protect the CPES. Here you see a drain that we installed with epoxy and a trimmed toilet supply line. We cut the "dome" (not sure what it's called) off of the top of the supply line. The part you stick up to the bottom of the toilet tank. This left us with a flange. We then used a forsner bit to cut a hole in the bottom of the AC drain box, and a 3/8 hole in the middle for the pipe to go through. This fits tight, and is epoxied into the bottom. The cover is then replaced and the rest sprayed with bed liner paint to protect it. All is sealed with OSI sealant. I didn't want to us PL premium in case some day I need to remove the cover.
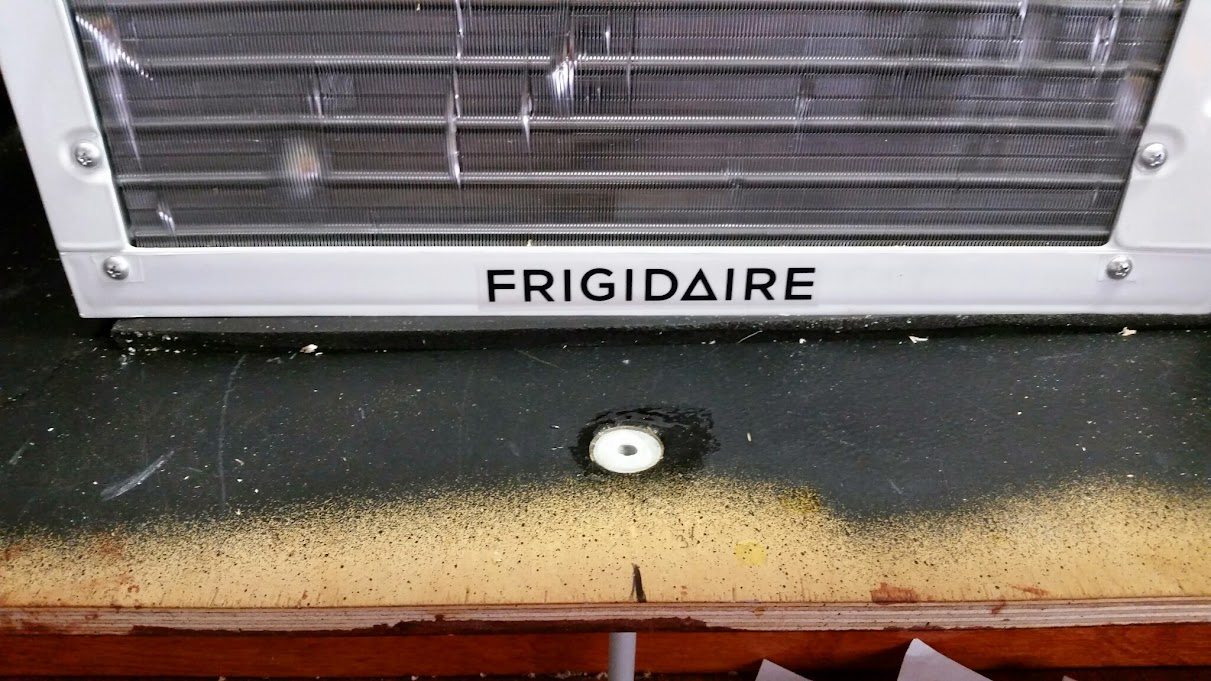
Image

Image

I made a couple brackets out of AL, riveted them to the side of the AC, and then scred to the back of the interior cabinet. Here is the left (from the rear) side attached.

Image

Once all this was complete the back cover was attached.

Next to the vent.

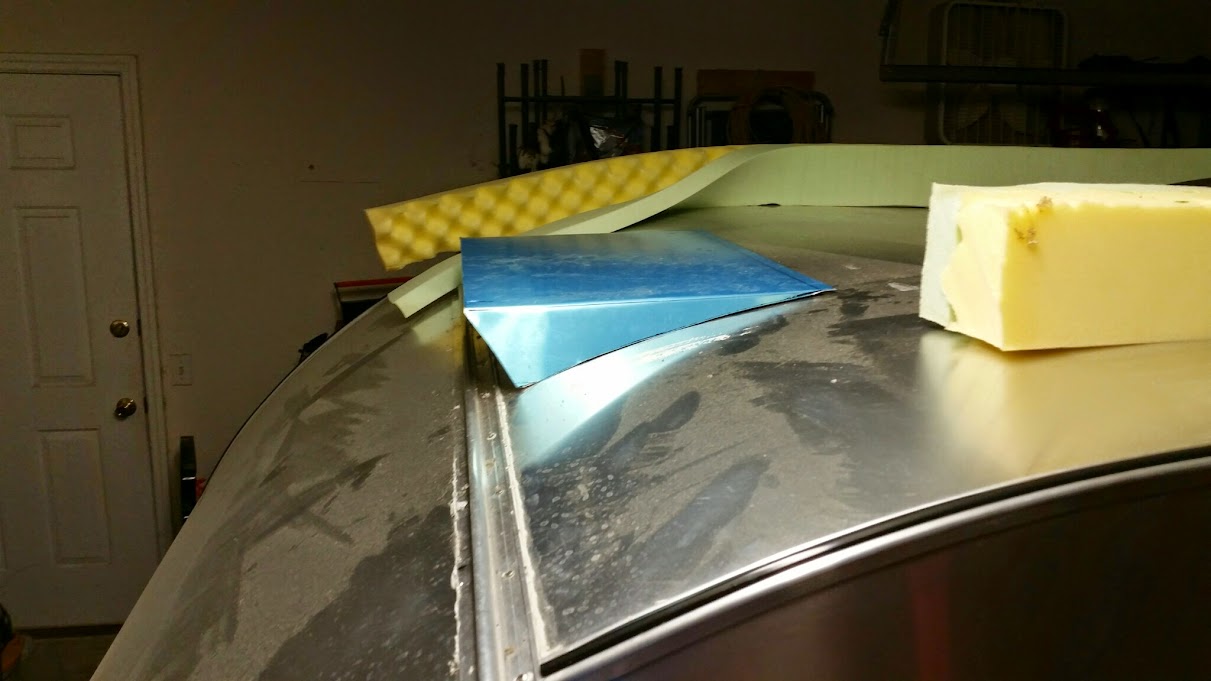
We went over and over this in our head and did a lot of looking for a way to make this happen. Dad worked on a form which he started to cover with fiberglass. The plan was to build it up, then sand and paint. I had an ah ha! moment on the way to work one day. The issue was bending on a compound curve. Dumb me..just make it into 2 pieces.

First I measured, marked , and cut a piece that would from the top and sides.

Image

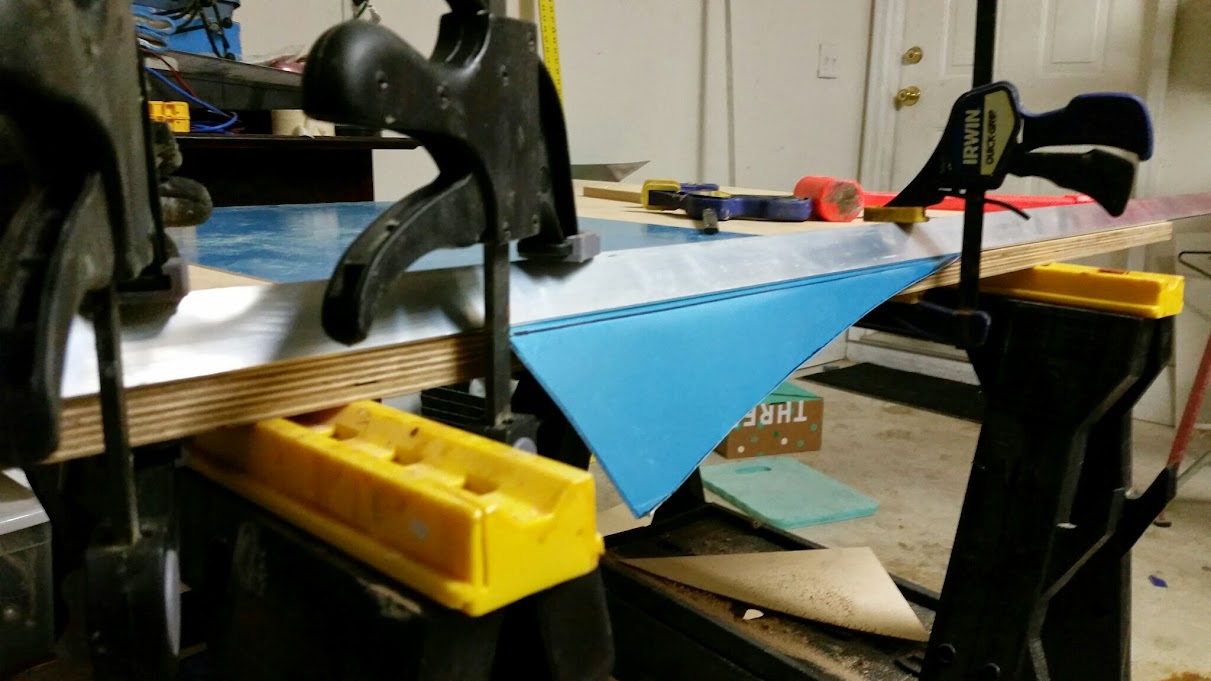
Then I used a piece of thick angle aluminum and clamped and bent it to approx the right angle (about 75 degrees).
Image

Test fit.

Image

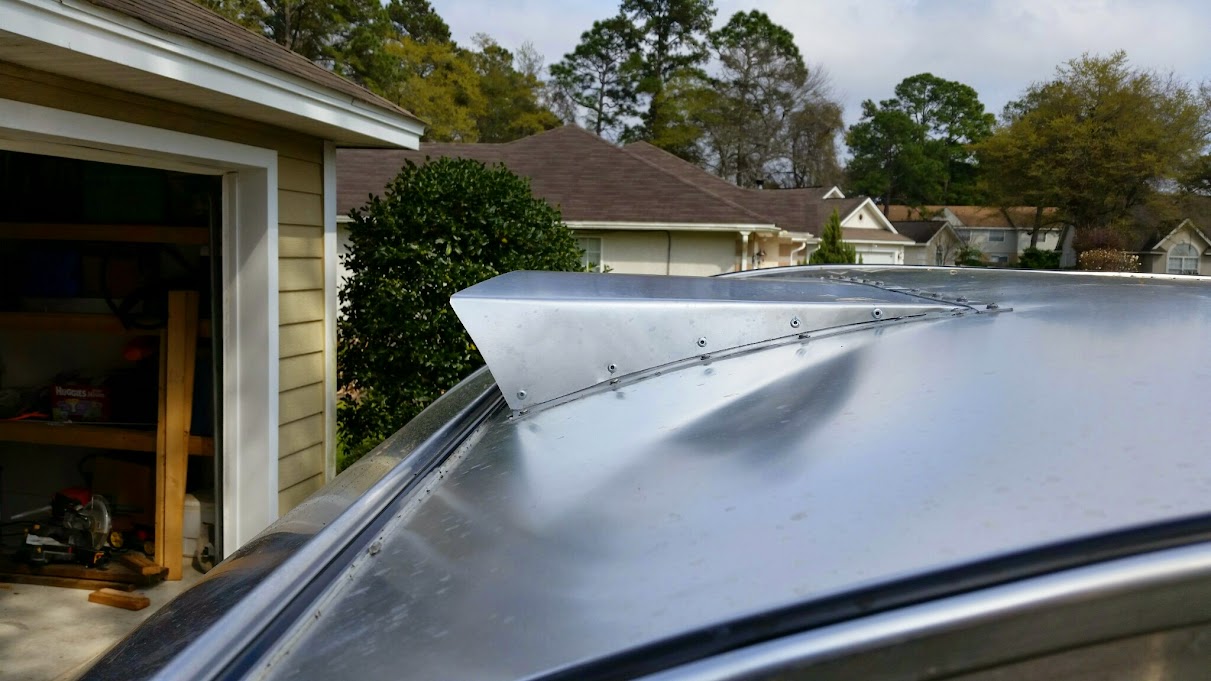
Then I bent a piece of 1" angle which I had annealed, to the back curve of the camper. I then drilled and attached the vent piece to the top leg of the angle.

Viola!

Image

Turned out pretty good.. or at least better than I thought it would.
Image

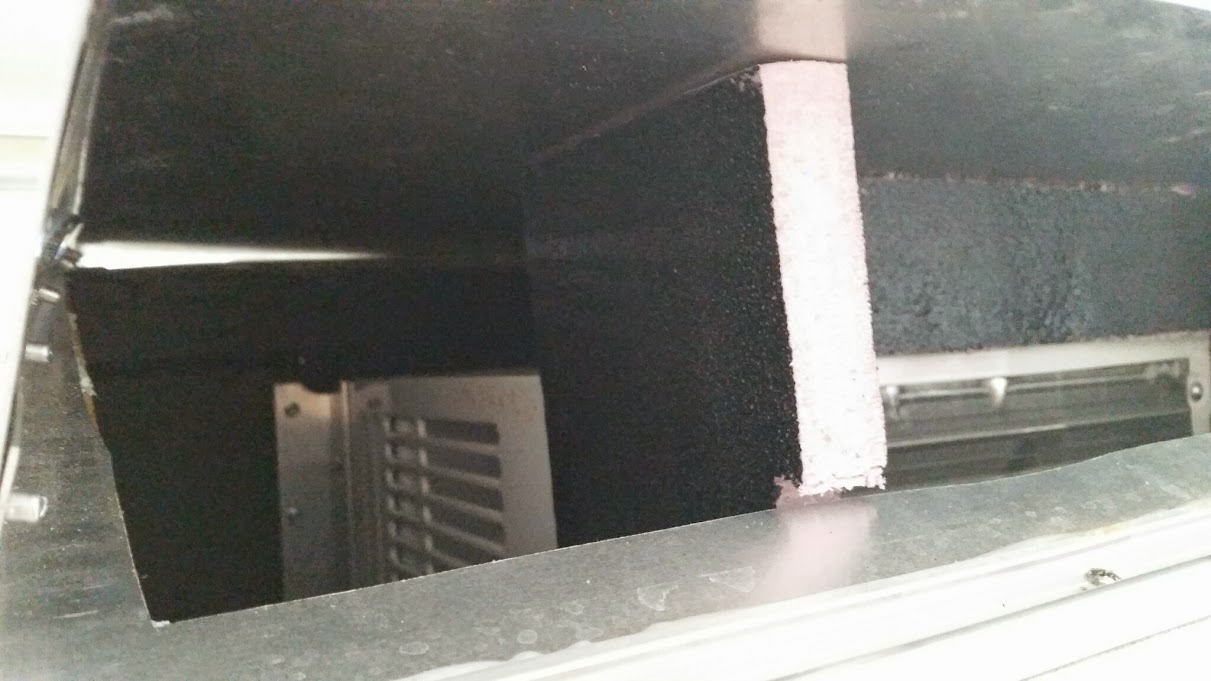
I don't have any good photos of it, but test runs told me i needed baffles in the back of the AC box to separate the air coming in/out. I used some 3/4 foam and sprayed with the same bedliner paint. Made a HUGE difference in the cooling capacity of the AC. These are just cut to fit tight and pressed into place.
Image

We got it packed and weighed... then went camping.. and a couple issued popped up.. more on that later. Bedtime for now!
Brian


Checkout my buildThe Regal Eagle Bow front for 4
Image
Also my teardrop updates from blog on Dad Rambles
User avatar
Gunguy05
The 300 Club
 
Posts: 385
Images: 6
Joined: Mon Dec 02, 2013 4:45 pm
Location: South GA
Top

Regal Eagle 2nd Camp 3/25/15

Postby Gunguy05 » Wed Mar 25, 2015 9:53 am

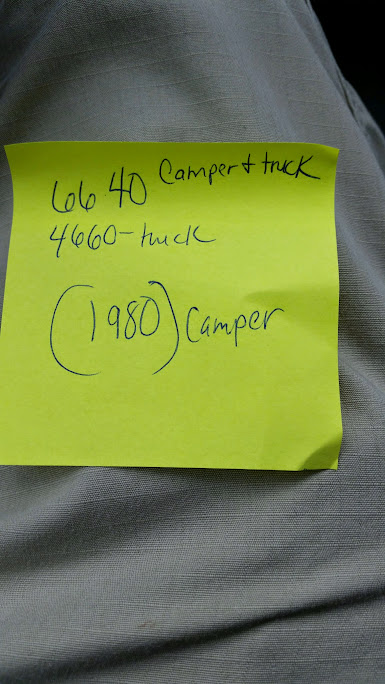
So, we got everything packed up.. I decided to take it to the local debris removal place down the way (a tip from a TD buddy told me they would weigh it for free).

Ater everything was said and done.. she's a beast, but that is fully loaded with everything we expect to take camping. I suspect if you deduct the cooler (60lbs), charcoal (25lbs) , shade tent (25lbs), cast iron (50ish), and some other odds and ends the final weight is in the 1750-1800 lb range. Not too bad considering that is a 4" frame, and the overall size of things 8) :shock:

Image

We STILL have few things to finish up, but then again, when are you ever finished.

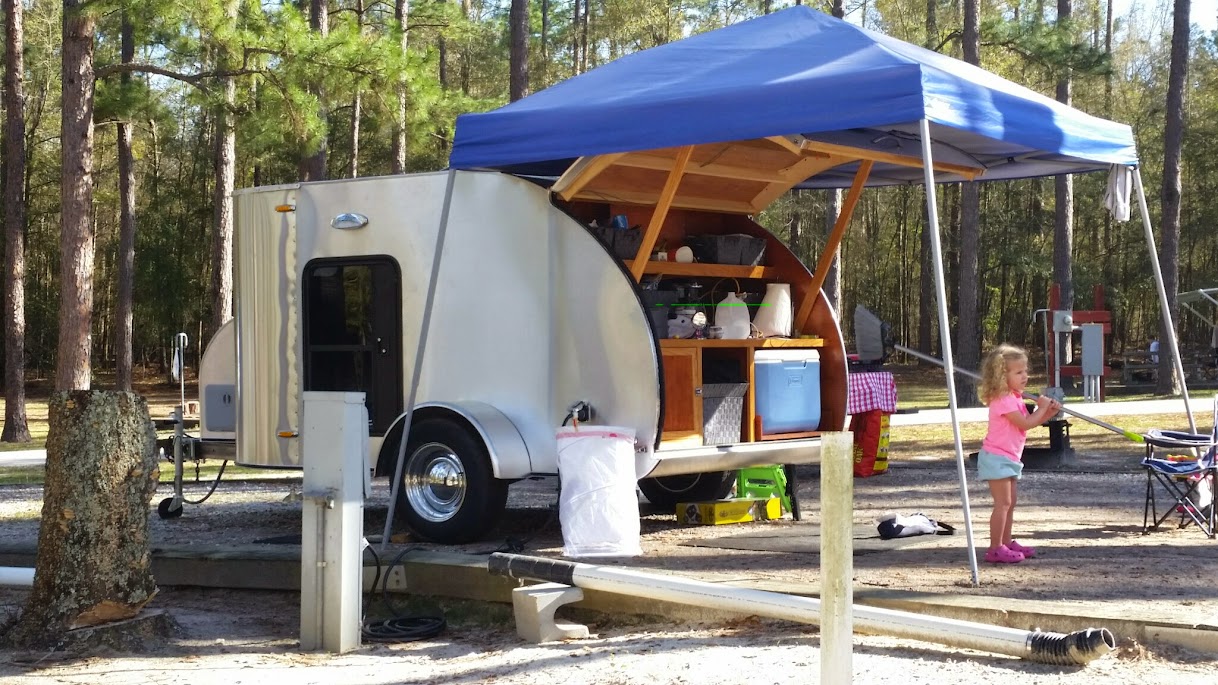
We went camping this past weekend.. had an outstanding time and we able to use the galley, fully stocked.. THAT WAS A DREAM! Just to have everything within arms reach and not have to run get it when you need it. GREAT STUFF!!

Image

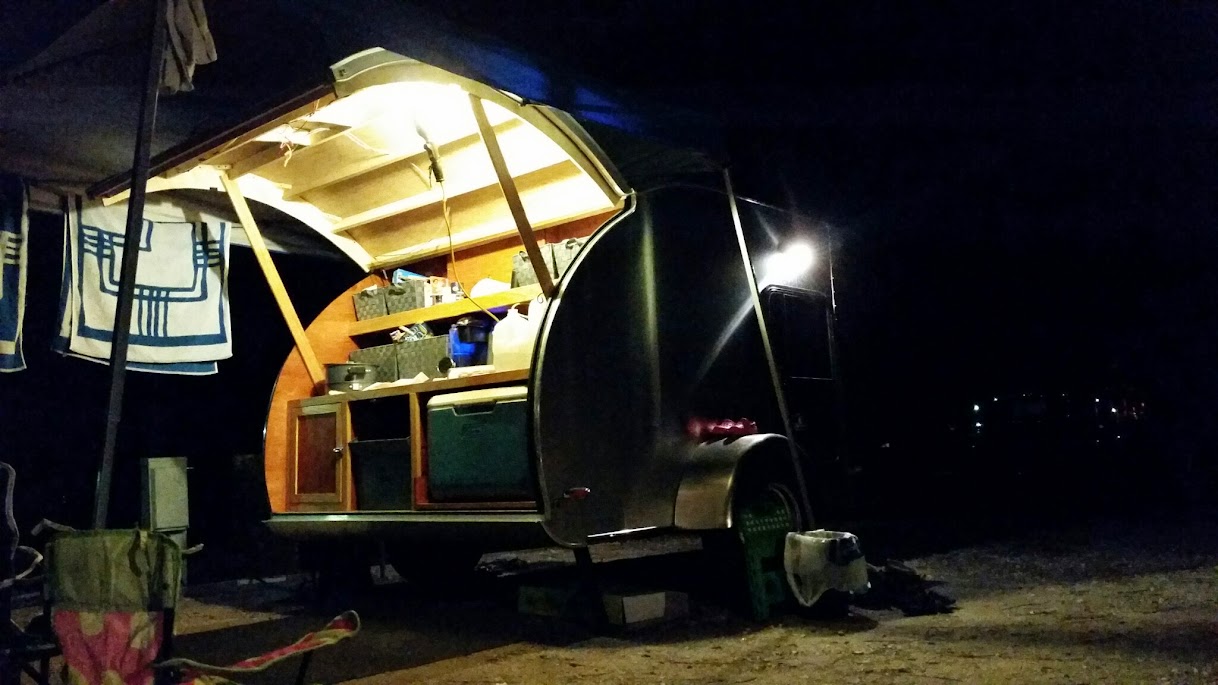
Time to kick back and enjoy camping.. took this photo while I was staring at the galley at 12am, kids and wife in bed, just me... wondering how to improve things next. :D

Image
Brian


Checkout my buildThe Regal Eagle Bow front for 4
Image
Also my teardrop updates from blog on Dad Rambles
User avatar
Gunguy05
The 300 Club
 
Posts: 385
Images: 6
Joined: Mon Dec 02, 2013 4:45 pm
Location: South GA
Top

Re: Regal Eagle 2nd Camp 3/25/15

Postby S. Heisley » Wed Mar 25, 2015 6:21 pm

I'm so glad you're happy with your raindrop. You did a good job on it.
Best wishes for many more successful camping trips!
User avatar
S. Heisley
Super Lifetime Member
 
Posts: 8774
Images: 495
Joined: Mon Sep 17, 2007 10:02 am
Location: No. California
Top

Re: Regal Eagle 2nd Camp 3/25/15

Postby Tommy2tone_1999 » Wed Mar 25, 2015 6:48 pm

It looks so much better in its natural element! Great work!
Make time for fitness and it'll make time for you.
http://TommyDoran.com
http://tommydoran.com/favor
Interview: http://goo.gl/Non1oR
Build Journal - http://www.tnttt.com/viewtopic.php?f=50&t=58395
Come find me on Facebook - http://www.facebook.com/tommy.doran
Image
Image
Tommy2tone_1999
Teardrop Master
 
Posts: 236
Images: 148
Joined: Tue Oct 21, 2008 10:54 am
Location: St. George, Louisiana
Top

Re: Regal Eagle 2nd Camp 3/25/15

Postby Sheddie » Thu Mar 26, 2015 4:29 am

S. Heisley wrote:I'm so glad you're happy with your raindrop. You did a good job on it.
Best wishes for many more successful camping trips!

Tommy2tone_1999 wrote:It looks so much better in its natural element! Great work!

Same from me :applause:
User avatar
Sheddie
1000 Club
1000 Club
 
Posts: 1499
Images: 1129
Joined: Mon Jul 01, 2013 3:26 pm
Location: Whangarei, New Zealand
Top

Re: Regal Eagle 2nd Camp 3/25/15

Postby KCStudly » Thu Mar 26, 2015 7:20 pm

Good on you, mate! Really nice job. I must admit I am a bit envious, but I will get my turn to 'first camp' someday soon. Glad everything went well for you. :thumbsup:
KC
My Build: The Poet Creek Express Hybrid Foamie

Poet Creek Or Bust
Engineering the TLAR way - "That Looks About Right"
TnTTT ORIGINAL 200A LANTERN CLUB = "The 200A Gang"
Green Lantern Corpsmen
User avatar
KCStudly
Donating Member
 
Posts: 9615
Images: 8169
Joined: Mon Feb 06, 2012 10:18 pm
Location: Southeastern CT, USA
Top

Regal Eagle 2nd Camp 3/25/15

Postby Gunguy05 » Sat Apr 18, 2015 5:04 pm

I have been doing little stuff here and there. Got the gas Springs put on today. This hatch is a beast and they were well worth it.

Gotta run, more later.

Image
Brian


Checkout my buildThe Regal Eagle Bow front for 4
Image
Also my teardrop updates from blog on Dad Rambles
User avatar
Gunguy05
The 300 Club
 
Posts: 385
Images: 6
Joined: Mon Dec 02, 2013 4:45 pm
Location: South GA
Top

Re: Regal Eagle 2nd Camp 3/25/15

Postby Sheddie » Sat Apr 18, 2015 8:30 pm

:thumbsup: they sure do make things easier, and safer. No chance of the wood poles falling out and the hatch coming down on some one. :thumbsup:
User avatar
Sheddie
1000 Club
1000 Club
 
Posts: 1499
Images: 1129
Joined: Mon Jul 01, 2013 3:26 pm
Location: Whangarei, New Zealand
Top

Re: Regal Eagle 2nd Camp 3/25/15

Postby Gunguy05 » Mon Jun 29, 2015 8:25 am

A wrap up post of sorts. I will still post here in the future, but it's done! Well, almost .

Here is a video I made last night showing all the highlights.

[youtube]https://www.youtube.com/watch?v=k5Vni9d_ST0[/youtube]
Last edited by Gunguy05 on Sat Jul 25, 2015 8:08 am, edited 1 time in total.
Brian


Checkout my buildThe Regal Eagle Bow front for 4
Image
Also my teardrop updates from blog on Dad Rambles
User avatar
Gunguy05
The 300 Club
 
Posts: 385
Images: 6
Joined: Mon Dec 02, 2013 4:45 pm
Location: South GA
Top

Re: Regal Eagle Done! Video Tour 6/29/15

Postby S. Heisley » Mon Jun 29, 2015 6:29 pm

...Good job! :applause: Your trailer is beautiful. :thumbsup:
User avatar
S. Heisley
Super Lifetime Member
 
Posts: 8774
Images: 495
Joined: Mon Sep 17, 2007 10:02 am
Location: No. California
Top

PreviousNext

Return to Build Journals

Who is online

Users browsing this forum: No registered users and 14 guests