Lance and Becky's Sagwagon

...ask your questions in the appropriate forums BUT document your build here...preferably in a single thread...dates for updates, are appreciated....

Re: Lance and Becky's Sagwagon

Postby S. Heisley » Sun Jun 03, 2012 9:45 pm

Well, you got yourself into a mess but you worked your way out of it very well indeed!
More power to you! :thumbsup: It looks good now! :applause:

If I had been in your shoes, I probably would have walked away and not looked at that teardrop for a week!
Ya done good. :)
User avatar
S. Heisley
Super Lifetime Member
 
Posts: 8774
Images: 495
Joined: Mon Sep 17, 2007 10:02 am
Location: No. California

Re: Lance and Becky's Sagwagon

Postby Oldragbaggers » Mon Jun 04, 2012 7:07 am

Thanks Sharon! Believe me, walking away definitely crossed my mind. But I knew I wouldn't have been able to relax and enjoy myself doing anything else until I had this fixed. It's not perfect, and I doubt it ever will be. But it's pretty good, and definitely watertight I should think. I could spend the rest of the summer sanding and putting on more resin trying to get perfection, but I think it's time to accept it and move on. Starting to work on the galley was fun and a very nice change.
Life is sooooo good.........
Sail...camp....bike...repeat
Becky

Build Journal http://www.tnttt.com/viewtopic.php?f=50&t=45917
Visit our blog at http://www.oldragbaggers.com
Image Image
User avatar
Oldragbaggers
Gold Donating Member
 
Posts: 1842
Images: 331
Joined: Mon Aug 01, 2011 9:22 pm
Location: Essex, MD

Re: Lance and Becky's Sagwagon

Postby Jkester » Mon Jun 04, 2012 7:22 am

Becky, you would never know that you had problems by looking at the final results of the roof finish. Great job!

I noticed you used 12oz fiberglass for the roof. What's the reason for that thickness (since I just received my 7oz in the mail)? Also, did you put a sealer coat of epoxy on before the fiberglass? I did on my walls and had a hard time getting the wrinkles out but it was still a little tacky.
James
He who loves instruction loves knowledge, but he who hates correction is stupid.
-- Proverbs 12:1


Our build journal is http://tnttt.com/viewtopic.php?f=50&t=50670
User avatar
Jkester
Teardrop Builder
 
Posts: 39
Images: 55
Joined: Sat May 12, 2012 7:43 am
Location: Colonial Heights, VA
Top

Re: Lance and Becky's Sagwagon

Postby Oldragbaggers » Mon Jun 04, 2012 8:03 am

Jkester wrote:Becky, you would never know that you had problems by looking at the final results of the roof finish. Great job!

I noticed you used 12oz fiberglass for the roof. What's the reason for that thickness (since I just received my 7oz in the mail)? Also, did you put a sealer coat of epoxy on before the fiberglass? I did on my walls and had a hard time getting the wrinkles out but it was still a little tacky.
James


Thanks!!

I used 6 oz on my walls, James, because they were structurally very strong already and I was just looking for good waterproofing and some impact protection for the thin (3mm) Okoume ply that I skinned my walls with. On the roof I decided to use 12 oz. because I skinned that with only 1 layer of 1/8" ply. It seemed kind of flimsy to me and I wanted to strengthen it. In hindsight, 6 oz would have been fine there too. Especially since I ended up doing it twice, I would have had 12 oz. in the end anyway.

Yes, I always put a sealer coat of resin on the wood before I lay up cloth. That way the wood doesn't absorb too much of your first layup coat and starve the cloth. I have learned, as you have now too, don't EVER lay cloth over tacky resin. I did that on one of my walls also and had one devil of a time getting that wall fair.

I am learning (the HARD WAY, as is my custom) that when working with fiberglass there is no substitute for good weather, good timing and patience.
Life is sooooo good.........
Sail...camp....bike...repeat
Becky

Build Journal http://www.tnttt.com/viewtopic.php?f=50&t=45917
Visit our blog at http://www.oldragbaggers.com
Image Image
User avatar
Oldragbaggers
Gold Donating Member
 
Posts: 1842
Images: 331
Joined: Mon Aug 01, 2011 9:22 pm
Location: Essex, MD
Top

Re: Lance and Becky's Sagwagon

Postby parnold » Mon Jun 04, 2012 8:49 am

Looking very good Becky! Sorry about your mishap, and glad you came out on the other side, wiser and OK! I'm hoping to start glassing mine this week while the weather is cool.
User avatar
parnold
Donating Member
 
Posts: 2344
Images: 302
Joined: Mon Feb 08, 2010 4:49 pm
Location: Northwest New Jersey
Top

Re: Lance and Becky's Sagwagon

Postby Oldragbaggers » Mon Jun 04, 2012 9:07 am

I'm glad you're going to have a run of good weather to get yours done Paul. Your build is looking great also!
Life is sooooo good.........
Sail...camp....bike...repeat
Becky

Build Journal http://www.tnttt.com/viewtopic.php?f=50&t=45917
Visit our blog at http://www.oldragbaggers.com
Image Image
User avatar
Oldragbaggers
Gold Donating Member
 
Posts: 1842
Images: 331
Joined: Mon Aug 01, 2011 9:22 pm
Location: Essex, MD
Top

Re: Lance and Becky's Sagwagon

Postby Cliffmeister2000 » Mon Jun 04, 2012 10:03 am

I guess if 90º is too hot to glas, then glasing is out of the question here until about November! :NC
God Bless

Cliff

♥God. ♥People.
1 John 4:9-11

My Teardrop build pictures
User avatar
Cliffmeister2000
Titanium Donating Member
 
Posts: 3622
Images: 157
Joined: Thu Jul 26, 2007 10:18 pm
Location: Phoenix, AZ
Top

Re: Lance and Becky's Sagwagon

Postby parnold » Mon Jun 04, 2012 10:43 am

Cliff:

There are a couple tricks you can use.. like refrigerating your resin, and doing smaller panels. Just do a test batch on a typical day to see what you're working with.
User avatar
parnold
Donating Member
 
Posts: 2344
Images: 302
Joined: Mon Feb 08, 2010 4:49 pm
Location: Northwest New Jersey
Top

Re: Lance and Becky's Sagwagon

Postby Cliffmeister2000 » Mon Jun 04, 2012 10:51 am

I was only being funny... or at least trying to be. No glas in my immediate future.

:FNP
God Bless

Cliff

♥God. ♥People.
1 John 4:9-11

My Teardrop build pictures
User avatar
Cliffmeister2000
Titanium Donating Member
 
Posts: 3622
Images: 157
Joined: Thu Jul 26, 2007 10:18 pm
Location: Phoenix, AZ
Top

Re: Lance and Becky's Sagwagon

Postby Oldragbaggers » Mon Jun 04, 2012 11:07 am

I'd also get the extra slow hardener for glassing in the summer. I am using the Raka non-blush formula, which apparently is not a slow hardener.
Life is sooooo good.........
Sail...camp....bike...repeat
Becky

Build Journal http://www.tnttt.com/viewtopic.php?f=50&t=45917
Visit our blog at http://www.oldragbaggers.com
Image Image
User avatar
Oldragbaggers
Gold Donating Member
 
Posts: 1842
Images: 331
Joined: Mon Aug 01, 2011 9:22 pm
Location: Essex, MD
Top

Re: Lance and Becky's Sagwagon

Postby Heifer Boy » Mon Jun 04, 2012 10:34 pm

I'm very impressed with your build so far. When I built my camper box it was my first experiance with epoxies and fibreglassing and I learned a lot and really enjoyed it. I love how much stronger everything is and how you can build without fasteners. I intend to build my teardrop (if I ever get the chance) the same way so I'm watching your build with interest.

Good job!!! :thumbsup:
Heifer Boy
Teardrop Builder
 
Posts: 38
Joined: Mon Feb 28, 2011 1:51 am
Location: Woolamia, NSW
Top

Re: Lance and Becky's Sagwagon

Postby Oldragbaggers » Tue Jun 05, 2012 8:09 am

Heifer Boy wrote:I'm very impressed with your build so far. When I built my camper box it was my first experiance with epoxies and fibreglassing and I learned a lot and really enjoyed it. I love how much stronger everything is and how you can build without fasteners. I intend to build my teardrop (if I ever get the chance) the same way so I'm watching your build with interest.

Good job!!! :thumbsup:


Of course I had to go and check out your camper box. All I can say is WOW. It's really beautiful. The detail in the design is amazing, the construction is first rate, and I never would have guessed this was your first time fiberglassing. You MUST build a teardrop. That's a build thread I would love to watch. And that camper box and a tear would be such a dynamite combination. You would be camping in the lap of luxury. :thumbsup:
Life is sooooo good.........
Sail...camp....bike...repeat
Becky

Build Journal http://www.tnttt.com/viewtopic.php?f=50&t=45917
Visit our blog at http://www.oldragbaggers.com
Image Image
User avatar
Oldragbaggers
Gold Donating Member
 
Posts: 1842
Images: 331
Joined: Mon Aug 01, 2011 9:22 pm
Location: Essex, MD
Top

Re: Lance and Becky's Sagwagon

Postby Heifer Boy » Thu Jun 07, 2012 11:35 pm

[quote="OldragbaggersOf course I had to go and check out your camper box. All I can say is WOW. It's really beautiful. The detail in the design is amazing, the construction is first rate, and I never would have guessed this was your first time fiberglassing. You MUST build a teardrop. That's a build thread I would love to watch. And that camper box and a tear would be such a dynamite combination. You would be camping in the lap of luxury. :thumbsup:[/quote]

Thanks. Both the camper and tear at once would be a bit of overkill just for the two of us but camper for serious offroad camping trips/tours is cool and a teardrop for more sedate camping holidays sounds good. That's the plan anyway but I think it will be Xmas/New Year sometime before I get a start on it. You will be off in yours long before that.

HB
Heifer Boy
Teardrop Builder
 
Posts: 38
Joined: Mon Feb 28, 2011 1:51 am
Location: Woolamia, NSW
Top

Re: Lance and Becky's Sagwagon

Postby Oldragbaggers » Fri Jun 08, 2012 8:12 am

I am really hoping to have mine camp-able by sometime in August, maybe late July if I really push and have good weekend weather for most of the summer. I'm sure I won't have all the details done by then, but it'll be good enough to get out in while I finish it.
Life is sooooo good.........
Sail...camp....bike...repeat
Becky

Build Journal http://www.tnttt.com/viewtopic.php?f=50&t=45917
Visit our blog at http://www.oldragbaggers.com
Image Image
User avatar
Oldragbaggers
Gold Donating Member
 
Posts: 1842
Images: 331
Joined: Mon Aug 01, 2011 9:22 pm
Location: Essex, MD
Top

Re: Lance and Becky's Sagwagon

Postby Oldragbaggers » Mon Jun 11, 2012 6:25 pm

School's OUT!!! Friday was the last day so for those of us involved in education that meant parties to go to. :cheerswine: :woohoo:

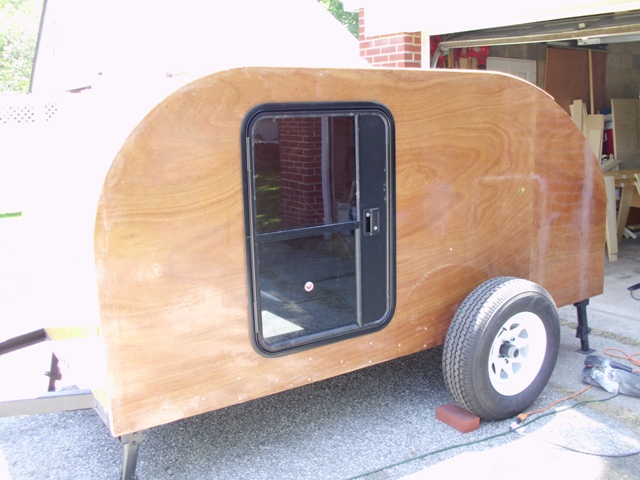
But all that notwithstanding, and despite the 90+ degree heat and humidity even higher, I had a thoroughly enjoyable weekend working on the teardrop. The heat drove me into the garage :fan: which was a perfect place to work on the galley cabinetry.

But first I needed to get my door openings sanded and get the doors fitted into them. I must have tried to put each door in twenty times or more before I finally got it right. (I really need to improve my skills with the jigsaw.) But they fit in now, tightly (which I think is a good thing) and I can get the plywood edges sealed up again in preparation for painting. (I thought I was going to be painting this weekend, but did not feel like doing all that sanding and prep work out in the heat.)

Image

I am loving working on the galley (and I am crazy about my Kreg jig). It's a simple plan, but should give us everything we need and can be added to later.

First let me explain about the weird wood tones in the galley. The cabinet wall by the cooler area that has the horrible dark stain on it, well, we'll just call that an error in judgement. And it was an error that cost me a face frame. The color on the can of stain was a nice light golden color, but when I put it on the wood....YIKES. But did I stop with just the face frame? No...of course I didn't. I figured it must be that it needed to dry, and then it would lighten up to that nice light golden color.
:laughing1: :laughing1: :laughing1: :laughing1:

I did not want dark wood, so.... I went and got new wood to rebuild the face frame. The walls were going to be painted white anyway, so now the interior of the cabinets will be white also. It also gave me an opportunity to start over with a different wood. I have been using poplar for all my framing and had intended to use it for the cabinets also, but I decided I did not like the natural tone of it (sort of ashen) and I am afraid now to try and stain it again, so I went looking for a wood that was not as heavy as oak but that I thought would look nice natural. I settled on maple and I am very happy with that decision. It is the exact look I wanted.

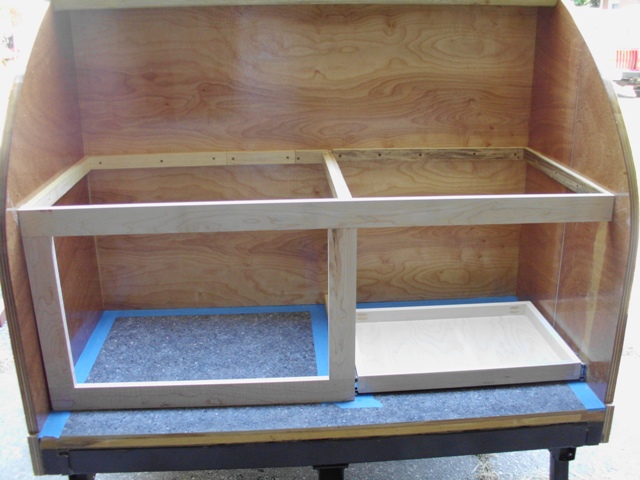
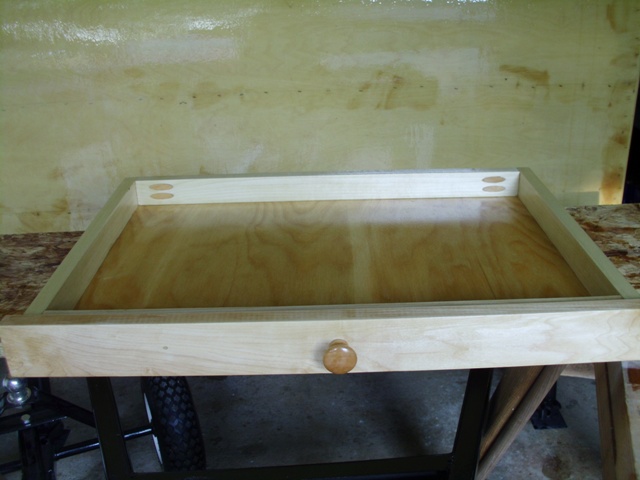
So here's what I have so far.

The right side has a sliding drawer for the cooler. The side next to the cooler will be left open, no shelves, and will only have one large door so that I will have easy access to load large items (like the water jug) and will not be restricted in the size of the containers I store in there. My stuff will mostly be organized into Tupperware type containers anyway and they stack easily enough on top of each other. Above the cabinets will be a single shelf, 5" deep, with galley rail. I am putting some Shaker style pegs under the shelf to hang coffee mugs, pot holders, cooking utensils and the like. I will put mounting hardware over the cabinet door where I can mount a table extension. The table will be long enough to allow the cabinet door to open fully when the table is in position.

Image

I found that the area behind the cooler drawer is a perfect fit for two Coleman lanterns and a can of fuel. I have a couple ideas for how to secure/protect them back there.

Image

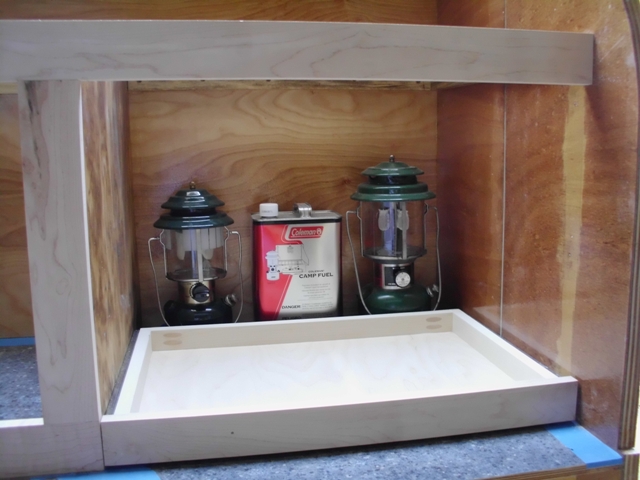
I shaved about 3/8" off the bottom of the drawer facing so that it would have room to clear the molding across the rear on the floor when the drawer is extended and still match up with the height of the other face frame.

Image

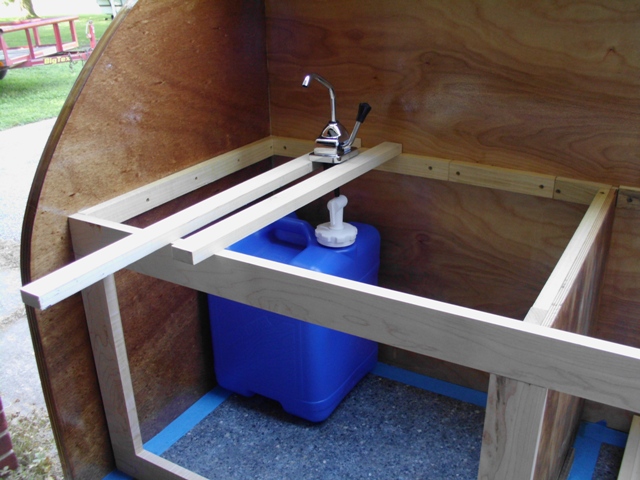
The hand pump will draw directly from this water jug and there will be just a small stainless steel bowl in the counter. I had planned on and purchased a regular sink with p-trap and drain and all, but I think all that plumbing just eats up too much space below the counter that could be better used for storage. We really wanted the ability to draw water with a pump though so we wouldn't have to mess with that big jug every time we needed to use a few ounces of water. We will be able to load the jug in the cabinet empty, then lift out the bowl and stick the hose in to fill it.

Image

I used my Kreg jig for my joinery and I just love it. I do not have the carpentry skills (or the tools) to do joints of this quality any other way. Plus I love the look of the plugs. I think they add an interesting visual element to the piece.

Image

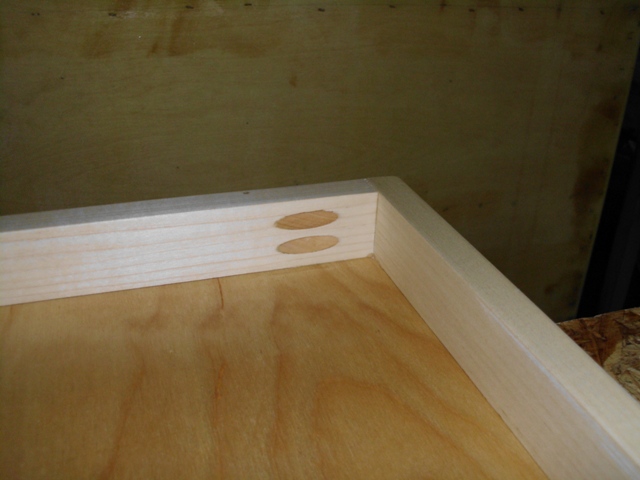
This will be the basic style of my cabinetry throughout. I guess it is basically Shaker, and it is very appealing to me.

Image

I hope my posts are not too boring with all the detail. This is just all so fascinating to me that I get carried away in my excitement to share it. I am loving this so much that I actually put my coffee in my car this morning and then went into the garage (totally unplanned) and put another coat of varnish on my cooler drawer before I went to work. I am obsessed.
Last edited by Oldragbaggers on Wed Jun 27, 2012 10:10 am, edited 1 time in total.
Life is sooooo good.........
Sail...camp....bike...repeat
Becky

Build Journal http://www.tnttt.com/viewtopic.php?f=50&t=45917
Visit our blog at http://www.oldragbaggers.com
Image Image
User avatar
Oldragbaggers
Gold Donating Member
 
Posts: 1842
Images: 331
Joined: Mon Aug 01, 2011 9:22 pm
Location: Essex, MD
Top

PreviousNext

Return to Build Journals

Who is online

Users browsing this forum: No registered users and 53 guests