Elf Cottage interior build/renovation

...ask your questions in the appropriate forums BUT document your build here...preferably in a single thread...dates for updates, are appreciated....

Re: Elf Cottage interior build/renovation

Postby PcHistorian » Sat Feb 02, 2013 2:24 pm

"
It was usually 3 steps forward and 2 steps back for me.
"

Well, it is difficult taking every step as if you may change you mind about it later. Sometimes, I think we should just make these out of playdough and be done with it. LOL

Ok, the roof air venting/heating/cooling. I finished the physical ducting and fan installation for the roof peak interior. 6 fans total. two "register"/air vents. Each fan intakes two roof compartments worth of air. Hot or cold. I will have the two fans on each side controlled simultaniosly. (left has two sets of two compartments. right has two sets of two compartments. front has only two ceiling compartments so only one fan. rear has only two ceiling compartments so only one fan.

Each of the 4 roof sides will have one temperature sensor (thermistor, these things can tell if a flashlight is on or off at a yard away), one temperature sensor inside. one temperature sensor underneath (ambient external sensor), and a sensor in the hot water tank. (ever felt a garden hose in sun? ever feel how hot the water is coming out? :-)

visuals in next post.

--------
(I like the "if you are found here at night, you will be found here in the morning" type of no trespassing signs. ;-)
Elf Cottage
Image

Build Documentary
https://sites.google.com/site/pchistorian/home/hobby/camping/elf-build
Build Forum
http://www.tnttt.com/viewtopic.php?t=48462
Build Album
http://www.tnttt.com/gallery/album.php?album_id=42

progress is progress. (don't look a gift "progress" in the mouth.)
User avatar
PcHistorian
The 300 Club
 
Posts: 354
Images: 198
Joined: Fri Dec 09, 2011 1:06 pm
Location: S.E. Michigan

Re: Elf Cottage interior build/renovation

Postby PcHistorian » Tue Feb 19, 2013 2:50 am

Ok, BIG progress jump!
First, I show you the interior look. Then in the next message I'll "prequel" the heating cooling system in the walls and ceiling, and how I finally resolved the ducting, fans and registers. After that I'll go into the wiring.

first picture
Note the blue marking of the inside roof beam locations. Each of the 4 corners have a triangle going each way, side and end. The middle of the sides have two spaces that are square/rectangle.

Image
---------------------------
interior floor view. that "table" at the front also doubles at the back for travel to make sure nothing blows out the rear door from rolling, if I pull a wheelie while towing.

Image
--------------------------------
interior left wall view. note I now have the paneling in under the fold down desk, and two compartments under the desk, with the doors as paneling. These doors will be spring close, friction latch, and ribbon grab and pull to open. The idea is to avoid knobs that will poke me in the back if I lean up against it or take a chunk out of me if I brush past it. ( the handles on the doors at the front are recessed, so they were left on. )

Image
------------------------------
this is the left roof interior. originally I was going to have these side roof panels slide open at the top, but that is a 90 degree angle to the next major surface. By placing the handles at the bottom and having them open at the bottom then there is only a 45 degree angle. The "guide boards" screwed to the studs are notched so the covers can slide, then the bottom latches by virtue of just going behind the wall piece. I have to cut down the guides, possibly in half. This is due to the cover pieces being MUCH more stiff than I had anticipated! The outlet was at the top for a center 110vac light, but I decided that with the end 12v spots, and I'll put in individual LED lights (4 or 5 variable brightness) that I don't need the light at the top and the cord(s) for any thing else would just get in the way. (One of the outlets is on a 3 way circuit with a switch at the front and rear, left side.) I am planning on cloth loops of velcro on the panel guides for attaching things, and screw-in eyelets in the corners for heavier stuff (so I don't loose my scalp hitting an eyelet they will be in the corners where my fat head can't reach. :-) This is also your first view of the ceiling registers installed.

Image
-----------------------------
right ceiling view. this only show the square/rectangle side-center pieces in. The corner triangle pieces (sides and ends) will hinge instead of slide open. the other end above at the ceiling duplicates what you see.

Image
-----------------------------
right side + ceiling.
Image
Elf Cottage
Image

Build Documentary
https://sites.google.com/site/pchistorian/home/hobby/camping/elf-build
Build Forum
http://www.tnttt.com/viewtopic.php?t=48462
Build Album
http://www.tnttt.com/gallery/album.php?album_id=42

progress is progress. (don't look a gift "progress" in the mouth.)
User avatar
PcHistorian
The 300 Club
 
Posts: 354
Images: 198
Joined: Fri Dec 09, 2011 1:06 pm
Location: S.E. Michigan

Re: Elf Cottage interior build/renovation

Postby bonnie » Tue Feb 19, 2013 7:53 am

You've been busy! It looks great. 8)
Remember, the turtle won. :)
User avatar
bonnie
Donating Member
 
Posts: 1390
Images: 107
Joined: Sun Jul 24, 2011 4:14 pm
Location: Roxana, IL
Top

Re: Elf Cottage interior build/renovation

Postby S. Heisley » Tue Feb 19, 2013 8:35 pm

WOW! :o The interior is looking like a home that you're planning to live in full time!
User avatar
S. Heisley
Super Lifetime Member
 
Posts: 8774
Images: 495
Joined: Mon Sep 17, 2007 10:02 am
Location: No. California
Top

Re: Elf Cottage interior build/renovation

Postby PcHistorian » Thu Feb 28, 2013 2:04 am

Well, I am a handy man in my alter ego. So home stuff gets done to the trailer. the other thing is that the trailer was framed and the shell built like a home so that was my blank canvas, as I bought it.

SO, gearing towards the home/(Elf Cottage) as the Theme... Consider if you will the Harry potter idea of an entire home magically contained in something which is actually larger on the inside than it is on the outside. ;-) (I am seriously considering a "loft" bedroom after I get everything else done. ;-)

I've been naming the cabinets as most people would closets and rooms. Bedrooms straight in. on the left is the Den/library (desk area), then the kitchen just before the window. On the right are the tool rooms, dining area (plates, cups), guest room (for guest storage), and then the little cabinets are mostly considered utility rooms, 110v ac, 12v dc, stove storage (hot plate) and tarp as the 4 corner smaller cabinets. The corner (side only) ones have paneling doors rather than cabinet doors, due to size considerations... The kitchen door (sink, hot & cold running water) I have yet to decide on. Same with the inner frame for the window, window shades, and I was considering a "half an umbrella" for a window awning outside. ;-)

The roof sections to display next makes this the prototype and miniature form for what I am considering to do to a house scale at full size.

Ok, next upload sequence is just the ceiling air ducting. I think I have it all figured out now as to the planned water heating system.
Last edited by PcHistorian on Thu Feb 28, 2013 3:53 am, edited 1 time in total.
Elf Cottage
Image

Build Documentary
https://sites.google.com/site/pchistorian/home/hobby/camping/elf-build
Build Forum
http://www.tnttt.com/viewtopic.php?t=48462
Build Album
http://www.tnttt.com/gallery/album.php?album_id=42

progress is progress. (don't look a gift "progress" in the mouth.)
User avatar
PcHistorian
The 300 Club
 
Posts: 354
Images: 198
Joined: Fri Dec 09, 2011 1:06 pm
Location: S.E. Michigan
Top

Re: Elf Cottage interior build/renovation

Postby PcHistorian » Thu Feb 28, 2013 3:26 am

Ok, here is the AIR PHASE of the heating cooling ceiling system. (passive solar only)

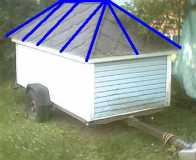
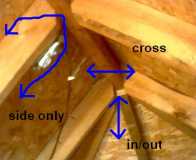
External roof view, with internal beams locations drawn in blue
Image

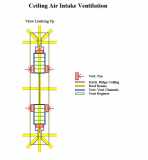
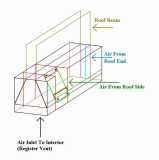
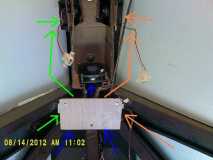
wire frame view of desired summer air flows. (hot air out, cool air in.)
Image

wire frame view of desired winter air flow. (hot air in.)
Image

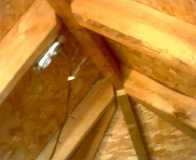
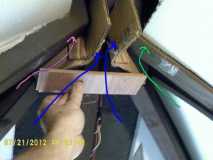
actual internal ceiling view.
Image

additional desired possible air flows. along one side, side to side across, and then from the outside to the inside or inside to outside.
Image

ceiling stained navy blue. vertical view of ceiling where the beams join. (the wire is for the future van spot lights.)
Image

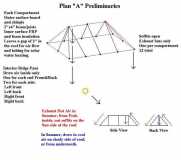
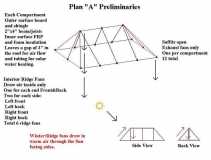
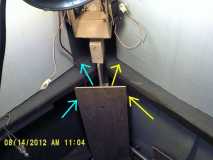
The Design of the air ducting. two end compartments to the end fan, two side compartments to a side fan. roof beams shown.
Image

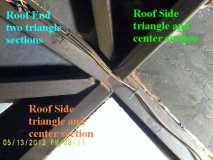
I was going to do the ducting in the same material used for the inner surface, what is used these days for psuedo-hard-wood-flooring, a highly compressed fiber like material (very dense and hard) but it was too hard to work with so I switched to cardboard and I'll either use that for the patterns of the final pieces or I'll just paint them with polyurethane for water proof and added stiffness. This shows the channeling for the end two sections into the single point, and the separate side triangle sections to get channeled in with their perspective side square areas.
Image

this shows an actual full sized "end cap" in place and the routes of the air flows.
Image

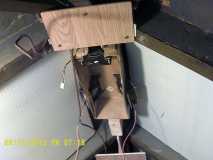
So I needed to make a combining "register box" that had a fan on the end and a fan on each side for input into the register.
(wire frame view.) The box would then be bolted to the center-line beam on top and the bottom would be open for the register/vent.
Image

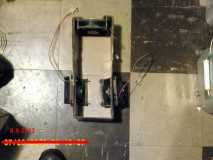
bottom view, assembled with fans.
Image

Bottom view, assembled with register in place, 3 air flows displayed.
Image

one register box mounted and interfaced with the end ducting, and cap
Image

various air flows diagrammed
Image

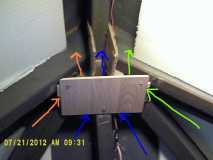
A ceiling register cover plate in place and more surrounding air flows diagrammed. This shows just the "along the side" air flow paths. Second box for the other end is installed. Note the divider coming down from the roof center-line beam to restrict the side to side cross ventilation, but just guide the air flows along the individual sides. One will be in the sun and the other in the shade, probably, unless the sun is overhead.
Image

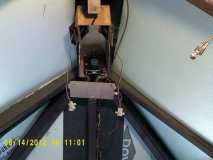
ok, the box at the near end ceiling.
Image

this then is the final view with the registers installed in their cover plates, with the side compartments having their covers in place and the end spot lights installed.
Image

So that is the air flow ducting system.
Next comes either the water system installation (for hot water heating, summer only) or the electronic circuits to automate this entire system. (already built, just not wired in yet.) I'll include a fine breakdown and schematic for anyone who wants to do that wiring themselves, also.
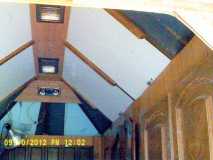
Elf Cottage
Image

Build Documentary
https://sites.google.com/site/pchistorian/home/hobby/camping/elf-build
Build Forum
http://www.tnttt.com/viewtopic.php?t=48462
Build Album
http://www.tnttt.com/gallery/album.php?album_id=42

progress is progress. (don't look a gift "progress" in the mouth.)
User avatar
PcHistorian
The 300 Club
 
Posts: 354
Images: 198
Joined: Fri Dec 09, 2011 1:06 pm
Location: S.E. Michigan
Top

Re: Elf Cottage interior build/renovation

Postby PcHistorian » Thu Feb 28, 2013 6:09 pm

ok, next comes the water jacket part of the roofing solar system.
What this entails is a layer of small water hoses in loops to take up heat in the ceiling space, that is coming in on the sunward side. (this is only going to be water in the summer. It will be emptied come winter. (probably by pressurized air)

Let's start with the arrangement of the water tanks. The water tanks will be made from 6 inch diameter PVC or water safe pipes, capped and with hose fittings, and mounted between frame sections under the trailer, in front of and behind the axle. (Fresh hot and cold water in front of the axle, and the grey water behind the axle.
Image

Next comes the fill and pump arrangement(s) for the supply tanks. Note that there are three pumps, one for hot, cold and solar heating the water. And, that there is a return for the heated solar water back to the hot storage tanks.
Image

Then we see the 6 loops of hose in the upper part of the trailer. Two loops go around the top of the walls, one is a pressurized cold water feed and the other is the hot water return. Then there are four loops, one for each side of the roof. By doing it this way I don't run hot water through cold sides of the roof as a single huge loop, or requite 4 pumps, on for each side of the roof. Which ever side(s) are warm or hot from the sun, then a latching valve for that section of roof is opened to supply that loop with water. These valves latch open or closed so that continuous 12vdc power is not needed, just a short pulse to open or close the valve. A little bit more cost up front but big savings in power over the life time. The solar heating pump is not to be run continuously either. It will only pump to flush and refill the sun side with cold water then let it heat, before purging the hot water down to the tanks and refilling again with cold water. That approach also saves on pumping electricity.
Image

Then we look at the layering of the roof sections from the outer shingle side of the roof to the inner ceiling surface inside. Originally there was just shingle, a surface of 1/2 inch particle board and the inner roof beams.
Image

The plan here is to put a layer of small water hose in loops surrounded with air gaps, so both air and water can flow through the sun heated roof compartments. these also serve to absorb the heat that would normally radiate into the trailer. So I can either draw the hot air of this compartment into the trailer to heat it, or push it out the sofits to cool the interior, by bring in shady air from the other side. Inside of the air/water layer is a layer of insulation to help control the heat or cold from outside of the trailer. (if winter then this keeps the cold of the shady side insulated from the interior, while I draw in the warm air. Or it keeps the hot air out on the sun side in the summer, there-by keeping the interior cooler.
Image

And lastly I have a diagram for the proposed looping of the hose. I want to keep the hose layers thin to conserve any other space that I might have in the ceiling, so just two thicknesses of hose are as deep as the hose layer goes.
Image
Elf Cottage
Image

Build Documentary
https://sites.google.com/site/pchistorian/home/hobby/camping/elf-build
Build Forum
http://www.tnttt.com/viewtopic.php?t=48462
Build Album
http://www.tnttt.com/gallery/album.php?album_id=42

progress is progress. (don't look a gift "progress" in the mouth.)
User avatar
PcHistorian
The 300 Club
 
Posts: 354
Images: 198
Joined: Fri Dec 09, 2011 1:06 pm
Location: S.E. Michigan
Top

Re: Elf Cottage interior build/renovation

Postby PcHistorian » Thu Mar 14, 2013 2:25 pm

So, does all this seem "above and beyond the call of duty," yes. "Gone where no one has gone before," sure! But, remember I bought the shell and pretty much had only to cut holes in the walls, put on cabinet doors and in some shelves, and run a few wires and attach some lights. SO, to really personalize it and "DO" something uniquely myself with it, I am.
Elf Cottage
Image

Build Documentary
https://sites.google.com/site/pchistorian/home/hobby/camping/elf-build
Build Forum
http://www.tnttt.com/viewtopic.php?t=48462
Build Album
http://www.tnttt.com/gallery/album.php?album_id=42

progress is progress. (don't look a gift "progress" in the mouth.)
User avatar
PcHistorian
The 300 Club
 
Posts: 354
Images: 198
Joined: Fri Dec 09, 2011 1:06 pm
Location: S.E. Michigan
Top

Re: Elf Cottage interior build/renovation

Postby WhitneyK » Thu Mar 14, 2013 3:07 pm

PcHistorian wrote:So, does all this seem "above and beyond the call of duty," yes. "Gone where no one has gone before," sure! But, remember I bought the shell and pretty much had only to cut holes in the walls, put on cabinet doors and in some shelves, and run a few wires and attach some lights. SO, to really personalize it and "DO" something uniquely myself with it, I am.


Is all the extra plumbing necessary? THAT is for you to decide. If your camping needs require you to have access to water and have found a way that will hopefully heat it as well (refering to boondocking style), then go for it. Our campers are of our own design and needs. Most of us are not going into production with them, so they are all uniquely customized to our needs / wants / desires / whim's.

I like the idea of the pvc pipe underneat for water storage, was actually considering that myself. :thumbsup:

One concern I would have with the ceiling plumbing is making sure that it is all sloped to a point of easy drainage. Air can blow most of the water out, but there is that opertunity for the remaining water and / or moisture to collect in the bottom of the loop. You live in MI, so, unless it's in a heated area, it's gonna freeze.

So, are you being too unique? We all are my friend, we all are. Uniqueness is what brings us together on the forum, to gather and gleen ideas from each and every one of us in our own odd turned little ways.

OK, so now I will end my ramblings, and of course, these are just my opinions, although they may not be honost ones, they're still mine. :? ;)

Good day and good luck. :D
Whitney & Tracie
Crothersville, IN

We never really grow up, we only learn how to act in public.

Do not confuse what you hear with what I mean.

My build: http://www.tnttt.com/viewtopic.php?t=41955

160061-------------------------------101114
States we've drug our
li'l camper through. (44 States + Vancouver Island and over 45,000 miles so far)
User avatar
WhitneyK
Gold Donating Member
 
Posts: 559
Images: 412
Joined: Sun Dec 12, 2010 10:28 pm
Location: IN, Crothersville (36mi N or Louisville)
Top

Re: Elf Cottage interior build/renovation

Postby PcHistorian » Thu Sep 05, 2013 7:10 pm

Well now I'm agonizing over the diameter of the roof hose to use, (ID) so that I can bend it and it will never kink under heat. I've considered down to 1/4 inch inner diameter, but it would need several parallel hoses to build up to the 1/2 inch for the pump output.

I think I may just have to use the "slouched/flattened coil" idea. If I make a perfect tower coil of the hose, and then topple it over and flatten it a bit that should be around right. With 1/2 inch outter diameter hose and then that coiled double thickness, that would give me 1" of depth. Another 1/2" for insulation on the inside, still leaves me with 2" depth of the 3.5" depth of the 2x4 stud walls and roof joists.

That is because of my worry that the smaller bends would get heated and end up a kink that would shut off the flow... Challenging to think into the future, go camping with it 10,000 times, decide how it worked for those 10,000 times and the fixes, then re-engineer it, and go through another 10,000 trips, etc.... til I finally get it right, then come back to the present and build the final design first. LOL (sounds great but we'll see how that works in practice...)

I am also deciding to make a single loop of hose on the wall top, have a basic "T" connector for the roof loop outputs and the latching valve 2 way for the roof loop inputs. I wanted to try to have cold water coming into each roof loop at an equal temperature and then hot water coming out of each roof loop at an equal temperature, instead of the warm output of one loop going into the next loop, because then one loop will be the constant coolest roof loop and one loop will be the constant hottest roof loop. I don't know if that is good or bad. LOL Hot water coils though will soften the hose, so I need to put it at a neutral, tightly controlled angles for that relaxed state. Too sharp an angle and not controlled positioning enough and the kink will be in and block the pump.

the order seems to be, put in the tanks. (3.5' long of 6" diameter pvc. undercarriage. now that I have it 6" higher from the ground.) Then go sink and pumps. Then add in the water heating system. No sense doing it in the reverse order... Although I'd like to get the ceiling compartments finalized so I can start using them for storage with the left over space...
:?
Elf Cottage
Image

Build Documentary
https://sites.google.com/site/pchistorian/home/hobby/camping/elf-build
Build Forum
http://www.tnttt.com/viewtopic.php?t=48462
Build Album
http://www.tnttt.com/gallery/album.php?album_id=42

progress is progress. (don't look a gift "progress" in the mouth.)
User avatar
PcHistorian
The 300 Club
 
Posts: 354
Images: 198
Joined: Fri Dec 09, 2011 1:06 pm
Location: S.E. Michigan
Top

Re: Elf Cottage interior build/renovation

Postby PcHistorian » Thu Oct 10, 2013 6:49 pm

now I wonder if I shouldn't just put in the heating loops so as to..... have it as an antifreeze system that the heat transfer stays filled year round but drain the water tanks in the winter. I am realizing I do not know much about the actual practice of using the water systems of RV's. Anyone suggest "a complete guide to the building, repair and maintenance of an RV water system" manual or guide book?

I think I'll go on to the 12v system, 110v inverter, interior led lighting, USB-charging, and the ceiling interior refinements.

At least at the front I have decided to have the corner covers (front and side) hinge down on chains in a drawbridge / storage arrangement, sort of, for those front ceiling triangular cover hatches. I did want to put hard screw eyelets in the corners where I couldn't gash my head open on them, for clothes hangers, and then put velcro straps on the side-ceiling middle braces where softer head impacts may occur. (and get those damn cover guides working right. (made them too long for the flexibility of the covers...)

I do have the kitchen sink to do now also. I also do have the faucet and switch thanks to the CRA-2013 silent auction. :-) I suppose I'll have to make a side switch for cold or hot water though, to come out. Cold is ambient cold, and hot is as hot as the passive solar heating will take it.

happy sawdust trails to all. (I thought that was "magic elf dust", hihn!)
Elf Cottage
Image

Build Documentary
https://sites.google.com/site/pchistorian/home/hobby/camping/elf-build
Build Forum
http://www.tnttt.com/viewtopic.php?t=48462
Build Album
http://www.tnttt.com/gallery/album.php?album_id=42

progress is progress. (don't look a gift "progress" in the mouth.)
User avatar
PcHistorian
The 300 Club
 
Posts: 354
Images: 198
Joined: Fri Dec 09, 2011 1:06 pm
Location: S.E. Michigan
Top

Re: Elf Cottage interior build/renovation

Postby rebapuck » Fri Oct 18, 2013 11:58 pm

Harry Potter is one good description. Snoopy's doghouse is another.
Judy
1966 VW camper
1967 VW singlecab
Image
User avatar
rebapuck
.
 
Posts: 2243
Images: 1
Joined: Thu May 14, 2009 1:55 pm
Location: Chapel Hill NC
Top

Re: Elf Cottage interior build/renovation

Postby PcHistorian » Tue Nov 12, 2013 11:32 am

@rebapuck Snoopy's exterior, Harry's interior. I figure it is about 2x larger inside than it looks like from the outside. Most people don't consider the sloping roof to add ANY room to the interior, much like their attics at home, so that it must be barely 2.5 feet high inside, just the base. In actuality, unless you try to bang your head against the wall, there is full head room for any where you put your body on the main/first floor. Designed for cross legged sitting against all walls, unless your legs are shorter than 40", then you can stretch them out straight. With 4 people playing cards and alternating side walls to lean against (or one at the front) there is plenty of air as the window has a screen and is double hung. Play cards... (OH! Maybe I can make the window INTO a door! That would be cool! @rebapuck you are genius catalyst. )

I have also bee considering a loft room, run 2x2's along the side walls for 6' from the front and have pipes woven with ribbons so that they make a bed but roll up, that still leaves 2' of crawl in and out space at the foot of the trailer, that doesn't disturb the down stairs sleepers in the master bedroom. So then I get a loft. The van lights at the ceiling peaks fore and aft are already set up for the loft. Light switch down stairs is 3 way Lighted, so that when I shut off the lights down stairs the switch is then a night light. About 30" of height downstairs. Plenny for any astronaut type used to small spaces. Cozy even. :-)

One alternative for the loft is a hammock with the screws into the roof studs fore and aft. Enh...?

I just haven't figured out the fireplace yet...
:(
(the bowling alley and the racquet ball courts go in the basement)
:twisted:
:D
Elf Cottage
Image

Build Documentary
https://sites.google.com/site/pchistorian/home/hobby/camping/elf-build
Build Forum
http://www.tnttt.com/viewtopic.php?t=48462
Build Album
http://www.tnttt.com/gallery/album.php?album_id=42

progress is progress. (don't look a gift "progress" in the mouth.)
User avatar
PcHistorian
The 300 Club
 
Posts: 354
Images: 198
Joined: Fri Dec 09, 2011 1:06 pm
Location: S.E. Michigan
Top

Previous

Return to Build Journals

Who is online

Users browsing this forum: No registered users and 26 guests