Re: The Pup's Penthouse - 7/17/12 - Flooring

...ask your questions in the appropriate forums BUT document your build here...preferably in a single thread...dates for updates, are appreciated....

Postby absolutsnwbrdr » Mon Jun 20, 2011 8:23 am

Welcome back! You've definitely been busy!!
Zach
Coming Soon...
Image Image
User avatar
absolutsnwbrdr
Donating Member
 
Posts: 2657
Images: 412
Joined: Mon Jan 25, 2010 6:10 pm
Location: Hanover, PA

Postby Cliffmeister2000 » Mon Jun 20, 2011 1:27 pm

Nice progress! Welcome back! :thumbsup:
God Bless

Cliff

♥God. ♥People.
1 John 4:9-11

My Teardrop build pictures
User avatar
Cliffmeister2000
Titanium Donating Member
 
Posts: 3622
Images: 157
Joined: Thu Jul 26, 2007 10:18 pm
Location: Phoenix, AZ

Postby synaps3 » Fri Jun 24, 2011 10:34 pm

Thanks for the welcome back. :thumbsup:

I did a bunch of work today.

I finished insulating the inner roof and installed the inner roof panels:
Image

Next, I finished skinning the rear panel, which involved putting on luaun, securing it, then using my flush trim bit on the router to get the door opening perfectly flush:
Image

Then, I built the back door. Here is me figuring out how to do so (my fiancee took the pic):
Image

She took another of me building it:
Image

I built a frame out of 1x3s, sized to fit the extra window I had, and built it. Here is the frame after I insulated it:
Image

And here is the other side, with the window mocked up:
Image

The door construction was the same as the rest of the camper. I've developed a basic build strategy for building light and strong:
1. Construct frame out of 1x3's. Use primarily pocket screws using my Kreg jig
2. Rough out luaun plywood, attach to the back, and trim to fit the edges using the flush trim bit.
3. Flip the part over, insulate.
4. Rough out luaun plywood on the other side, attach, and trim to fit the edges again using the flush trim bit.

The last thing I did today was add a second layer of luan ply to the roof. I did the top of the roof carefully, but got a bit precarious when I was closer to the ground. My fiancee called me out on it, and called me an idiot for it. Rather than helping, she took a picture...
Image

And another:
Image

Then came the video of me busting my ass (she was right, as usual):
http://www.youtube.com/watch?v=3nA8CGIlb7A

I was low to the ground, so I just got a scratch:
Image

Despite my injury, I finished the job. I'm ready to seal now, and would have tonight, if it weren't for the rain coming right after I finished.

Here is what the trailer looks like now, before sealing it:
Image

Image

Image

And from on top the roof:
Image
-- Dave

Build log: here
User avatar
synaps3
The 300 Club
 
Posts: 433
Images: 254
Joined: Sun Nov 08, 2009 1:09 am
Location: Marietta, GA
Top

Postby CliffinGA » Sat Jun 25, 2011 5:06 am

Looks great Dave! Love the shape your trailer has taken!

Cliff
In God we trust, shoot the rest and he will sort out!

My Build:

viewtopic.php?f=50&t=42628
User avatar
CliffinGA
1000 Club
1000 Club
 
Posts: 1499
Images: 207
Joined: Sat Nov 14, 2009 1:29 pm
Location: Jefferson, GA
Top

Postby synaps3 » Sat Jun 25, 2011 10:07 pm

I started my day today by finishing the rear door.

I needed to finish cutting out the other side of the door, so I drilled holes around each edge:
Image

Put my router with the trim bit through:
Image

Making sawdust:
Image

Image

And done:
Image

The last thing I needed to do before starting to seal was build the doorframe:
Image

Image

I couldn't resist mocking the door up:
Image


Next, it was time to start sealing. I'm using Titebond II:
Image

Titebond II is awesome because it is nontoxic, cleans with water, and dries completely waterproof. I watered it down, mixing 2 parts Titebond, 1 part water for the base coat:
Image

Thoroughly mixed, ready to apply:
Image

I applied using a standard paint roller:
Image

I started with the door:
Image

Here's before / after applying:
Image

Once the door was done, I started sealing the roof (with a skeptical look on my face):
Image

Roof almost done:
Image

One side done:
Image

Other side done:
Image

Once the base coat was mostly dry (it dries clear), I began the "ghetto fiberglass" process.

Step one: Take a sheet, mine were about 1'x3':
Image

Step two: Dip the sheet in thinned down Titebond II, I used a 1:1 water : titebond mix:
Image

Step three: Squeeze out the excess:
Image

Step four: Apply to surface, smoothing it in place:
Image

Step five: Squeeeeze out all the bubbles:
Image

And done:
Image

Repeat until done (I've still got a long way to go :lol: ) :
Image

I would have finished, but it started to rain. :cry:

I'll finish tomorrow though, assuming the weather cooperates.

And here is an obligatory dog pic:
Image
-- Dave

Build log: here
User avatar
synaps3
The 300 Club
 
Posts: 433
Images: 254
Joined: Sun Nov 08, 2009 1:09 am
Location: Marietta, GA
Top

Postby synaps3 » Sat Jun 25, 2011 10:11 pm

Oh, and if you use Titebond, WEAR GLOVES, it will turn your hands yellow:

Image


Edit: here is a quick video of how to lay Titebond II that I uploaded: http://www.youtube.com/watch?v=rjwW3308Ah0
-- Dave

Build log: here
User avatar
synaps3
The 300 Club
 
Posts: 433
Images: 254
Joined: Sun Nov 08, 2009 1:09 am
Location: Marietta, GA
Top

Re: The Pup's Penthouse

Postby synaps3 » Fri Feb 17, 2012 2:56 pm

I've been out camping and living life, too busy to get back here and update. :D

It's starting to thaw out finally though, so I'm getting the build bug again. I'm going to start working on the interior and improving the looks of the exterior... But first, I'll catch you guys up.

I finished all the tightbonding, and painted over the whole trailer with aluminized roof paint for the time being. It's ugly, but functional, and we've already made 4 trips using the camper in its half-built state.

Backing into our campsite at St. Joseph Peninsula State Park in Florida:
Image

A bit closer up:
Image

Side view:
Image

Back (we brought the scooter along):
Image

The only pic of the inside I have... It's still unfinished, so you're not missing anything. :lol:
Image

She doesn't leak, and tows straight. Fully loaded, with the scooter inside, I got roughly 14mpg on the trip down. :NC I think I'll get better gas mileage with my new truck though (2006 Ford Ranger Edge v6). I'll have to bring myself to disconnect my dirt bike first though:
Image


My friends have dubbed the camper fugly ("D#%N, that thing is F*&@ing UGLY!") I think there's a lot of potential to pretty her up, but I need to get the surface smoothed with some bondo and paint. I'll probably paint to match my truck. But, since the ugly finish is functional, I'll probably at least build the interior before working on the outside.
-- Dave

Build log: here
User avatar
synaps3
The 300 Club
 
Posts: 433
Images: 254
Joined: Sun Nov 08, 2009 1:09 am
Location: Marietta, GA
Top

Re: The Pup's Penthouse

Postby absolutsnwbrdr » Fri Feb 17, 2012 3:25 pm

Ugly and functional is better than not functional at all! :lol:

The aluminized paint just gives it a rustic weathered look. Congrats on finally being able to go camping! :beer:
Zach
Coming Soon...
Image Image
User avatar
absolutsnwbrdr
Donating Member
 
Posts: 2657
Images: 412
Joined: Mon Jan 25, 2010 6:10 pm
Location: Hanover, PA
Top

Re: The Pup's Penthouse

Postby synaps3 » Thu Feb 23, 2012 10:39 pm

Thanks for the congrats, I appreciate the encouragement. :)

I worked a few hours today and yesterday on the interior, framing out the bathroom and cabinets. Rather than make the cabinets outside and bring the frames in, I just built them in place to save weight. Please excuse the poor picture quality, I seem to have misplaced my camera, so all these were taken from my cell phone.

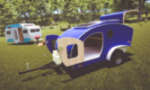
Here's where my standie has been living:
Image

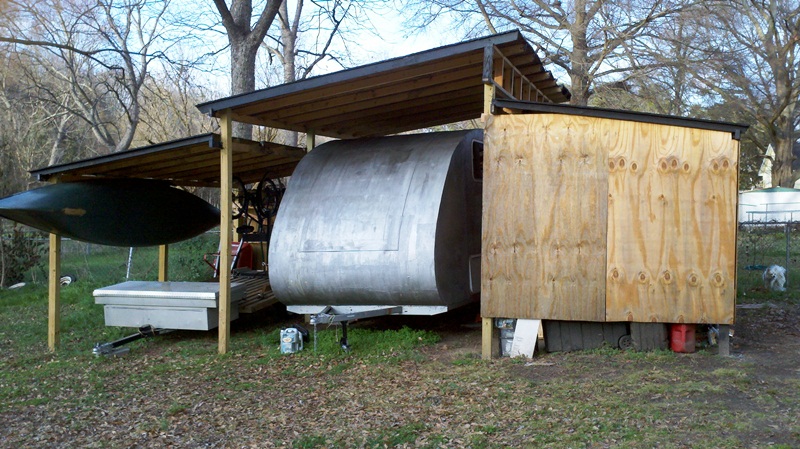
I built this carport at the end of last year, you can kinda see it in the updates from the end of last summer. Anyways, I made one of the stalls into a workshop:
Image

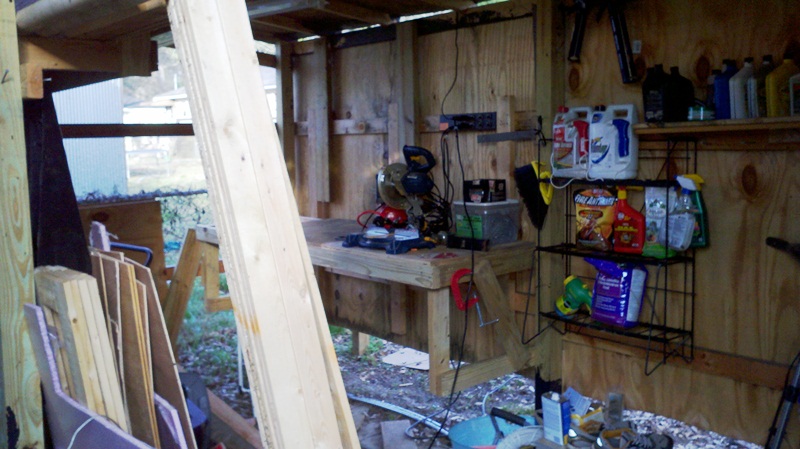
The whole place is a giant mess, but I'd rather build while we have nice weather than organize my tools, especially because we're getting a bigger house in a year or so. My wife's already talking about kids, so gotta get a bigger house soon. :shock: Our current house is under 800 square feet, with 2 bedrooms and one bath. I've seen campers bigger than our house! :lol: We could afford a bigger house now, but I don't want to have to pay two mortgages. We need to hold on to the house we are in now for another year and 3 months to keep the $7500 first-time homebuyer's credit we got back in 2010, then sell it and get a new one. For the next house, I have gotten her to agree to letting me buy a house on a lot of land... More space for toys, and the mandatory giant workshop / mancave. I can't wait. :twisted:

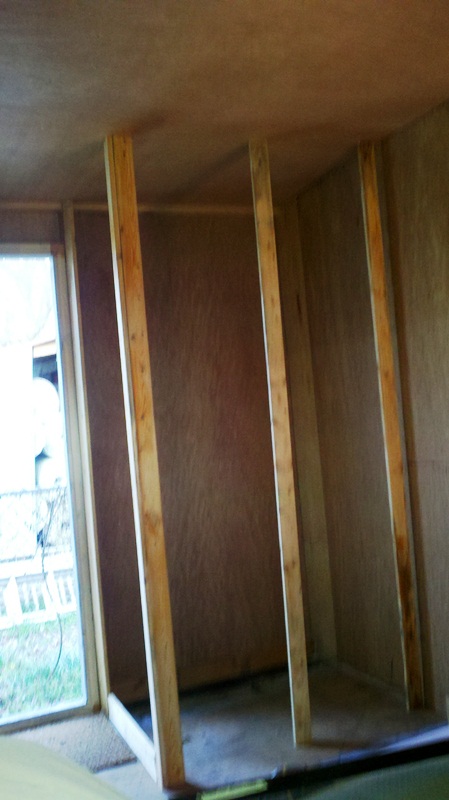
Back on topic though, I went inside and framed up the bathroom. It only took an hour or so:
Image

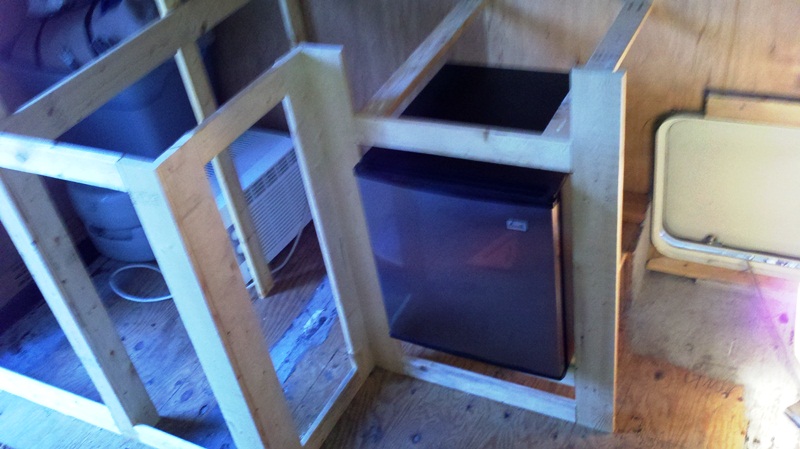
Then I started framing the cabinets. Don't mind the dog. :lol:
Image

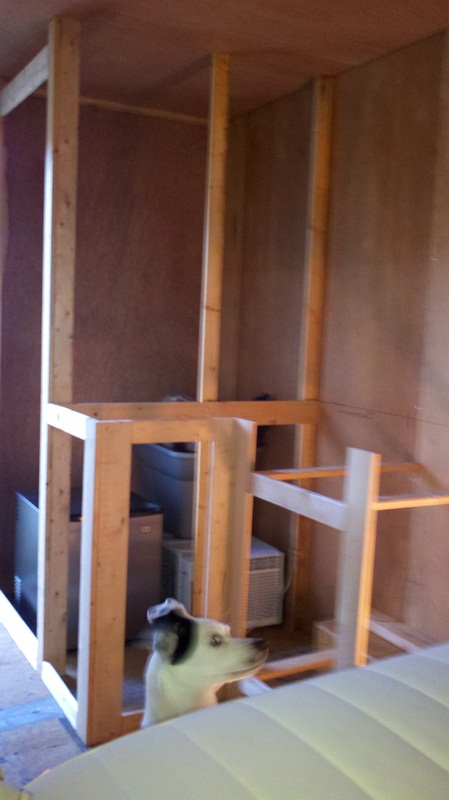
Here's where the fridge will go:
Image

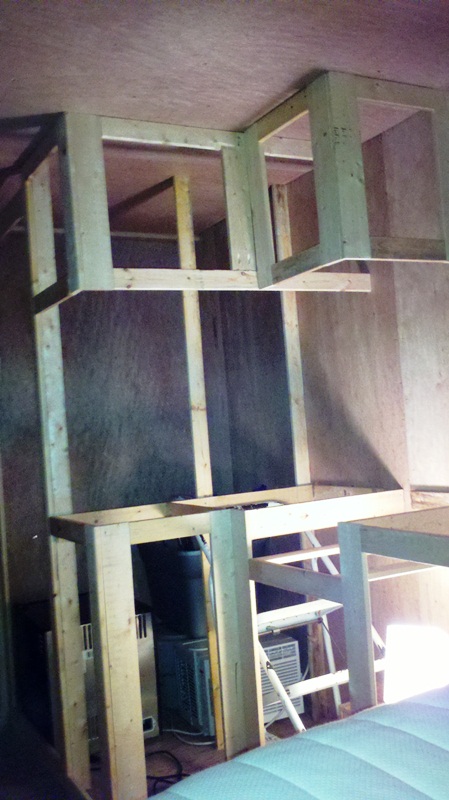
I added a bit more length to the lower cabinets, and then made the upper cabinets:
Image

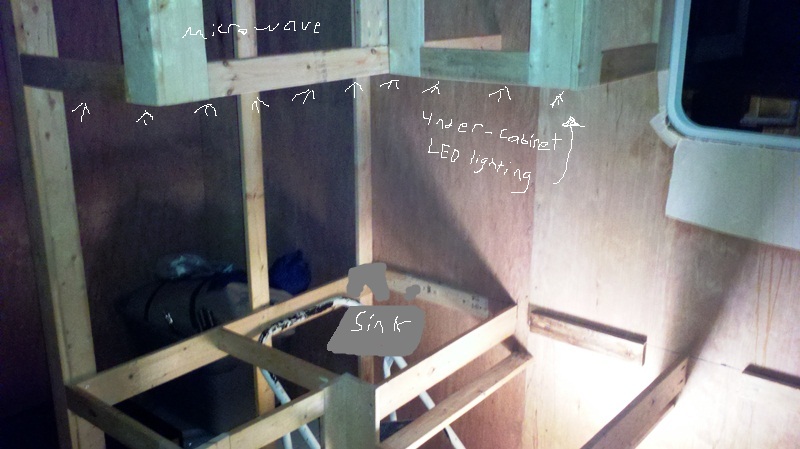
Here's a close-up of the lower and upper cabinets, complete with MS paint annotations of what will go where. There will also be a point-of-use hot water heater underneath the sink, providing hot water to both the sink and shower. The LED undercabinet lighting will be white LED lighting that I bought after Christmas for $1 a strand. I bought all 6 strands, and will use 2 as under-camper lighting to illuminate the ground around the camper, 2 as under-cabinet lighting, and the last 2 for interior lighting elsewhere. Still not sure what I'm going to do for lighting in the shower, but I'll figure that out...
Image

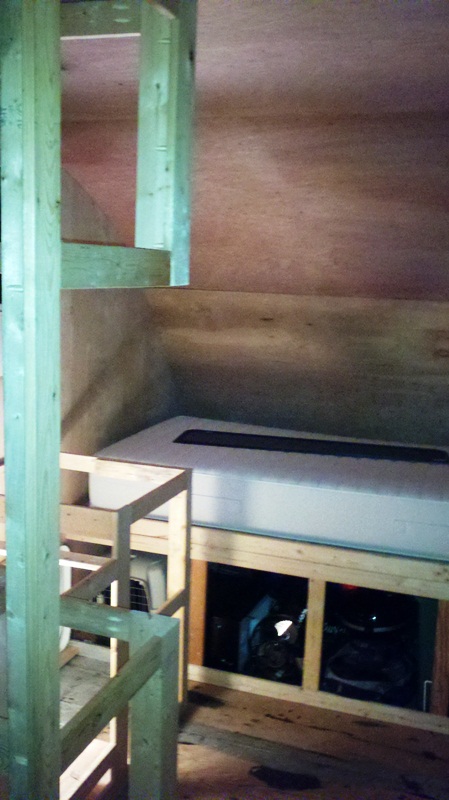
Finally, here is the view from just when you walk in the door. Off to the left (not pictured) is where the shower door will be. I'll use a nice shower curtain as the shower "door" to save weight.
Image

Weather and time-permitting, I'm going to work on the interior more this weekend. The interior will be mostly white, with cabinet doors and accents made of wainscoting for a bit of texture.
-- Dave

Build log: here
User avatar
synaps3
The 300 Club
 
Posts: 433
Images: 254
Joined: Sun Nov 08, 2009 1:09 am
Location: Marietta, GA
Top

Re: The Pup's Penthouse

Postby eaglesdare » Fri Feb 24, 2012 6:47 am

i like your build very much. love the ghetto fiberglass! :applause: :wine:
Louella
May the foam be with you.
User avatar
eaglesdare
Donating Member
 
Posts: 3168
Images: 13
Joined: Tue Aug 26, 2008 7:06 pm
Top

Re: The Pup's Penthouse

Postby Martiangod » Fri Feb 24, 2012 8:46 am

Such a cool look, Keep coming back and going through the thread,
Your doing an awesome job.
I could see that profile on a manufactured trailer, its just so cool lookin...carry on :thumbsup:
If it ain't broke, fix it till it is

Chris

Deep in the Heart of Nowhere
The topper viewtopic.php?f=50&t=58140, gone to a new home to be converted
into an ice fishing shack...FREEBIE !!! for a nice young family
The trailer viewtopic.php?f=50&t=48156
User avatar
Martiangod
500 Club
 
Posts: 856
Images: 432
Joined: Mon Jan 09, 2012 10:39 pm
Location: Peace River, Alberta
Top

Re: The Pup's Penthouse - 2/24/12 - Cabinetry

Postby synaps3 » Fri Feb 24, 2012 7:24 pm

I'm looking for ideas for paint...

Here's the driver side profile:
Image

Passenger side profile:
Image

Front:
Image

Aaaand back:
Image


Here's what I came up with after a few minutes tinkering in paint:
Image
But I don't entirely like it... It's the best I can come up with though. :lol: I have no clue what I'm doing when it comes to paint. I'm hoping someone more creative will have a better idea... I'll ask my wife for input tonight though. Either way, if you have any ideas, feel free to contribute. I always love asking the community for ideas, someone always has a concept that is better than what I could come up with on my own. :thumbsup:

Edit: Some details on the paint... I'd like to keep it mostly white. The chassis at the bottom will be black no matter what, I'm going to use bedliner paint for that. Otherwise, I'm open to ideas. :D
-- Dave

Build log: here
User avatar
synaps3
The 300 Club
 
Posts: 433
Images: 254
Joined: Sun Nov 08, 2009 1:09 am
Location: Marietta, GA
Top

Re: The Pup's Penthouse - 2/24/12 - Cabinetry

Postby Martiangod » Fri Feb 24, 2012 10:23 pm

Image
If it ain't broke, fix it till it is

Chris

Deep in the Heart of Nowhere
The topper viewtopic.php?f=50&t=58140, gone to a new home to be converted
into an ice fishing shack...FREEBIE !!! for a nice young family
The trailer viewtopic.php?f=50&t=48156
User avatar
Martiangod
500 Club
 
Posts: 856
Images: 432
Joined: Mon Jan 09, 2012 10:39 pm
Location: Peace River, Alberta
Top

Re: The Pup's Penthouse - 2/24/12 - Cabinetry

Postby Martiangod » Fri Feb 24, 2012 11:25 pm

or predominatly white

Image
If it ain't broke, fix it till it is

Chris

Deep in the Heart of Nowhere
The topper viewtopic.php?f=50&t=58140, gone to a new home to be converted
into an ice fishing shack...FREEBIE !!! for a nice young family
The trailer viewtopic.php?f=50&t=48156
User avatar
Martiangod
500 Club
 
Posts: 856
Images: 432
Joined: Mon Jan 09, 2012 10:39 pm
Location: Peace River, Alberta
Top

Re: The Pup's Penthouse - 2/24/12 - Cabinetry

Postby Martiangod » Sat Feb 25, 2012 12:40 am

Image

Image

Image

The black was a bit much
If it ain't broke, fix it till it is

Chris

Deep in the Heart of Nowhere
The topper viewtopic.php?f=50&t=58140, gone to a new home to be converted
into an ice fishing shack...FREEBIE !!! for a nice young family
The trailer viewtopic.php?f=50&t=48156
User avatar
Martiangod
500 Club
 
Posts: 856
Images: 432
Joined: Mon Jan 09, 2012 10:39 pm
Location: Peace River, Alberta
Top

PreviousNext

Return to Build Journals

Who is online

Users browsing this forum: No registered users and 13 guests