GOT IT DONE!!!!! (Yea right, we've heard that before)

...ask your questions in the appropriate forums BUT document your build here...preferably in a single thread...dates for updates, are appreciated....

Postby down under tech » Thu Apr 01, 2010 8:03 pm

Hi sagebrush: I really like the diamond pattern you have choosen for the inside walls of your TD.

Image

It is looking good and you are in hyper-drive with your build.

P.S. Keep it up !!!
Johnny D.

"If you think you can, you can. If you think you can't, your right !" ... Henry Ford

"The Silver Nugget" Build
viewtopic.php?t=35314&postdays=0&postorder=asc&start=0
User avatar
down under tech
Silver Donating Member
 
Posts: 565
Images: 571
Joined: Sat Feb 06, 2010 10:01 pm
Location: Reno, Nevada

Postby Kixwy2 » Fri Apr 02, 2010 1:59 am

Looks good!

And I love your little helpers!

***TOTAL HIJACK***

Here's my little booger - love him to death. He "helps" too...


Image
User avatar
Kixwy2
Teardrop Advisor
 
Posts: 68
Images: 14
Joined: Mon Jun 15, 2009 12:26 am

Postby sagebrush » Mon Apr 05, 2010 8:57 pm

Well....... I got the skin on the sides and..... Lovely Assistant looked at the mill finish aluminum and stated " That doesn't work for me" :( :cry: :shock: :? :oops: :cry: :roll:
I knew polished wouldn't work for me ( TOO MUCH WORK FOR ME :thumbdown: 
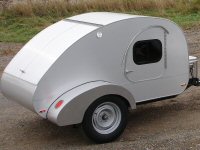
)....... Paint was out.... :thinking:
So here is our compromise.
Image
Whatcha think? :thumbsup: :thumbdown:

Here is a closeup.
Image

Image
Here I am starting on the other side. ALWAYS wear a dust mask when sanding or polishing aluminum !

Image
Here is what I used. Scotchbright 2" fine grit polishing disks on a 1 1/2" square grid.
Image
And another view of the jig clamped to side of trailer.
I'm going to do the top skin on the bench, HAS to be easier ( I hope!)
( Photos by LOVELY ASSISTANT)
More pics in album.
http://tnttt.com/album_personal.php
We ain't skeer'd of the dark!

Living large in a small way!
User avatar
sagebrush
Platinum Donating Member
 
Posts: 608
Images: 161
Joined: Tue Feb 23, 2010 9:09 pm
Location: Casper, WY.
Top

Postby Kixwy2 » Mon Apr 05, 2010 9:43 pm

I like! :D

At first I thought you recoated to a silver foil, but that's pretty awesome... lots of work though. Admire your patience with that!
User avatar
Kixwy2
Teardrop Advisor
 
Posts: 68
Images: 14
Joined: Mon Jun 15, 2009 12:26 am
Top

Postby perche » Mon Apr 05, 2010 9:43 pm

:thumbsup: :thumbsup: :thumbsup:

I really like that. Bet it'll look amazing with the colors of a sunset reflecting.
User avatar
perche
Teardrop Builder
 
Posts: 39
Images: 3
Joined: Fri Mar 26, 2010 4:25 pm
Location: NW Minnes(n)ota, USA
Top

I love it ......

Postby down under tech » Mon Apr 05, 2010 9:50 pm

Hi sagebrush: I love the engine turning you did on the sides. It looks great !!! :thumbsup:

I thought about doing this to my TD. I want to do just a small portion like the galley walls & counter top. I would use a 1" pad there. I didn't know how to do it to keep the lines straight. Any advise??? I saw you had a storyboard to use as a guide. More info. PLEASE. The 2" pads are the right size for the sides & top of your TD. This is a process that was popular in the 20s & 30s. You would see this on automotive dash instrument clusters of that era. You did a very nice job, sagebrush. :applause:

You need to get a product to seal the aluminum that I found out about yesterday on "Two Guys Garage". It is called "Sharkhide". http://www.sharkhide.com/index.html It is a clear sealer that will keep the aluminum just like it is now, new looking. It will keep it from dulling. I plan to use it on mine. It is a liquid that you wipe on in straight swipes from front to back in one motion and overlap the swipes until the sheet is covered. Check it out !!! Oh yeah, the rest of the TD looks great, too.


Looking Good, 8)
Last edited by down under tech on Wed Apr 07, 2010 6:31 am, edited 2 times in total.
Johnny D.

"If you think you can, you can. If you think you can't, your right !" ... Henry Ford

"The Silver Nugget" Build
viewtopic.php?t=35314&postdays=0&postorder=asc&start=0
User avatar
down under tech
Silver Donating Member
 
Posts: 565
Images: 571
Joined: Sat Feb 06, 2010 10:01 pm
Location: Reno, Nevada
Top

Postby High Desert » Mon Apr 05, 2010 9:55 pm

sagebrush, all I can say is WOW!!! 8) :thumbsup: 8) :thumbsup:
Image
that deserves a second posting!
Shaun

"it's not the years honey, it's the mileage"
High Desert
Platinum Donating Member
 
Posts: 8780
Images: 27
Joined: Wed Apr 08, 2009 1:46 pm
Location: SW Washington state
Top

Postby GreatPumpkin » Mon Apr 05, 2010 11:52 pm

Image


Awesome looking! I was about to ask where you got it and how much, but scrolled down and saw the answer. I really like that look, but probably don't have the patience to do it myself. How long did it take for each side?

GP
Custom Benroy/Grunman/Hybrid...In Progress
2001 Dodge Ram 1500
2001 Honda XR650R

"In regione caecorum rex est luscus." GP
User avatar
GreatPumpkin
Teardrop Master
 
Posts: 124
Images: 5
Joined: Sun Oct 11, 2009 12:47 am
Location: Colville, WA
Top

Postby sagebrush » Tue Apr 06, 2010 8:21 pm

Thanks for the feedback. We are very pleased with the way it is looking!
:D :)
Great Pumpkin it took a good solid 6 hours to do the side with the door, am still working on the window side. Definitely not a quick project! Get in a hurry then go back to fix screwups.

Down Under Tech, here are some pics I hope will help. Dimensions are for 2" pads, 1 1/2" grid. Adjust yours accordingly.
Image
Here is end view of the jig that I made to keep everything in line. Nuttin special just scraps of plywood. Had to cut relief in corner to clear pad.
Image
Here is cutting slots in top of jig. Mine were 9/32" wide 1 1/2" centers and 1/2" deep. Just a little loose for the 1/4' shaft of the arbor.
Image
I made it 3" from edge to center of arbor ( 2x 1 1/2") Not critical just easier for working either direction on layout marks. Be sure to make distance from last slot to end the same on both ends for same reason.
Image
Here is how it looks on a practice piece. Good idea to practice on scraps first. I made marks every 1 1/2" on edges with a graphite pencil and moved jig for each row. Start at corner work your way across. Check for quality. Repair screwups. Move jig. Start at begining edge. Repeat as required to get to opposite corner. Now go have FUN!!!!!!
:thumbdown: Weather forecast is calling fot 4-8" of wet and sloppy snow tonight so tomorrow will be a good TD construction day! :thumbsup: :thumbsup:
We ain't skeer'd of the dark!

Living large in a small way!
User avatar
sagebrush
Platinum Donating Member
 
Posts: 608
Images: 161
Joined: Tue Feb 23, 2010 9:09 pm
Location: Casper, WY.
Top

The picture is "Very Clear", now .

Postby down under tech » Tue Apr 06, 2010 8:45 pm

Sagebrush: A picture is worth a thousand words. Four pictures is a novel. And that is a novel idea. I always wondered how to do that "Now you know, the rest of the story". Good Day... I will give the first one of you who can put that quote to the person that said it a brand new shiny nickel !!! Yeh, I'm a cheap skate at times. But, I am building a TD trailer. You understand, don't you? This novel will help others if they choose to spend 12 hours in this endeavor. I bet some of you will do just that. A couple of hours here and there and viola, a masterpiece.

I posted a product that I thought was called "Sharkskin" in my last post here. I was wrong about the name of the stuff. It is a metal sealer that will keep the metal looking like NEW.
It is called "Sharkhide". Check it out, here is the link to their website.. http://www.sharkhide.com/index.html

Thank you, Master. Wax on, Wax off, Danielson. Ok, I am done, but how will this help me ??? Hum ??? :thinking: :roll:
Last edited by down under tech on Wed Apr 07, 2010 6:30 am, edited 1 time in total.
Johnny D.

"If you think you can, you can. If you think you can't, your right !" ... Henry Ford

"The Silver Nugget" Build
viewtopic.php?t=35314&postdays=0&postorder=asc&start=0
User avatar
down under tech
Silver Donating Member
 
Posts: 565
Images: 571
Joined: Sat Feb 06, 2010 10:01 pm
Location: Reno, Nevada
Top

Postby parnold » Tue Apr 06, 2010 9:22 pm

Paul Harvey! "and now you know the rest of the story"
User avatar
parnold
Donating Member
 
Posts: 2344
Images: 302
Joined: Mon Feb 08, 2010 4:49 pm
Location: Northwest New Jersey
Top

Ding Ding Ding, We have a winner !!!

Postby down under tech » Tue Apr 06, 2010 9:31 pm

parnold: You are correct !!! To bad he passed away.:( I liked to listen to him at lunch time. Where would you like to have your nickel sent to? You can also pick it up in Sunny Reno, Nevada, but you can't put it in a nickel slot machine. You are responsible for your own taxes, if any are due by accepting this prize. :cry:
Johnny D.

"If you think you can, you can. If you think you can't, your right !" ... Henry Ford

"The Silver Nugget" Build
viewtopic.php?t=35314&postdays=0&postorder=asc&start=0
User avatar
down under tech
Silver Donating Member
 
Posts: 565
Images: 571
Joined: Sat Feb 06, 2010 10:01 pm
Location: Reno, Nevada
Top

Postby parnold » Tue Apr 06, 2010 9:35 pm

Where would you like to have your nickel sent to?


Just hang on to it, I'll look you up next time I'm out your way.
User avatar
parnold
Donating Member
 
Posts: 2344
Images: 302
Joined: Mon Feb 08, 2010 4:49 pm
Location: Northwest New Jersey
Top

Postby sagebrush » Sun Apr 25, 2010 1:33 pm

Been busy with real job so progress has slowed considerably, but here are a few pics,

Image

We got the white skin on top, corner moulding and chip guard installed. The black insert on corner really sets it off. When I take the fenders off to mount taillights will get more/better pics of them.

Image

Nuttin' new in galley. Fenders are a tandem fender cut in two and angled to kindasorta match profile.
Got the door hung and swinging in the breeze.
Image
Here is the left side showing the window from Grant. Still need to install drip caps.
Thank you's to Mike,Grant and everyone else who has contributed to this project. Having more fun than I thought was possible with my boots still on!
We ain't skeer'd of the dark!

Living large in a small way!
User avatar
sagebrush
Platinum Donating Member
 
Posts: 608
Images: 161
Joined: Tue Feb 23, 2010 9:09 pm
Location: Casper, WY.
Top

Postby absolutsnwbrdr » Sun Apr 25, 2010 2:33 pm

Amazing looking!! Love the finish!
Zach
Coming Soon...
Image Image
User avatar
absolutsnwbrdr
Donating Member
 
Posts: 2657
Images: 412
Joined: Mon Jan 25, 2010 6:10 pm
Location: Hanover, PA
Top

PreviousNext

Return to Build Journals

Who is online

Users browsing this forum: No registered users and 13 guests