The Justintime: 6/21/11 update *interior finishing*

...ask your questions in the appropriate forums BUT document your build here...preferably in a single thread...dates for updates, are appreciated....

Postby Weirdnerd » Thu Nov 04, 2010 10:42 pm

Hi RockyMountainTeardrops, I used to build carbon fiber aircraft and could give you a hand, keep in mind that the vacuum systems are not cheap ( pump, harbor freight is about 90 bucks, and the fittings for the vacuum bagging/ vacuum hose will run you about 150 bucks or more) breather material, peel ply, elastic non stick bagging etc, can run you another 300 to 700 bucks, and knowing the difference between 0/45/90 degrees on the layup will save your sanity ( warping issues on specific configurations) I know it is attractive on the way of weight savings, and durability of the final product, but the cost of the final product would be very high, specially if you do a "one off", a better way ( cheaper and less headache) would be to use minimum thickness plywood, ( almost a veneer) and cover it with three layers of light weight fiberglass, no vacuum, only perforated peel ply to give it a " smooth finish", we could get together and talk about it.
This is my build thread...
Weirdnerd's teardrop
User avatar
Weirdnerd
The 300 Club
 
Posts: 318
Joined: Thu Sep 23, 2010 3:03 pm
Location: Denver, Co ( USofA)

Postby RockyMountainTeardrops » Fri Nov 05, 2010 1:55 pm

Miriam C. wrote:Actually if you leave that forward cabinet you will crack your head a few times

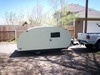
It's not as bad as it looks. The prototype camper has a forward cabinet, and while, yes, I did bump it a few times, the added storage space makes it worthwhile go ahead and refine the design.

Weirdnerd wrote:Hi RockyMountainTeardrops,

Please, call me Lee

Weirdnerd wrote:I used to build carbon fiber aircraft...... and knowing the difference between 0/45/90 degrees on the layup will save your sanity

Remember, I'm only worried about the pounds, not the ounces.
An extra 5 lbs of resin and fabric won't make any difference while towing, but would make a difference while flying (in fuel economy if nothing else)

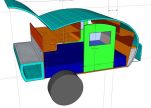
Current design is planned as making two shells, an inside and outside, separated by a 1" void to be filled by pour foam. (there are slow rise, easy expansion foams available) or a layer of boat foam (big $$$ there).
Still working on the layup schedule, but right at this moment, I'm thinking about three layers of 4oz for the outside, and perhaps a 10oz layer of woven roving on the inside. (covered by carpet for noise and condensation control)
Also considering a layer of Spraycore as a filler and structural core material.
Weirdnerd wrote:keep in mind that the vacuum systems are not cheap ( pump, harbor freight is about 90 bucks, and the fittings for the vacuum bagging/ vacuum hose will run you about 150 bucks or more) it.

Already gone there, have the pump from HFT and a control system from Veneer Supplies.
I'm starting this off with the full expectation and plan to make this a business, so right now, upfront costs are not as much of an issue as final product design. (within reason, of course. A HFT pump may not last more than a year, but a $90 pump opposed to a $500 pump at this point just makes sense).

So I'll leave this post with a picture of the first test of vacuum infusion (it didn't go well, but I sure learned a lot.)
Image

More later,
Lee
User avatar
RockyMountainTeardrops
Super Teardrop Manufacturer
 
Posts: 99
Images: 233
Joined: Fri Oct 22, 2010 1:28 pm
Location: 4,000 above Denver, CO

Postby Weirdnerd » Fri Nov 05, 2010 2:00 pm

You can build the walls, with a 1/8 thick plywood lay them flat, ( make sure they are VERY flat) and add a ply at a time, one trick is to wet (resin) the fiberglass over a sheet of clean plastic marked with a sharpie with the shape of what you want to cover ( like the plastic drop cloths they use for painting), cut to size (with the wet resin the fiberglass over it) then use the plastic to locate the fiberglass over the structure, then squeege it very well ( to remove bubbles and excess resin), remove the plastic carefully and leave the fiberglass in, repeat for the other two plies.

Once the three plies are in place, you can cover them with release peel ply, perforated ( it's like a plastic film, with holes to bleed the excess resin) and squeege it firmly, making sure you don't have voids, excess resin, or "pleats" , the plastic release film serves two purposes, one, to keep dust and debris from becoming part of the finish, and two, keeps the lay up in place and makes a smooth ( shiny) finish.

the perfect way to lay them is 45/0/45 ( orientation of the fibre strands) so you have a flat finish ( some other combinations create waves, or warping on the laminate, so this is the easiest way to make sure it is flat).

Once the resin has cured ( I would recommend a slow cure catalyst, so you have lots of time to correct misplacements and not worry about it " gelling on you", you can remove the peel ply release film.

when you want to lay up an overlapping laminate ( say, the roof to meet the sides, which create a solid shell) make sure you sand the cured laminate ( over which you will lay up the fresh resin fiberglass) with crocus cloth 80 grit or 120 grit ( avoid aluminum oxide, it will turn into sulfate due to galvanic corrosion, and it will delaminate the fiberglass) 1/2 an inch past the edge of the new plies, , clean very very well with methyl alcohol and a lint free paper towel, wait 15 minutes ( no more than 2 hours) and proceed to lay up,

a good way to lay up the overlapping plies ( the roof, that will overlap the sides) is to make the first one 3/4 of an inch smaller than the second and the second 3/4 of an inch smaller than the third, that way you will not have a " lip" thicker than the rest of the laminate...it's kind of hard to explain in writing, but I am sure I can explain any other questions better.


PS, a better location for the vacuum port ( the one inside the bag) is to make a small extension for the bleeder material about 2 to 4 inches away from the laminate, so the vacuum port doesn't suck resin, and you don't end up with permanent port marks over the fiberglass.
This is my build thread...
Weirdnerd's teardrop
User avatar
Weirdnerd
The 300 Club
 
Posts: 318
Joined: Thu Sep 23, 2010 3:03 pm
Location: Denver, Co ( USofA)
Top

Postby RockyMountainTeardrops » Fri Nov 05, 2010 2:49 pm

Weirdnerd wrote:You can build the walls, with a 1/8 thick plywood lay them flat, ( make sure they are VERY flat) and add a ply at a time, one trick is to wet (resin) the fiberglass over a sheet of clean plastic marked with a sharpie with the shape of what you want to cover ( like the plastic drop cloths they use for painting), cut to size (with the wet resin the fiberglass over it) then use the plastic to locate the fiberglass over the structure, then squeege it very well ( to remove bubbles and excess resin), remove the plastic carefully and leave the fiberglass in, repeat for the other two plies.

Once the three plies are in place, you can cover them with release peel ply, perforated ( it's like a plastic film, with holes to bleed the excess resin) and squeege it firmly, making sure you don't have voids, excess resin, or "pleats" , the plastic release film serves two purposes, one, to keep dust and debris from becoming part of the finish, and two, keeps the lay up in place and makes a smooth ( shiny) finish.

the perfect way to lay them is 45/0/45 ( orientation of the fibre strands) so you have a flat finish ( some other combinations create waves, or warping on the laminate, so this is the easiest way to make sure it is flat).

Once the resin has cured ( I would recommend a slow cure catalyst, so you have lots of time to correct misplacements and not worry about it " gelling on you", you can remove the peel ply release film.

when you want to lay up an overlapping laminate ( say, the roof to meet the sides, which create a solid shell) make sure you sand the cured laminate ( over which you will lay up the fresh resin fiberglass) with crocus cloth 80 grit or 120 grit ( avoid aluminum oxide, it will turn into sulfate due to galvanic corrosion, and it will delaminate the fiberglass) 1/2 an inch past the edge of the new plies, , clean very very well with methyl alcohol and a lint free paper towel, wait 15 minutes ( no more than 2 hours) and proceed to lay up,

a good way to lay up the overlapping plies ( the roof, that will overlap the sides) is to make the first one 3/4 of an inch smaller than the second and the second 3/4 of an inch smaller than the third, that way you will not have a " lip" thicker than the rest of the laminate...it's kind of hard to explain in writing, but I am sure I can explain any other questions better.


PS, a better location for the vacuum port ( the one inside the bag) is to make a small extension for the bleeder material about 2 to 4 inches away from the laminate, so the vacuum port doesn't suck resin, and you don't end up with permanent port marks over the fiberglass.

All I can say is:
Thanks!:thumbsup:
That was pretty much my plan except for the 40/0/45 (that's something I haven't read before, and the aluminum oxide sanding)
It's nice to hear somebody who has done it before share their knowledge.

The plan is to build the walls laying flat, "stepping" the laminate back from the edge where the roof will join.
I'm still having "builders block" on the best way to make the curved roof. Leaning toward a plywood buck, perhaps with a layer of plastic/ pealply / release ply or some combination (mylar film?) to allow the form to be disassembled for storage.
I don't have the storage space for a full, gelcoated mold.
(Talked to an architect, he's thinking $100 a square foot for a shop building!!!! So working out of the 700sf garage will be the current plan until we can afford to expand)

On the plywood, the major reason I'm shying away from that is the worry about delamination.
I'm reading a lot on boat building forums (a teardrop is pretty much a boat, if you think about it), and one of the major problems with "modern" boats is delamination.
(a problem not suffered by "solid" fiberglass boats of 30 or 40 years ago).
The quest for light and cheap has led a lot of the industry to sandwich construction.
Dust, oil, or maybe just vengeful spirits are causing the composites to shear off of the foam core.
The one thing plywood has over foam is it's strength to resist a point impact.
Some people are swearing that the impact of the boat on rocks or pylons or whatever are causing the foam to crush, but the laminate skin is rebounding, shearing it off of the core. So when the laminate is repaired, the shock of wave action will cause the delaminated area to spread until the whole skin will peel off the core. (be sure to clicky the linky)

So that's why plywood has me worried, but I don't have a better solution yet.

Lee
User avatar
RockyMountainTeardrops
Super Teardrop Manufacturer
 
Posts: 99
Images: 233
Joined: Fri Oct 22, 2010 1:28 pm
Location: 4,000 above Denver, CO
Top

Postby Weirdnerd » Fri Nov 05, 2010 3:26 pm

In some ways plywood is way better than "nomex core" or "foam core", because is rigid, and almost 100% of the surface is bonded with the resin laminate, versus 5%-20% of the core, they started the concept with the " DeHaviland Mosquito" airplane in WW2, they used a balsa wood core ( with the wood laid on the cross section, not longitudinally) , with a 0.20 inch aluminum skin, testament that wood performed better is that many of those airplanes came back with what could be considered ultimate damage ( as in bye bye) on a regular aluminum airplane.

boats receive amazing punishment, waves weighing thousands of pounds hammer them almost continually, and in extreme cases, they get deformed by the impacts, but due to the fiberglass retaining it's original shape, the only thing that gets damaged is the core. on a teardrop, the only concern would be a car crash, or very large hail.

and yes, dust, fingerprints, oil, and improper core preparation are always the only culprits of delamination ( when you lay up on moist core, when the resin cures, it releases heat, and moisture in the core expands, delaminating it almost instantly, it looks fine, but unless you do an ultrasound test on it, you will not notice until it's too late,
This is my build thread...
Weirdnerd's teardrop
User avatar
Weirdnerd
The 300 Club
 
Posts: 318
Joined: Thu Sep 23, 2010 3:03 pm
Location: Denver, Co ( USofA)
Top

Postby RockyMountainTeardrops » Fri Nov 12, 2010 5:30 pm

So let's see......where were we?

I've got the bench started, so perhaps an explanation of it's construction.
Since space is so limited, I going with a semi modular design.
$25 sawhorses from HD and adjusting bolts in the bottom of the frame make a table that can be disassembled to just 5" tall plus stack-able sawhorses.
Used 3/4" MDF for the top. (but going to build a new bench in a few weeks, I'll post that in a new thread, maybe)

Image
Image

Next step is full size drawings & transferring them to 1/4" hardboard templates.
Image

As you can see, the wife is very involved in the design and construction.
;)
Image

Next up, CONSTRUCTION!

More later,
Lee
User avatar
RockyMountainTeardrops
Super Teardrop Manufacturer
 
Posts: 99
Images: 233
Joined: Fri Oct 22, 2010 1:28 pm
Location: 4,000 above Denver, CO
Top

Postby TurboandMe » Sat Nov 13, 2010 2:54 pm

Welcome to the small and almost completely unknown Colorado Homegrown Trailer Association.... CHTA. Weirdnerd is our leader and rightfully so as he has already given me a hand. Alright completely unknown 'cause it don't exist! So welcome anyway. Sounds like you have big plans and I look forward to seeing your progress.
Chateau Le Cargo build: Now for sale!
viewtopic.php?t=40569
User avatar
TurboandMe
Teardrop Builder
 
Posts: 49
Images: 41
Joined: Tue Sep 21, 2010 9:05 am
Location: Denver, CO
Top

Postby Weirdnerd » Sat Nov 13, 2010 4:46 pm

Teardrops in Colorado are a rare thing to see, out of the thousands of RV's in state, I dare to say, there is no more than a dozen teardops ( but again...I may be wrong), keep the pics coming! :lol:
This is my build thread...
Weirdnerd's teardrop
User avatar
Weirdnerd
The 300 Club
 
Posts: 318
Joined: Thu Sep 23, 2010 3:03 pm
Location: Denver, Co ( USofA)
Top

Postby RockyMountainTeardrops » Fri Nov 19, 2010 8:25 pm

Yea, I'm amazed to have only seen one other teardrop on the road (I've seen a couple parked, but only one going somewhere).
With all of the National Forests around here, you'd think tears would be all over the place.

Okay, time to make sawdust.
Templates traced to mdf. These are ribs for the "buck" of the hatch.
(Making "bucks" to make a form to make a mold to make final parts)
Image

One piece cut very carefully makes it easy to make them all the same.
Image

with a router and trim bit.
Image
Image

Okay, now it's getting on to late April (2010) and I start thinking that there is no way I'm going to get this finished by our standard late August vacation.
After consulting with the Wife....(and dog)
Image

We decide to make a "Weekender", but to make it as close to the size of the final design as possible.
(remember, I'm still making an "ultralight" for real off-road camping, but that will wait until 2011)
Laying out the straight shape using the round templates.
Image
Image

One drawback to this....I have to join plywood (didn't want to go to the hassle of getting 5'x10' plywood).
Image
With my design, I'm not worried about strength.

Side walls, one cut and sanded very carefully.
Image

The other side on top, ready for the router and trim bit to make them exactly the same size and shape.
Image

I'm sure I'm killin' you all with this many pictures for one post. :twisted:

More later,
Lee
User avatar
RockyMountainTeardrops
Super Teardrop Manufacturer
 
Posts: 99
Images: 233
Joined: Fri Oct 22, 2010 1:28 pm
Location: 4,000 above Denver, CO
Top

Postby Cliffmeister2000 » Fri Nov 19, 2010 10:01 pm

RockyMountainTeardrops wrote:I'm sure I'm killin' you all with this many pictures for one post. :twisted:

Lee


Nope. We loves us some pictures! Jest keep 'em coming! :thumbsup:
God Bless

Cliff

♥God. ♥People.
1 John 4:9-11

My Teardrop build pictures
User avatar
Cliffmeister2000
Titanium Donating Member
 
Posts: 3622
Images: 157
Joined: Thu Jul 26, 2007 10:18 pm
Location: Phoenix, AZ
Top

Postby 2bits » Sat Nov 20, 2010 12:12 am

Interesting build and Scott, thanks for the interesting concept of length vs. weight! That was cool!
Thomas

Image
User avatar
2bits
2bit Member
 
Posts: 5132
Images: 8
Joined: Thu Dec 27, 2007 6:04 pm
Location: Lake Tawakoni, TX
Top

Postby Weirdnerd » Sat Nov 20, 2010 12:15 am

You have a garage to work in...I had to rely on good weather last winter to build mine ( besides, I wanted to sleep in a bed, as explained by my best half)...anyway, you seem to be on a roll!... :lol:
This is my build thread...
Weirdnerd's teardrop
User avatar
Weirdnerd
The 300 Club
 
Posts: 318
Joined: Thu Sep 23, 2010 3:03 pm
Location: Denver, Co ( USofA)
Top

Postby RockyMountainTeardrops » Sat Nov 20, 2010 9:11 am

Weirdnerd wrote:You,, have a garage to work in...I had to rely on good weather last winter to build mine:lol:


Yea, without a garage....9,200 feet elevation makes for long winters.
:Flippin Burger:
This:
Image


Is under there:
:shock:
Image

More later,
Lee
User avatar
RockyMountainTeardrops
Super Teardrop Manufacturer
 
Posts: 99
Images: 233
Joined: Fri Oct 22, 2010 1:28 pm
Location: 4,000 above Denver, CO
Top

Postby asianflava » Sat Nov 20, 2010 12:55 pm

Nice rig! I lived in NC for 4 years and TX for 10, I know what BBQ is supposed to taste like and I had a hard time finding it in CO. I had to learn how to do it myself. Been using a BGE with a DigiQ, with good results. Just pulled a brisket off 30min ago.
User avatar
asianflava
8000 Club
8000 Club
 
Posts: 8412
Images: 45
Joined: Mon Aug 02, 2004 5:11 am
Location: CO, Longmont
Top

Postby RockyMountainTeardrops » Sat Nov 20, 2010 3:05 pm

asianflava wrote:Nice rig! I lived in NC for 4 years and TX for 10, I know what BBQ is supposed to taste like and I had a hard time finding it in CO. I had to learn how to do it myself. Been using a BGE with a DigiQ, with good results. Just pulled a brisket off 30min ago.

I don't use it much anymore (I'm going to try to sell it in the spring)
I've gotten my Traeger to (finally) put out some pretty good bbq.
Smoked turkey sandwich was my lunch today!
Right now I have three smokers (4 if you count the trailer as two), and one grill. I used to be a real bbq hound, but now I just use the Traeger. I've spent too many nights tending the fire of a wood-burning pit to want to do that for just myself anymore.
(The wife is not much of a red meat person, so a 12-14 lb brisket is just too much food, and you can only have so many batches of chili before she threatens to make you sleep on the sofa.)

Lee
User avatar
RockyMountainTeardrops
Super Teardrop Manufacturer
 
Posts: 99
Images: 233
Joined: Fri Oct 22, 2010 1:28 pm
Location: 4,000 above Denver, CO
Top

PreviousNext

Return to Build Journals

Who is online

Users browsing this forum: No registered users and 15 guests