Another foam standie...

Canvas covered foamies (Thrifty Alternatives...)

Moderator: eaglesdare

Re: Another foam standie...

Postby GPW » Tue May 01, 2012 11:22 am

TLAR only works when you have a valid concept of what it’s “supposed” to look like .... Not an excuse, just a “shortcut” ... :R
There’s no place like Foam !
User avatar
GPW
Gold Donating Member
 
Posts: 14920
Images: 546
Joined: Thu Feb 09, 2006 7:58 pm
Location: New Orleans

Re: Another foam standie...

Postby Wobbly Wheels » Tue May 01, 2012 6:16 pm

Just a though Catherine, but if you can spare the height, it might not be too late to get some foam and build it as a sandwich. This one DOES give me more rigidity than the sum of it's parts (3/8 bottom, 3/4" foam, 1/8 top), it's just that I don't think it will stand up long-term when it comes to the point loading of footsteps. It doesn't feel like the there's any actual deflection in the floor, just that the foam is compressing in some spots where I step. It's not bad enough that it's a stop-work issue, but I don't want to leave it as is because it will always bug me otherwise.
That being said, gluing underlayment to a subfloor does a pretty good job of stiffening up a floor 'sans sandwich'.

Papi wrote:At first when I looked at your build, I had to scratch my head

Hehe...you and me both. Thx for the thumbs up.
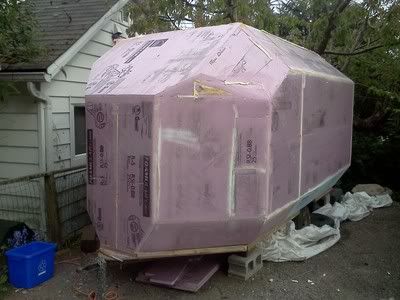
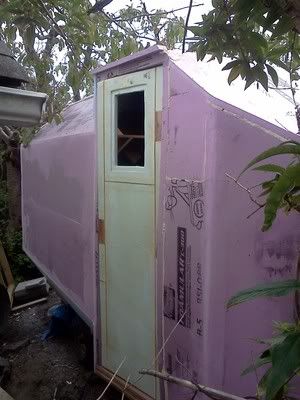
I had most of the idea in my head despite a few changes but it was tough to describe what I wanted to do. I mucked around with SketchUp a bit, but I could see my learning curve on that was going to cut into building time, so that became a project to tackle some other time. I'm still not super happy with the roof geometry up front because of the asymmetry from having the door on one side and a slope on the other, but I couldn't really visualize that one before hand so I started cutting and gluing foam in. If I don't like it, I can cut it out and redo it. The door has to go where it is, and I don't want to pull a big square box through the air, so....
It's going to be angular rather than round, mostly because it's quicker to build it that way - if I don't get the foam pieces glued in, I'll never get the darn thing built. So maybe I'm stretching the TLAR definition there a bit...but I won't tell if you don't.
:MLAS :D

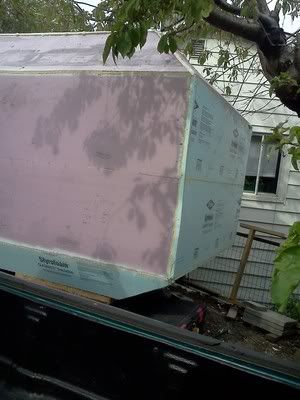
So far, the wood frames have been a resounding success. Those are some good sized panels and they are flimsy until they are glassed. When the panels flop around so much, you need to be able to keep them on a fixed plane. If anyone's contemplating building this much surface area, give it a try. It makes life pretty easy...once you stop smacking your head on them while working inside !
:DOH2:
Still, I'll be pretty happy when I can pull them out...
User avatar
Wobbly Wheels
Donating Member
 
Posts: 1080
Joined: Tue Mar 15, 2011 9:51 am

Solar Score !!

Postby Wobbly Wheels » Wed May 02, 2012 6:50 pm

Opportunity was rap-rap-rapping at my parlor door.....

I heard through the grapevine that there was a fella selling an unused 60W solar kit for $200. The retail on the current version is $400. I called him and set it up....and came home with the solar for my build.
It's definitely an entry level kit: it's got four 12"X36" 15W panels with a harness to link them before they run into the 7A controller.

Having the panels on hand this early is a good thing: I had reserved the back 6' of roof for solar should I go that route, but I need to decide if I'm going to build a tilting rack for them or just mount them fixed flat (tilting gets them closer to 90 deg to the sun for more output). I'm using one (eventually two) 120A*h deep cycles. Anyone with solar experience have any thoughts ?

The entire kit:
Image

This is the 'octopus' that links all the panels together.
Image

The panels are pre-wired with 10' leads into two-pin auto connectors (think of a 4-pin trailer harness minus two pins). I will probably cut those plugs off and wire them into a bus so that I can isolate them with diodes so they don't backfeed if one of them is shaded. I don't know if it's really that big a concern in terms of efficiency, but it's certainly not going to hurt.
User avatar
Wobbly Wheels
Donating Member
 
Posts: 1080
Joined: Tue Mar 15, 2011 9:51 am
Top

Re: Another foam standie...

Postby atahoekid » Sun May 06, 2012 10:17 pm

My neighbor built a stand for his panels (he has two) so he can direct them to the sun. It's enough to recharge the multiple 6V batteries on his Airstream trailer. I'm going to steal the idea although I will only have one panel mounted to an A-Frame stand since I only am charging a single 12V battery. I think it makes it easier to "find" the sun instead of trying to maneuver your trailer in the optimum location.
Mel

"Believe in your abilities... Remember amateurs built the ark, professionals built the Titanic"

"Indecision may or may not be my problem" Jimmy Buffet

Image

The Road Foamie Build Thread: viewtopic.php?t=45698
User avatar
atahoekid
Platinum Donating Member
 
Posts: 1773
Images: 158
Joined: Sat Jul 24, 2010 2:49 am
Location: Incline Village, NV
Top

Re: Another foam standie...

Postby Wobbly Wheels » Sun May 06, 2012 11:25 pm

Yeah, these ones came on a cheesy tilting stand that wasn't up to the weight (panels are pretty heavy). I've fabbed up mounts of square aluminum tubing and Z-channel for panels I've put on boats and I don't think it would be too hard to hinge one end to the roof and put a crank on the other end. You could have the crank handle inside like a vent or a fold-down TV antenna so you don't have to get up on the roof. For now though, they're just going to be mounted flat and the tilting mount will be a future project despite the reduced efficiency.
I am going to lose an inch of interior height because I'm going to glass in some ribs to carry the panels' weight out to the sidewalls so I'll keep them near the back where headroom isn't critical because it's over the bed.

Apparently the rule of thumb for solar is 60W for every 100 A*h of battery, so my 60W of panels would probably need an upgrade anyway when I put in the second battery. I have a 120 A*h Group 31 to go in right away, but I'm wiring for two banks so I'll probably run the charge controller into the isolator (along with the battery charger and a charge lead from the tow vehicle) rather than to the battery itself.

Had to give the knee a break this weekend (MRI next weekend...finally !) so I didn't get much done, though I did hit a bit of a milestone. The trailer is completely enclosed now and I'm on to the shaping and sanding. I sat in it for a bit with a small heater and a propane lantern while I worked out cabinet placement.
It got too warm after about an hour, even with a 14" square hole in the roof for the vent...
User avatar
Wobbly Wheels
Donating Member
 
Posts: 1080
Joined: Tue Mar 15, 2011 9:51 am
Top

Re: Another foam standie...

Postby loaderman » Mon May 07, 2012 12:59 am

Following with much interest! Moire pics please!!!! :applause:
loaderman
The 300 Club
 
Posts: 306
Joined: Fri Jan 27, 2012 12:03 am
Top

Another foam standie...

Postby PcHistorian » Mon May 07, 2012 4:05 pm

sounds great. (yeah, pictures!)

I would think if you charge from tow vehicle on the way there and home (Isolator next to the alternator to split the charging), keep to your solar panel limits of usage for the most part, you shouldn't have problems no matter how many batteries. Or have one to use and recharge as primary use battery, and the other for backup that you only charge off of the tow vehicle, so solar to one only. (so an isolator for between the trailer two batteries, and an isolator for the tow/trailer circuits.) If you use terminal screw strips for the attachments I can't see how you are limiting yourself for the build. I'm trying to set up terminal strips for the load circuits and terminal strips for the power circuits, and I'll cross connect the two as the design evolves and my needs change.

I did ask an alternator rebuild place if they'd sell me some diode triodes, they said "no problem." As soon as I figure out the circuit I will post. (for use as isolators, 100 amps, no problem, just sink the heat, two batteries and one charge source. pricing at e-bay is about $10 for 50 amps (and $10 shipping. LOL))

ok, gtg, wheel well woes.
Elf Cottage
Image

Build Documentary
https://sites.google.com/site/pchistorian/home/hobby/camping/elf-build
Build Forum
http://www.tnttt.com/viewtopic.php?t=48462
Build Album
http://www.tnttt.com/gallery/album.php?album_id=42

progress is progress. (don't look a gift "progress" in the mouth.)
User avatar
PcHistorian
The 300 Club
 
Posts: 354
Images: 198
Joined: Fri Dec 09, 2011 1:06 pm
Location: S.E. Michigan
Top

Re: Another foam standie...

Postby Wobbly Wheels » Tue May 08, 2012 10:29 pm

Thx for your thoughts on this, PcH.
I will indeed be using terminal strips for a lot of my wiring - most of what I'll be using is the Blue Sea marine stuff because that's what I use in my day job.
As far as isolators go, I've got a 150A unit in the truck right now (salvaged from an ambulance) from when I was running a second battery to feed an inverter to charge cordless batteries on remote sites. That sounds counter-intuitive, but the losses were insignificant over an 8 or 10 hr work day.
I'm going to take that isolator and install it between the two house batteries. I don't think I need the isolator between the tow vehicle's start battery and the trailer circuit because the only time that lead will be hot is when I'm driving to the campsite. Were I likely to leave the trailer hooked up while parked, I would DEFINITELY install the isolator in the truck, but I'll have to unhook it right away to get the truck down to the water to launch the boat off the rack.

I'm thinking of running the charge lead back into an Anderson plug at the bumper. It will be completely independent of the trailer plug, will still provide a breakaway connection, and will allow me to connect high-draw loads (bumper winch, jumper cables, etc) to the back end of the truck.
Thoughts ? Opinions ? Criticism ?

On to the new update....
Something of a milestone: I no longer need tarps since the shell is now enclosed !!
I set up a folding chair and a lantern the other night and fond that my floorplan with the transverse (athwartships) bed should work out great. I still have some surplus cabin length which will certainly get eaten up but is great to have at this stage.

I have just started sanding the outside, but I don't think it will take too long given how easy this stuff is to shape.
Using canned foam as a fairing compound is FANTASTIC.
I'm using a 40G block and a 100G longboard right now and the canned foam is perfect because it's slightly easier to sand than the styro. When you're sanding over a low, it takes the filler down right away so your time is spent on feathering it in rather than eating away at the filer till it's level.

And of course, there's some pics...

Image

Image

Image
User avatar
Wobbly Wheels
Donating Member
 
Posts: 1080
Joined: Tue Mar 15, 2011 9:51 am
Top

Re: Another foam standie...

Postby loaderman » Wed May 09, 2012 12:16 am

Thanks for the update and pics, love the door detail.
Any layout drawings of the inside?
I too am looking at building a larger foamie and am very interested in yours.
loaderman
The 300 Club
 
Posts: 306
Joined: Fri Jan 27, 2012 12:03 am
Top

Re: Another foam standie...

Postby Wobbly Wheels » Wed May 09, 2012 1:13 am

Thx for the interest, loaderman.
I've got a few fixed dimensions for the inside but I'm leaving it open till I get the glassing done in case I have to add any internal reinforcement. Generally, the bed will be across the back and there will be a 2-seat dinette between there and the door on the curb side. The left side will see the galley, and the head will be in the nose with a partition bulkhead 44" back. That puts it about 11" behind where the nose taper meets the sides.The other side of that bulkhead will cant forward to meet the right wall an inch forward of the door's hinge line.

Given all my 'off time' at the moment, I'll probably draw it out anyway so I'll scan and post it at some point.

Personally, I'm still not happy with the way the door came out. In hindsight, I ought to have cut two long triangular panels to blend in the trailing edge to the trailer's sides, though that would effectively eliminate the skylight going in on that side. Having the door project out like that was a necessary evil and, all things considered, I'm happy enough with it to leave it as is.
It's sitting off kilter because it's just stuffed into the hole right now: the jamb is undersized to allow me to sand it to size so the door doesn't fit properly. It will close flush to the outside wall.

From a construction/floorplan perspective for a bigger trailer, consider extending (at least) the sides out. I was blown away by the options it gave me in laying out the interior. Essentially, it took me from an aisle along one wall and a longitudinal bed to a bed across the back and a center aisle with the galley on one side and the dinette on the other. It also allowed me to set it up so that I don't have to collapse the dinette to set up the bed. The rear extension is a vital part of that and its success will depend on the internal framing and getting the stabilizers mounted well aft, but I don't see a major problem since it will be locked to the shell once it's glassed.

The white paint you see on the foam is a latex spray paint I picked up because it ought to be compatible with the epoxy, won't eat the styro, and will give the canned foam the UV protection it needs.
Unfortunately, it doesn't cover worth a damn so it's completely and utterly useless for my needs: it needs to be WAY thicker. I'm going to sand it and brush epoxy over the seams - I know epoxy isn't UV resistant but it will give me the time I need to do the layup on all the panels without the canned foam going brittle and separating from the styro.
User avatar
Wobbly Wheels
Donating Member
 
Posts: 1080
Joined: Tue Mar 15, 2011 9:51 am
Top

Re: Another foam standie...

Postby GPW » Wed May 09, 2012 4:58 am

W2 , JMHO , I think it looks SUPER !!! 8) :thumbsup: :applause: Nice and streamline too !!! Should tow Great !!!
There’s no place like Foam !
User avatar
GPW
Gold Donating Member
 
Posts: 14920
Images: 546
Joined: Thu Feb 09, 2006 7:58 pm
Location: New Orleans
Top

Re: Another foam standie...

Postby bonnie » Wed May 09, 2012 6:11 am

Really like that shape! :applause: :applause: :applause:
Remember, the turtle won. :)
User avatar
bonnie
Donating Member
 
Posts: 1390
Images: 107
Joined: Sun Jul 24, 2011 4:14 pm
Location: Roxana, IL
Top

Re: Another foam standie...

Postby eaglesdare » Wed May 09, 2012 8:11 am

i also like this! :thumbsup: :thumbsup: :wine:
Louella
May the foam be with you.
User avatar
eaglesdare
Donating Member
 
Posts: 3168
Images: 13
Joined: Tue Aug 26, 2008 7:06 pm
Top

Re: Another foam standie...

Postby PcHistorian » Wed May 09, 2012 9:51 am

Looks like you got "One Big Lump Of Pink" there. Reminds me of the stealth fighter, which doesn't look very elegant but is a bad assed fighter. Course you don't have on the outer colors yet, and you might find a design which camouflages what you have. (jungle scene, pine forest, like a duck blind... with that one picture and the trees around it, you could pull into a camp area in the desert and be a forest or pull into a place in the woods and blend right in. (stealthy)) And I mean paint the trees on, not do it in actual camoflage pattern. Beach scene with palm trees, ocean. apple orchard painted on... I bet those slight angles are better than big-ole' square corners for aerodynamics. "guide the flow and prevent the burbles in the airflow."

since your outer paint is sure to be UV resistant just weather proof for now and worry the UV when you get there. I'm in the middle of a tree-doctor for a customer. I brushed out the dirt and bugs, let a bunch of poly (water based) soak into the tree core, then Great-stuff'd the rest back out to tree diameter. now I have to paint that. I'm planning dark brown exterior latex by brush, to kind-a match the bark. I would wonder if spray paint might prevent your outer epoxy from holding well.

You know, since you are going to paint that all over, you might play with a magic marker on the outside to get your internal design. Or like I do and use dry erase marker for planning, then permanent marker once you decide. Then the outside becomes a black board for figuring it all out.

The anderson connector: I was going to say, "why not just use the anderson connector to hook up the trailer," but then changed my mind to, "Then ALSO put an anderson connector on the trailer for two reasons. 1. You can greatly boost the amount of electricity going to the trailer. (by doubling the wiring you have less loss of energy (in DC) over a distance) 2. You then become compatible with other vehicles that don't have a standard trailer electrical connector but that DO have an anderson connector. (tow truck...)"

Yeah, I have 2 & 3/4 medicine chest sized cabinets with no assigned purpose now, but if you start getting frivolous you might over use YOUR free space too quickly. Clothes (keep empty unless traveling) Cabinet, bedding,... (don't want things to sit there and get full of mice or bugs while not getting used. It's tough, shoe-horn-ing a house into a trailer... :-) And you are light so far, but don't over abuse that or you might end up being as heavy as the rest of us... I have had to say, "k these cabinets are for bedroom purposes... (single room interior, but...), these are kitchen..., den, guest room."

So, linen closet off the bathroom inside, the forward sloped area? Water tank?

what does the door frame look like outside, back edge?

Get "before" pictures of the interior, that way when the palace gets built inside, we'll know what kind of miracle you performed to do it. :-)

As for your solar panel(s) aiming, I wouldn't corrupt your shell with cranks or cables. I'd make an electrical swivel/tilt system. I used something like TV antenna aimer, for a college project. The swivel is obvious how to do that, the tilt is (put one swivel on a 90 degree bracket, on the turning part.) That may be a full topic on it's self. I don't know how small you could get the motor assemblies. slap it all on a lazy-suzan to swivel. (You DO realize that with the solar panel up there, you are going to look like a mobile government command post.... ;-) Just have an output meter near the aim controls and you can adjust for greatest output from inside.
Elf Cottage
Image

Build Documentary
https://sites.google.com/site/pchistorian/home/hobby/camping/elf-build
Build Forum
http://www.tnttt.com/viewtopic.php?t=48462
Build Album
http://www.tnttt.com/gallery/album.php?album_id=42

progress is progress. (don't look a gift "progress" in the mouth.)
User avatar
PcHistorian
The 300 Club
 
Posts: 354
Images: 198
Joined: Fri Dec 09, 2011 1:06 pm
Location: S.E. Michigan
Top

Re: Another foam standie...

Postby Wobbly Wheels » Wed May 09, 2012 11:37 am

Thx for the kind words ladies and gentlemen.

The shape sort of grew into this form on its own. I would have like to have made that front wall lower (no higher than my tailgate) but it took out too much headroom from the toilet that's going to back against the inside of that wall.

I think I'm going to do my final sanding in situ, then wash it down to clear off the dust. The smooth jigsaw blades I've been cutting the panels with don't leave any dust so it will further cut down on inclusions that would leave a bump needing to be sanded out later. I've got another day's sanding (today), so I ought to be starting on the glassing this weekend.

PcH, I had actually thought about a camo paint job at one point. I will likely use a garage floor epoxy kit to paint it and fill the weave, so I'll probably go with a grey base coat and use the included flecks along the rocker panels. The roof will get a topcoat of white elastomeric coating to bounce the heat off. I do want it to blend in rather than stand out as a bright white box like an RV. The matte grey will make it less noticeable without the gung-ho look of a camo job (no offense to GPW's foamie !)
I don't have anywhere NEAR the artistic talent to paint trees, orchards, or beaches. I do have a buddy that does vinyl though, so at some point I'm sure we'll be talking about a graphics theme. At the very least, a decal saying "Designed by TLAR Engineering" (or similar) is a must.
:lol:

I've been using Sharpies like they're going out of style. It's pretty simple to pin a panel into place with skewers and trace out the inside opening, marking which way the bevels go (D'Oh !!) and cutting them out with either the jigsaw or the 'handled' hacksaw blade you can see sitting on the tongue (works great for flush cutting as well). The interior will be well-marked by the time I'm done: thanks for the tip on the dry-erase markers. I hadn't thought of that.

So, linen closet off the bathroom inside, the forward sloped area? Water tank?
what does the door frame look like outside, back edge?


The toilet will be under the sloped nose with a small counter on the curb side. There will be space for a cabinet on the street side, but it will be accessible from outside as a vented LPG locker if I don't mount the bottle on the front wall. A single 10lb bottle will fit up front and allow a smooth rounding of the nose (but not enough capacity), or I can put a 20lb higher up and that will provide the radius itself without a foam/glass fairing block. If I do either of those, then that locker will be a vanity cabinet with a pullout shower/faucet.

I'll put up pics of the individual areas as I get them sanded to shape. Right now, the door frame is undersized so I can sand it to fit the door before glassing, but it blends into the same plane as the vertical side panel. There are triangular fillers top and bottom because the door vestibule has a horizontal roof and floor rather than making a 'bent' door (like on the War Wagon build).
That does create a low pressure area (with its drag) top and bottom while towing. I could use two long triangular panels to bring each of them back down, but on the top one I have a skylight going there. As compromises go, having a window there is worth a bit of lost fuel economy. I may still address the bottom, but that's another job for another day.
Gotta get camping !

In Canada, the May 24 long weekend (observed on the 21st this year) is traditionally the kick off for the camping season, so there's an extra imperative now to "git 'er done".
The missus isn't really a camper yet...and DEFINITELY doesn't enjoy tent camping with two dogs !
User avatar
Wobbly Wheels
Donating Member
 
Posts: 1080
Joined: Tue Mar 15, 2011 9:51 am
Top

PreviousNext

Return to Foamies

Who is online

Users browsing this forum: DrAlvarez and 6 guests