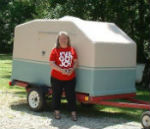
My Foamie Build--Updated --Jul 3 I'm eating an elephant

Canvas covered foamies (Thrifty Alternatives...)

Moderator: eaglesdare

Re: My Foamie Build--Updated 12 May

Postby GPW » Sun May 13, 2012 6:01 pm

PC, you can say that again .... "Can't wait to see the final door hung.” Very Cool and Unique... 8)
There’s no place like Foam !
User avatar
GPW
Gold Donating Member
 
Posts: 14920
Images: 546
Joined: Thu Feb 09, 2006 7:58 pm
Location: New Orleans

Re: My Foamie Build--Updated 12 May

Postby bonnie » Sun May 13, 2012 6:40 pm

Thanks for the kind words, gentlemen. I have really enjoyed the puzzle this door presents. I can hardly wait to see it finished and installed. Took today off, though and enjoyed the children and grandchildren. Been a blessed weekend.
Remember, the turtle won. :)
User avatar
bonnie
Donating Member
 
Posts: 1390
Images: 107
Joined: Sun Jul 24, 2011 4:14 pm
Location: Roxana, IL

Re: My Foamie Build--Updated 12 May

Postby atahoekid » Sun May 13, 2012 9:27 pm

That is indeed a very unique door. I like the way you figured it out. Happy Mom's Day to you and all of the other moms out there! :wine: :wine:
Mel

"Believe in your abilities... Remember amateurs built the ark, professionals built the Titanic"

"Indecision may or may not be my problem" Jimmy Buffet

Image

The Road Foamie Build Thread: viewtopic.php?t=45698
User avatar
atahoekid
Platinum Donating Member
 
Posts: 1773
Images: 158
Joined: Sat Jul 24, 2010 2:49 am
Location: Incline Village, NV
Top

Re: My Foamie Build--Updated 12 May

Postby PcHistorian » Mon May 14, 2012 9:20 am

@GPW, I can't wait until the door is finished, the trailer is finished, everything is painted, and the door is put on the back of the trailer, "hung" on those hinges.
(are those considered "half-barrel hinges?" like in pirates of the caribean, 1 & 3)
Elf Cottage
Image

Build Documentary
https://sites.google.com/site/pchistorian/home/hobby/camping/elf-build
Build Forum
http://www.tnttt.com/viewtopic.php?t=48462
Build Album
http://www.tnttt.com/gallery/album.php?album_id=42

progress is progress. (don't look a gift "progress" in the mouth.)
User avatar
PcHistorian
The 300 Club
 
Posts: 354
Images: 198
Joined: Fri Dec 09, 2011 1:06 pm
Location: S.E. Michigan
Top

Re: My Foamie Build--Updated 12 May

Postby GPW » Mon May 14, 2012 11:06 am

PC, it’s gonna; be Cool eh !!! 8) So much design and innovation going on in the Foamie world... Wonderful !!! :applause:
There’s no place like Foam !
User avatar
GPW
Gold Donating Member
 
Posts: 14920
Images: 546
Joined: Thu Feb 09, 2006 7:58 pm
Location: New Orleans
Top

Re: My Foamie Build--Updated 12 May

Postby PcHistorian » Mon May 14, 2012 5:14 pm

@GPW, I'm a convert to the foamie side. May the foam be with you. now I've got to mind set to do my trailer in a slightly larger size, and devise the bracing inside. (1x2's with ply corners?)

I'm still waiting to hear about that "another foam standie" he is cutting it apart now that he has it built. to poly/glass each of the panels, then put them back in place and go onto the next panel. sounds interesting. at least he know that the shape is right. must be a shrinkage thing or a level surface for drying thing. (no runs on the vertical surfaces.)
Elf Cottage
Image

Build Documentary
https://sites.google.com/site/pchistorian/home/hobby/camping/elf-build
Build Forum
http://www.tnttt.com/viewtopic.php?t=48462
Build Album
http://www.tnttt.com/gallery/album.php?album_id=42

progress is progress. (don't look a gift "progress" in the mouth.)
User avatar
PcHistorian
The 300 Club
 
Posts: 354
Images: 198
Joined: Fri Dec 09, 2011 1:06 pm
Location: S.E. Michigan
Top

Re: My Foamie Build--Updated 12 May

Postby PcHistorian » Mon May 14, 2012 6:03 pm

Elf Cottage
Image

Build Documentary
https://sites.google.com/site/pchistorian/home/hobby/camping/elf-build
Build Forum
http://www.tnttt.com/viewtopic.php?t=48462
Build Album
http://www.tnttt.com/gallery/album.php?album_id=42

progress is progress. (don't look a gift "progress" in the mouth.)
User avatar
PcHistorian
The 300 Club
 
Posts: 354
Images: 198
Joined: Fri Dec 09, 2011 1:06 pm
Location: S.E. Michigan
Top

Re: My Foamie Build--Updated 12 May

Postby eaglesdare » Tue May 15, 2012 6:51 am

pc: you have a real nice camper there! so many fit inside, good job with that one! :wine:
Louella
May the foam be with you.
User avatar
eaglesdare
Donating Member
 
Posts: 3168
Images: 13
Joined: Tue Aug 26, 2008 7:06 pm
Top

Re: My Foamie Build--Updated 12 May

Postby PcHistorian » Tue May 15, 2012 8:54 am

oh that link wasn't mine. that was just a reference for bonnie, building this tilt-ie, to look at. Mine is the little one you see in my signature. (2 snuggly for sleeping. possibly 4 sitting for cards during cold, windy, rainy, mosquito-ie weather (open the window for air.))
Elf Cottage
Image

Build Documentary
https://sites.google.com/site/pchistorian/home/hobby/camping/elf-build
Build Forum
http://www.tnttt.com/viewtopic.php?t=48462
Build Album
http://www.tnttt.com/gallery/album.php?album_id=42

progress is progress. (don't look a gift "progress" in the mouth.)
User avatar
PcHistorian
The 300 Club
 
Posts: 354
Images: 198
Joined: Fri Dec 09, 2011 1:06 pm
Location: S.E. Michigan
Top

Re: My Foamie Build--Updated 15 May

Postby bonnie » Tue May 15, 2012 5:37 pm

May the foam be with us all. Boy, it's messy stuff!

I had a day off coming and took it today. I could have laid around and done nothing, but I couldn't! So, I got some foam flying and lookie what's drying in the garage:

First, there was the filling:

92005

Then I sandwiched the two doors together and clamped everything down evenly. Have I said I need more clamps?

92006

The whole thing looked a mess; but I kept telling myself it would work out. :worship: I had made the foam parts bigger on purpose, so I really shouldn't have been so :frightened:
Ate lunch and fired up the saw:

92007

Whew! That looked much better. So I went on and trimmed out the rest. I should have laid the skins good side out. I'm going to have to trim and sand a few opps spots. Oh, well, live and learn.

The deadbolt has become the project pain. The mechanism wouldn't fit into the box. I ended up using chisels to widen it just a bit. Then I had more problems than I'll recount getting the keyhole drilled out. :cry: In the end, it will work. Just frustrating to have such a small step take so long.

92008

Had to try the door hardware. It all works. Though the lociking rods fell off the door latch mechanism. I need some sort of locking pin for them. I have an idea and see no issue with the operation. To build the hatch I glued the cut out piece to the cedar skin and then tried mounting that in the slot. Worked like a champ. :D :D :D

92009

And the day's work ends with the glue drying:

92011

I am pleased with the progress I've made so far. I worked today, because I won't be able to work much on the foamie for the next 3 weeks. I have several family obligations that will keep me from extended working time. I also need to save up some money. :) The door cost a lot more than I anticipated. I'm afraid to add everything up -- and it's not finished!

Next step will be to do some filling work, then retrim and sand the edges down. Then I'm going to glue some mesh around the edge to give it some support. The mesh I'm using is 4" headliner mesh. It's polyester and should glue just fine. After that step. I want to glue the rubber edging in place. I bought 2 rubber pipe insulation pieces. I am expecting them to work just fine. I have an entire roll of 3M VHB tape and I think I'm going to use it to bond the rubber to the door.

After the rubber edge is on, I'll face the skins with the cedar boards. With the exception of the hatch piece they will be glued to the skins and extend about /4" out from the edge of the door. I will then cover the exposed edges with car door edge guard. I bought black; it has adhesive already applied and should give the door a finished look. I hope so, anyway.

Long post. Hope you all are enjoying this as much as I am. 8) 8) 8) 8) 8)
Remember, the turtle won. :)
User avatar
bonnie
Donating Member
 
Posts: 1390
Images: 107
Joined: Sun Jul 24, 2011 4:14 pm
Location: Roxana, IL
Top

Re: My Foamie Build--Updated 15 May

Postby KCStudly » Tue May 15, 2012 6:02 pm

Way to plug along! Lots of progress there. :thumbsup:
KC
My Build: The Poet Creek Express Hybrid Foamie

Poet Creek Or Bust
Engineering the TLAR way - "That Looks About Right"
TnTTT ORIGINAL 200A LANTERN CLUB = "The 200A Gang"
Green Lantern Corpsmen
User avatar
KCStudly
Donating Member
 
Posts: 9640
Images: 8169
Joined: Mon Feb 06, 2012 10:18 pm
Location: Southeastern CT, USA
Top

Re: My Foamie Build--Updated 15 May

Postby mezmo » Tue May 15, 2012 11:25 pm

Hi Bonnie,

Great progress on your door!

After seeing your pics of it I wanted to do a small bit
of devil's advocating:

On the circumfrence of the door; would it be beneficial
to glue a strip of plywood or some hard sheet material
[as wide as the foam is thick, or the foam and ply sandwich]
or such bent around it for additional strength instead of the mesh?
[It could fit between the ply skins or just fit flush at their edges.]
It could be 1/4in or less in thickness.

I was thinking it'd give more support to the heavier gasket
[garage door gasket] you're using as well as to the foam and
the plywood door skins - help tie the skins together and
protect the foam and have the additional strength of being
glued to the ends of the wooden interior door framing ends.

Since there will be pressure/thrust forces when you open and
close the door, it might help with those. IMPORTANT: I believe I read
somewhere, on the forum here, that the VHB tape really can't be used to
adhere to a foam surface [or a painted canvas type surface either].
It needs a hard smooth surface in order to be used. Since that is a bit pricey ,
'thought I'd give you a heads-up about that and not have you waste
any of it finding that out by trial and error!

Cheers,
Norm/mezmo
If you have a house - you have a hobby.
User avatar
mezmo
1000 Club
1000 Club
 
Posts: 1817
Images: 194
Joined: Fri Jan 01, 2010 4:11 am
Location: Columbia, SC
Top

Re: My Foamie Build--Updated 15 May

Postby GPW » Wed May 16, 2012 5:41 am

That’s just GOTTA' be the most Unique door ever seen in these parts ... 8) 8) 8) :thumbsup: :applause: :beer:
There’s no place like Foam !
User avatar
GPW
Gold Donating Member
 
Posts: 14920
Images: 546
Joined: Thu Feb 09, 2006 7:58 pm
Location: New Orleans
Top

Re: My Foamie Build--Updated 15 May

Postby bonnie » Wed May 16, 2012 6:24 am

PcH: Yes, they are 1/2 barrell bolt shutter hinges.

Eagle, thanks for the completment.

KC, thanks.

Norm, I've gone back and forth on what to do with the door edge finish. It's good to know the VHB won't hold up, unless it's smooth. I wonder if bondo would work on the door's edge? Oddly enough I have some of that. :roll: I have scoured the net looking for some sort of cap to put across the foam and ply skins. Either it's not wide enough, or it's too expensive. It would need to be pretty thin, so that I can glue the cedar down and have it look okay. I had thought of metal tape, or flashing, but have never handled either. Suggestions to that department are more than welcome.

GPW, thank you. I think it will be unique. But from the rumblings I hear, I think others may try it, if mine works. :)

Now, for today's question(s).

The door is going to be about 2 3/8ths wide before the final cedar skin -- almost 3" after. It weighs approx. 20lbs with everything on it.

1. Norm started this one. What to seal the door edge with? Flasing? Tape? Wood? Bondo? I need something less costly than fiberglass/epoxy. The budget for the door is long spent. I do want it to hold up though. :roll:

2. Should I plan on bolting the hinges all the way through the door? I have 1" ply bracing and approx 1/2" door skins. The screws that came with the hinges will certainly work. Just wondering. Really trying not to overbuild/think this. This same question applies to the hinge part of the arrangement.

3. When applying the gasket, what would work best? I'm using the rubber pipe insulators from the big box store. They are one thickness, should be easy to trim and were in the price range I could afford.

Like this: http://www.lowes.com/pd_202802-1410-RS710XB/6_0__?productId=3132299&Ntt=rubber+pipe+insulation&pl=1&currentURL=%2Fpl__0__s%3FNtt%3Drubber%2Bpipe%2Binsulation&facetInfo=

4. I'd like suggestions on how to finish the cedar door. Keeping with the Hobbit theme, I could paint it green or burgundy. But what to use? Exterior paint or stain?

You all have made this much more doable with your encouragement and suggestions, I am grateful. :applause:
Remember, the turtle won. :)
User avatar
bonnie
Donating Member
 
Posts: 1390
Images: 107
Joined: Sun Jul 24, 2011 4:14 pm
Location: Roxana, IL
Top

Re: My Foamie Build--Updated 15 May

Postby GPW » Wed May 16, 2012 6:42 am

Bonnie , flashing , for this door .... Copper !!!! 8)
As far as painting , it’s pretty easy with a wood graining tool to make a faux wood finish , and using a more “antiqued” finish/coloring would make it very realistic... Cheap to do , but more Work ... :o Might as well go all the way with your Theme, the “look” ... you’ll never be happy till you do ... :roll: Faux wood graining is all over You Tube , and when you get good at it , you’ll be wood graining everything ... We even did the refrigerator once ... 8)

Imagine the irony of painting a Foamie trailer to look like wood :o :lol: :lol: :lol:
There’s no place like Foam !
User avatar
GPW
Gold Donating Member
 
Posts: 14920
Images: 546
Joined: Thu Feb 09, 2006 7:58 pm
Location: New Orleans
Top

PreviousNext

Return to Foamies

Who is online

Users browsing this forum: No registered users and 5 guests